by Clara Scott | Feb 21, 2026 | Uncategorized
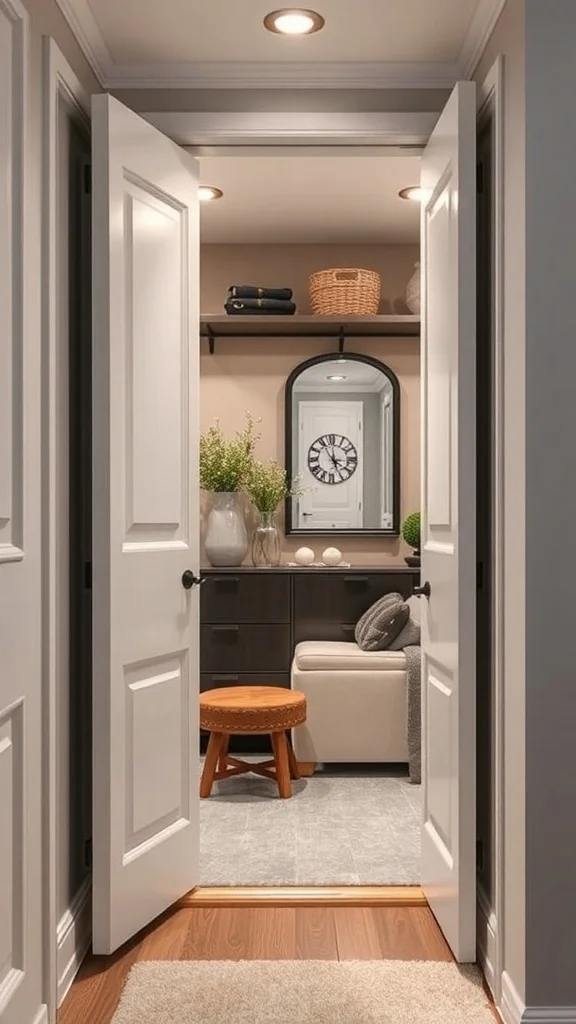
The narrow pantry hides so much potential. You open the door and dream of everything neatly in place.
No more digging around or forgotten items in the back. These clever ideas turn that tight space into your favorite kitchen spot. Here are some ways to make it happen.
Using Tension Rods for Kitchen Towels and Wraps
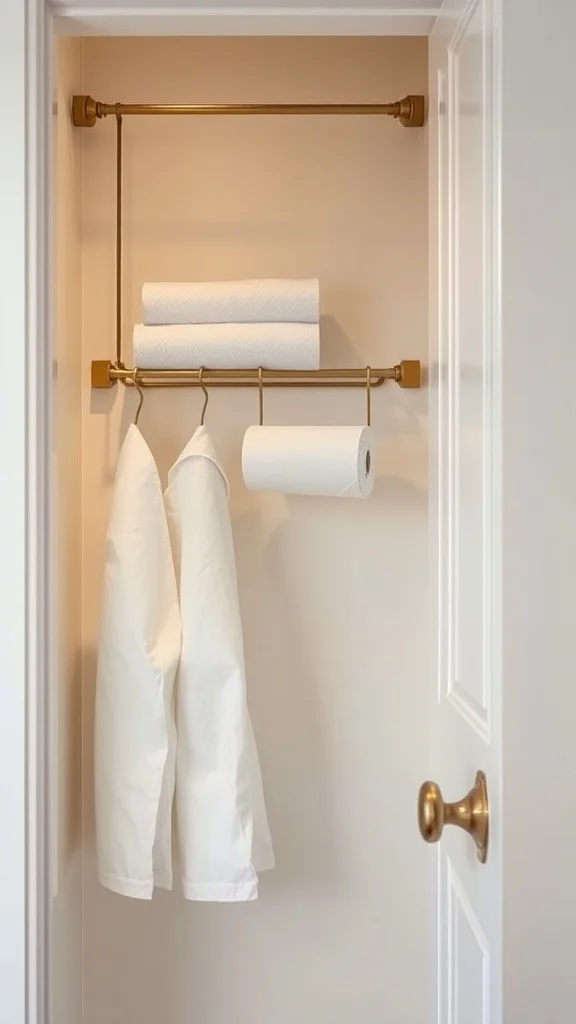
A slim tension rod stretches across the narrow gap. Paper towels roll neatly beside foil and plastic wrap. Soft towels hang below like little flags of readiness. Everything stays off shelves yet right at your fingertips. The setup feels light and open even in such a small space.
It looks so effortless. You wonder why you didn’t try it sooner.
Grab a tension rod that fits your pantry width snugly. Install one higher for rolls and lower for hanging towels. Look for ones with good grip to hold weight without slipping. Pick up coordinating hooks if you want extra spots for small tools. This trick frees up precious shelf real estate fast. Worth every penny for the instant tidy feel.
Labeling Containers for Easy Identification
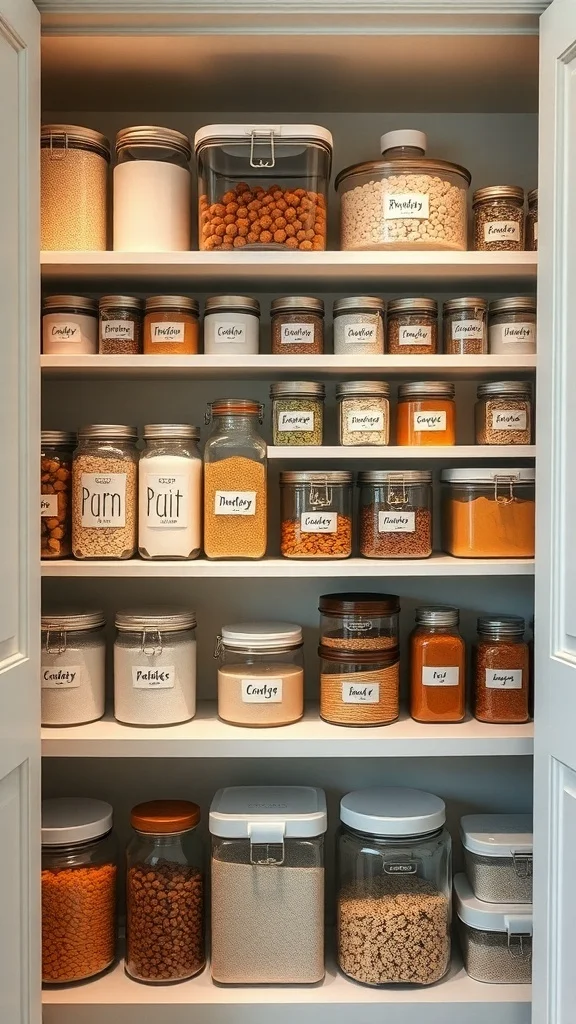
Clear jars line the shelves in perfect rows. Bold black labels declare flour, sugar, oats. The writing pops against the white contents. Soft light catches the glass edges. The whole shelf feels calm and inviting like a little organized shop.
Suddenly finding ingredients becomes joyful. No more guessing games.
Choose waterproof vinyl labels that stick well. Use a consistent font for that polished look. Pick clear or frosted containers so contents show through beautifully. Search for label makers or printable sheets online. Place labels at eye level for quickest grabs. Your pantry will feel so much more intentional this way.
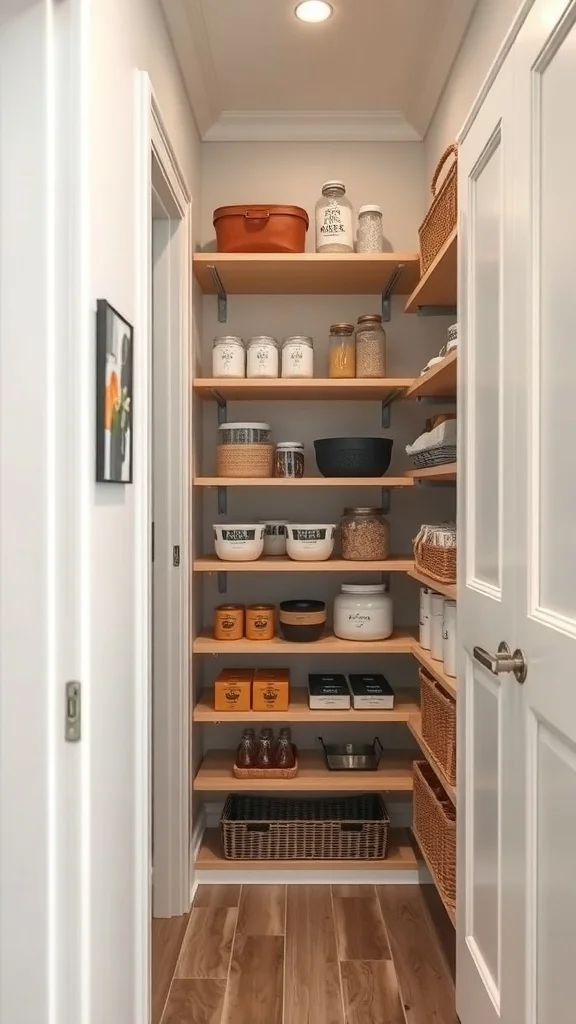
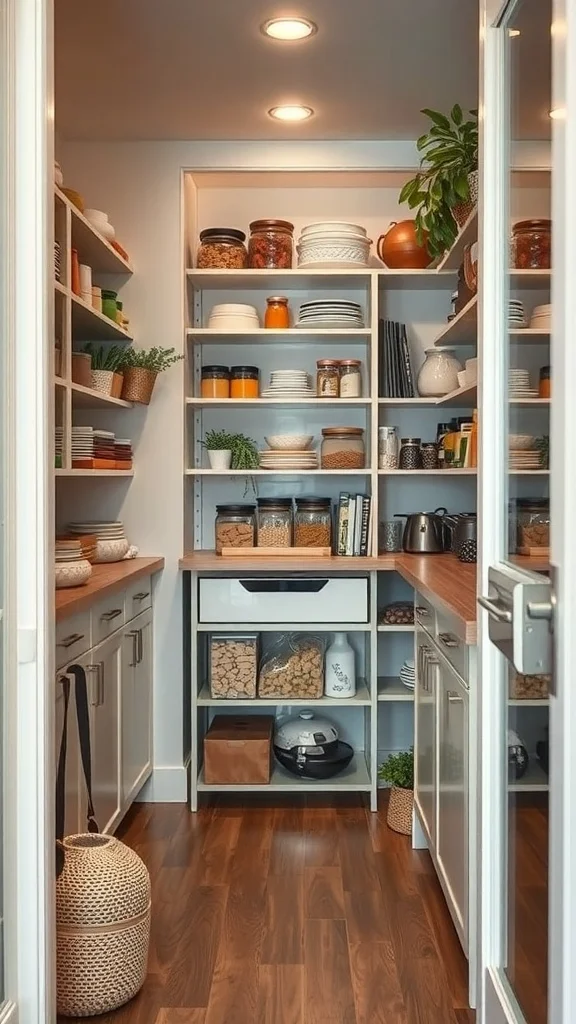
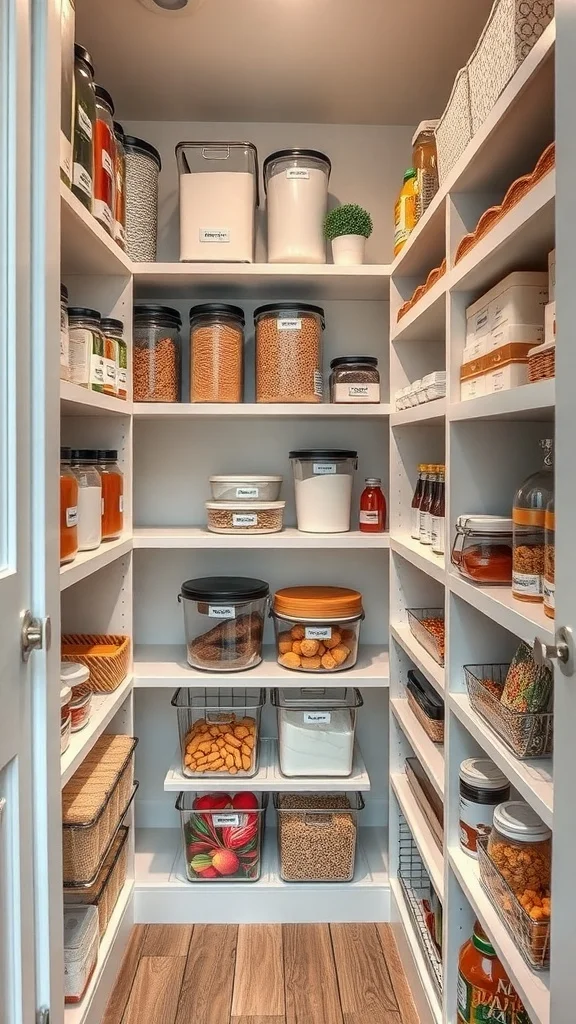
Maximizing Vertical Space with Shelving
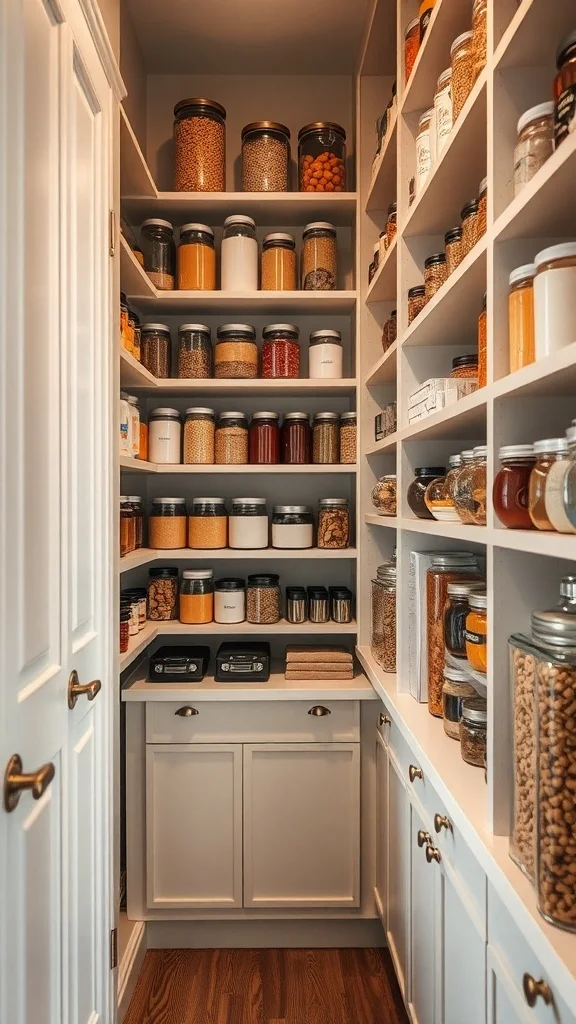
Tall shelves reach from floor to ceiling. Glass jars filled with pasta and rice stack high. Wicker baskets nestle on middle levels. Everything aligns neatly without a single wasted inch. The vertical flow draws your eye upward making the space feel taller and airier.
It turns a skinny closet into serious storage. You feel clever every time you open the door.
Install adjustable shelves if possible for custom heights. Go for sturdy wood or wire that holds heavy cans. Measure your tallest items first to avoid surprises. Find slim brackets at hardware stores to keep the look clean. Stack clear containers on top shelves for less-used things. This approach doubles your storage without any major changes.
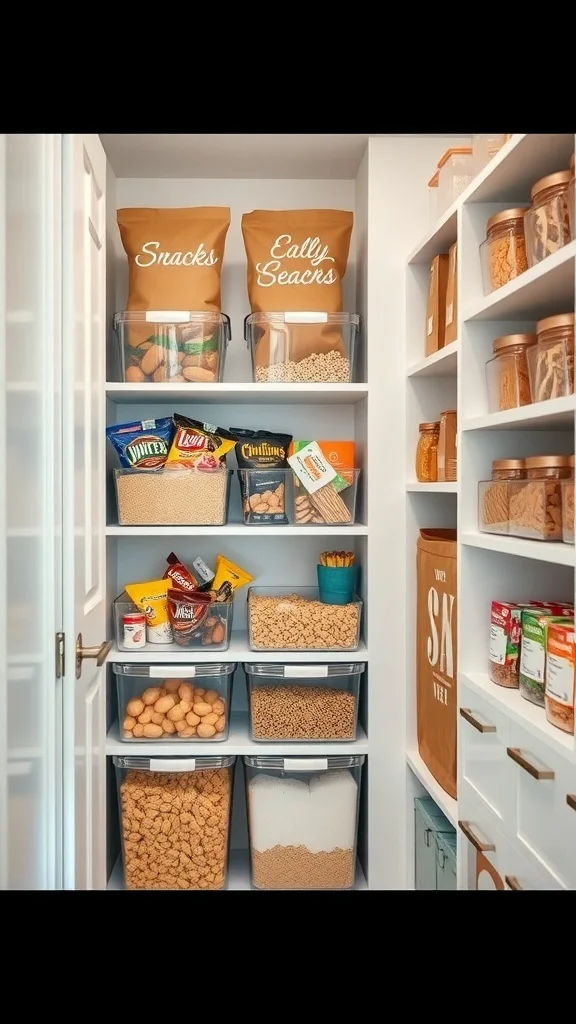
Creating a Snack Station for Quick Access
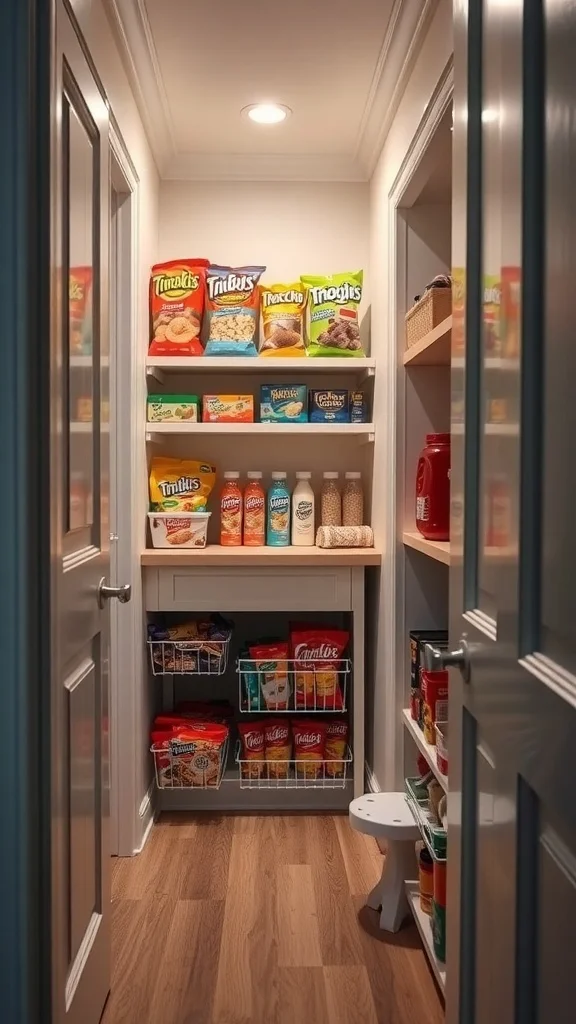
Bright snack bags line lower shelves in colorful rows. Pretzels, nuts, and granola bars sit front and center. A few fruit pouches peek out invitingly. The area feels fun and approachable like a mini convenience store in your home.
Grabbing a quick bite becomes effortless. Everyone loves it.
Dedicate the easiest-to-reach shelves to snacks. Use shallow bins to corral loose items. Choose stackable baskets for variety without mess. Keep heavier cans lower if you add them nearby. Add a small basket for kid favorites up front. This setup encourages healthy choices while keeping chaos away.
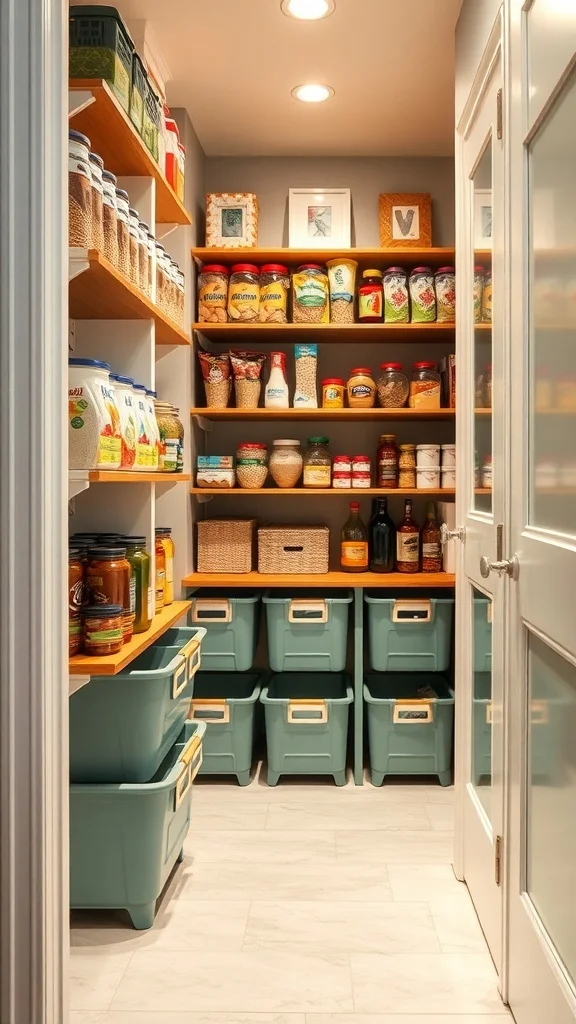
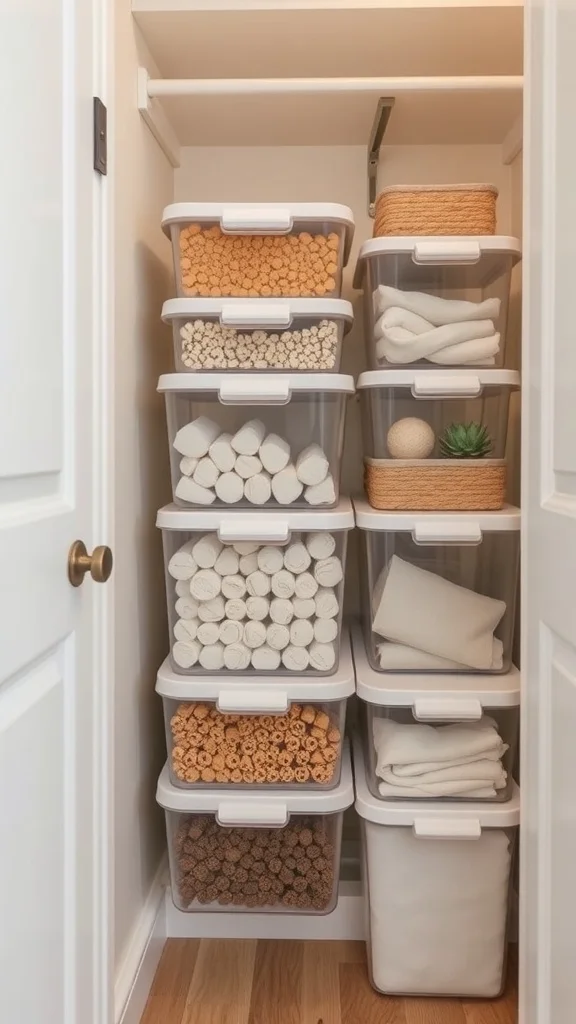
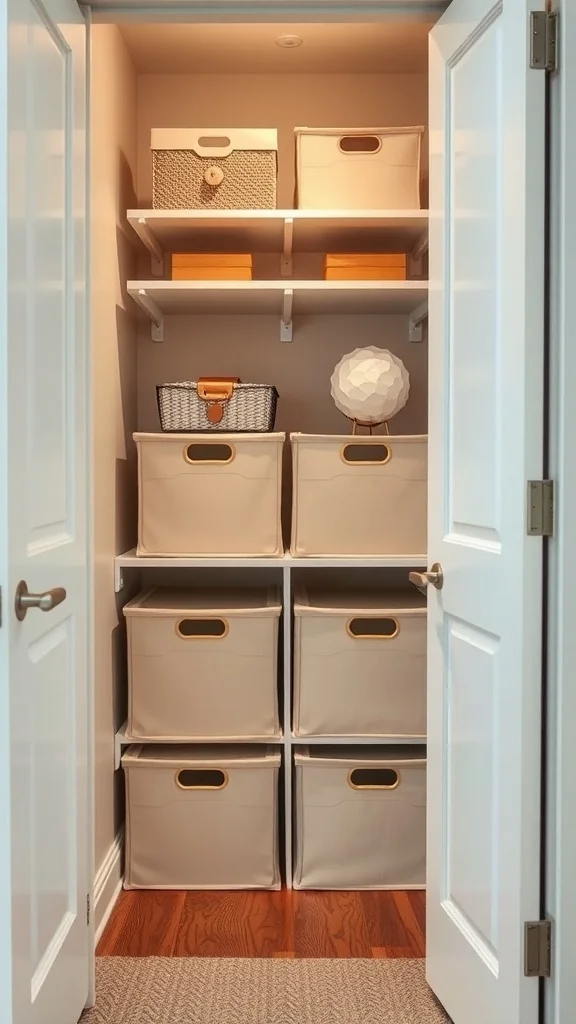
Incorporating Clear Storage Bins
Transparent bins slide neatly side by side. Cereals spill over in one while chips fill another. Handles make pulling them out simple. The clear sides reveal every last cracker or noodle. Light bounces through creating a bright clean vibe.
You see everything at once. It feels so satisfying.
Pick bins with secure lids in matching sizes. Stack taller ones on bottom shelves for stability. Look for ones with built-in handles for easy access in tight spots. Group like items together inside each bin. Wipe them down quickly after any spills. They make narrow shelves work harder than ever.
Organizing Baking Supplies with Tiered Stands
A tiered stand rises gracefully on the shelf. Jars of sprinkles and chocolate chips catch the light on each level. Baking powder and vanilla sit proudly in front. The arrangement looks charming and bakery-ready. Every layer invites you to start mixing.
It sparks joy just looking at it. Baking feels exciting again.
Find a sturdy metal or wood stand that fits your shelf depth. Arrange tallest items in back and shorter ones forward. Label each jar clearly for fast finds. Choose clear glass for that pretty layered effect. Add a small sign if you love a personal touch. This keeps supplies visible and inspires more homemade treats.
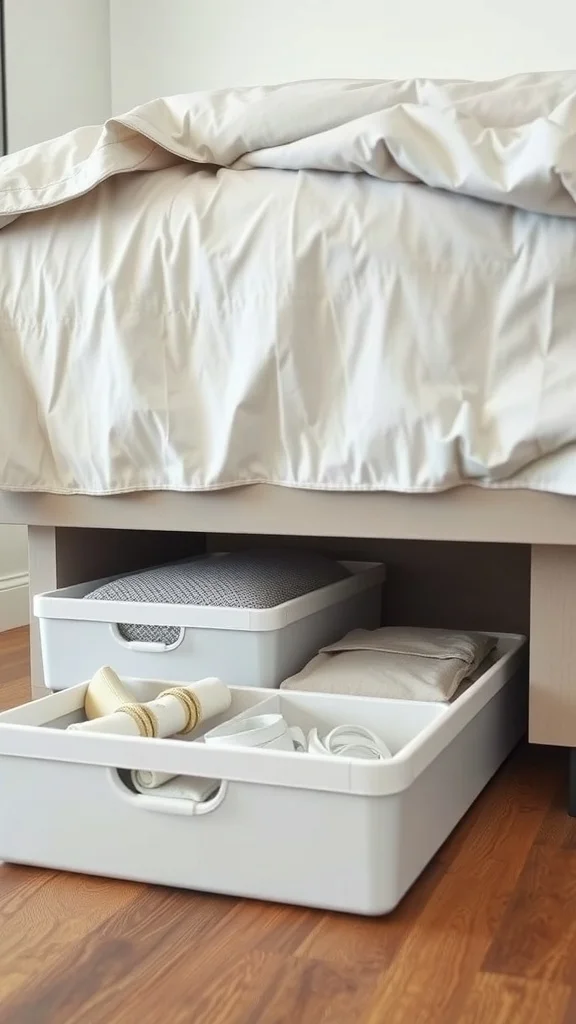
Utilizing Pull-Out Drawers for Accessibility
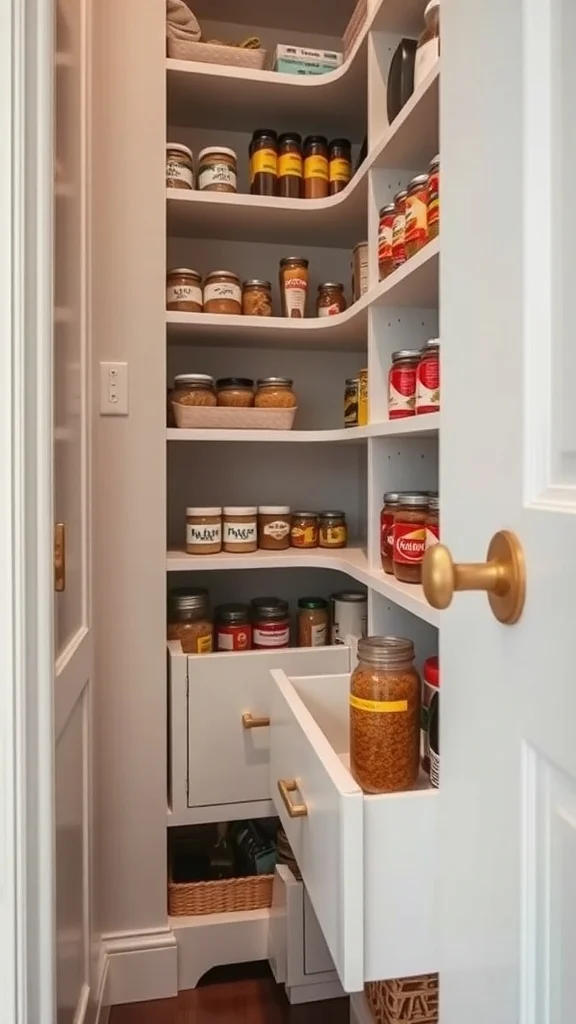
Smooth drawers glide out from the lower section. Small jars and packets line up inside. You see every spice or seasoning packet without bending deep. The motion feels luxurious in such a compact space. Everything stays dust-free and tidy.
Reaching the back becomes a thing of the past. Pure convenience.
Install narrow pull-out organizers designed for pantries. Measure your shelf width carefully first. Opt for ones with soft-close features if you can. Categorize contents like baking extras in one and snacks in another. Secure heavier items toward the front. This upgrade makes the whole pantry feel custom-built.
Hanging Racks for Smart Extra Storage
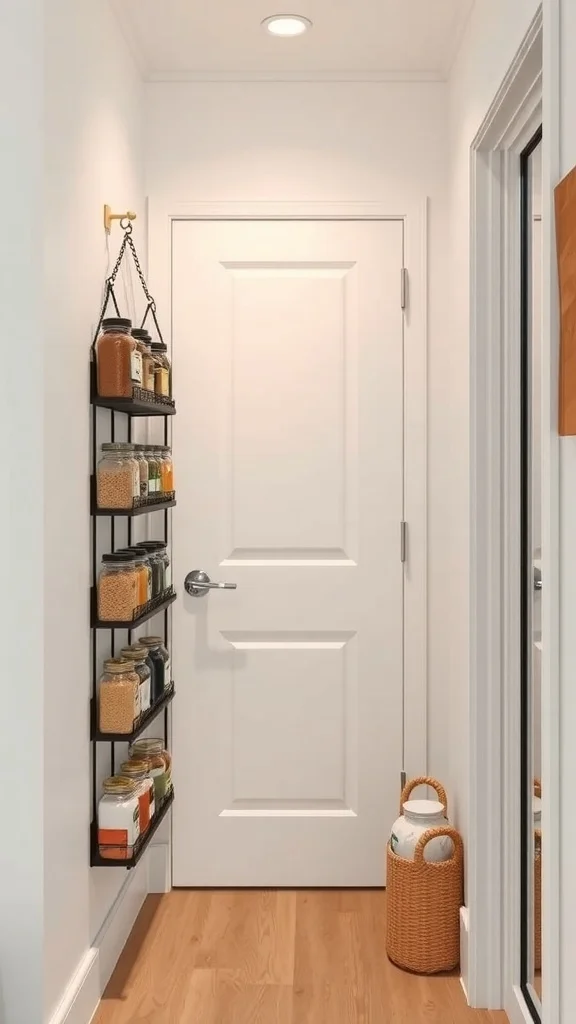
A sleek rack hangs on the wall. Clear jars dangle with spices and grains inside. Metal hooks hold them securely. The open design keeps colors and textures on display. It adds a modern industrial charm to the narrow nook.
Everything looks intentional and pretty. Cooking flows smoother.
Mount a slim wall rack at eye level. Choose one with adjustable hooks for different jar sizes. Fill with uniform glass containers for cohesion. Label lids so you spot favorites instantly. This frees shelves for bulkier things below. A small investment that adds big style and function.
Adding Hooks for Utensils & Gadgets
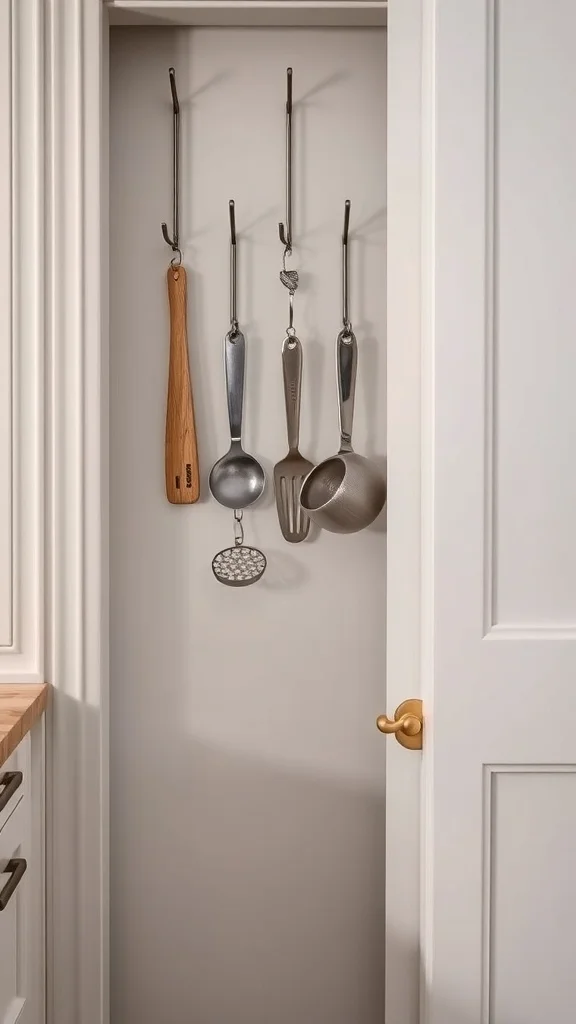
Rows of hooks line the door interior. Wooden spoons and whisks hang in neat order. Measuring cups dangle nearby like ornaments. The setup keeps tools visible and tangle-free. Soft shadows play across the handles creating gentle interest.
Grabbing what you need happens in seconds. It feels so smart.
Screw in adhesive or screw hooks rated for weight. Space them evenly for balance. Hang lighter gadgets higher and heavier ones lower. Mix styles for personality if you like. This trick turns dead door space into prime real estate. Super simple and incredibly useful.
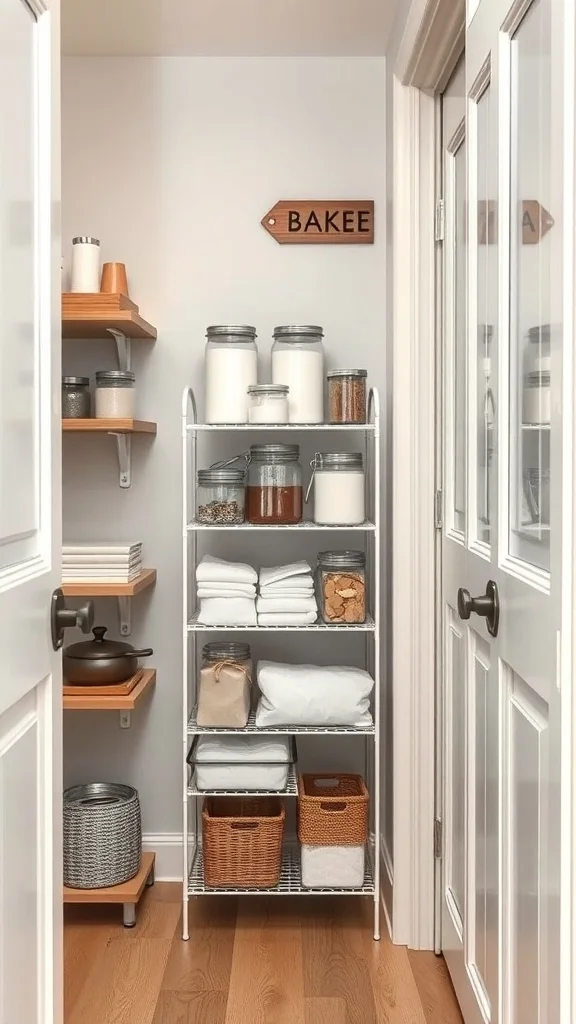
Installing Adjustable Shelving for Maximum Flexibility
Wooden shelves adjust to any height. Tall cereal boxes fit perfectly beside short spice tins. Baskets tuck in gaps without crowding. The clean lines make the narrow space feel expansive. Light wood warms everything up nicely.
You adapt as your needs change. It grows with you.
Buy systems with movable pegs or tracks. Measure heights for your most common items first. Go for durable materials that hold steady under load. Position frequently used shelves at waist level. Rearrange whenever you bring home new things. This flexibility keeps your pantry working perfectly forever.
Using Magnetic Strips for Spices
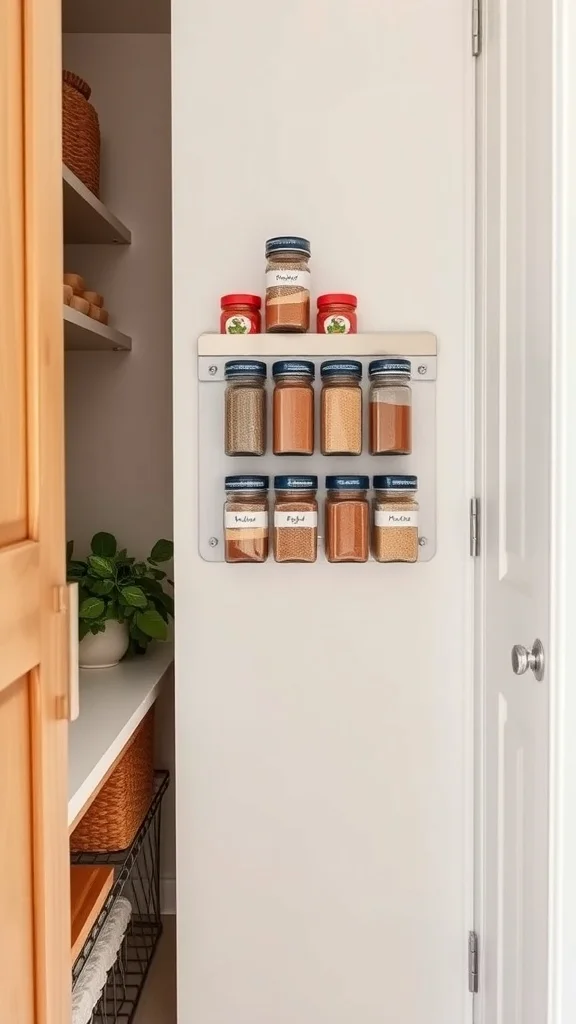
Magnetic strips cling to the side wall. Tiny labeled jars snap into place. Spices form a tidy rainbow of colors. The vertical display saves shelf space completely. It looks sleek and professional like a chef’s station.
Finding cumin or paprika takes no effort. You smile every time.
Attach strong magnetic strips inside the door or on a wall. Use metal-lid jars or add magnets to glass ones. Arrange by frequency of use for quickest access. Keep labels facing out clearly. This method maximizes narrow walls beautifully. A favorite for serious home cooks.
Grouping Items by Category
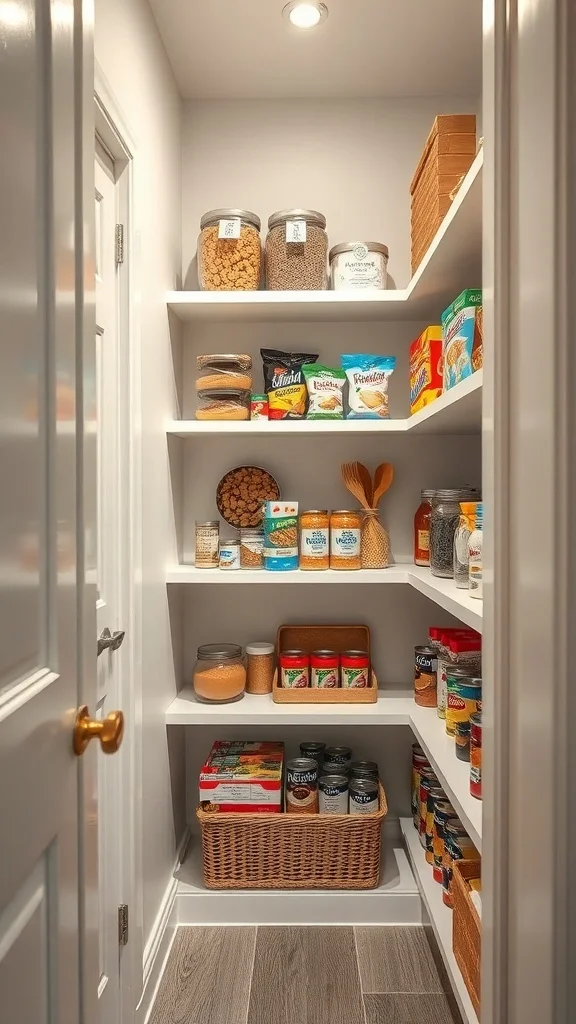
Shelves divide into clear zones. Baking lives together up top. Cans stack neatly below. Snacks claim their own cheerful row. The logical flow makes sense the moment you look. Everything feels purposeful and calm.
Meal planning gets so much easier. You know exactly where to look.
Sort everything into categories first. Assign shelves or bins to each group. Use dividers if shelves are deep. Keep like-with-like for instant recognition. Adjust zones as habits change. This simple habit cuts down search time dramatically.
Incorporating a Lazy Susan for Easy Access
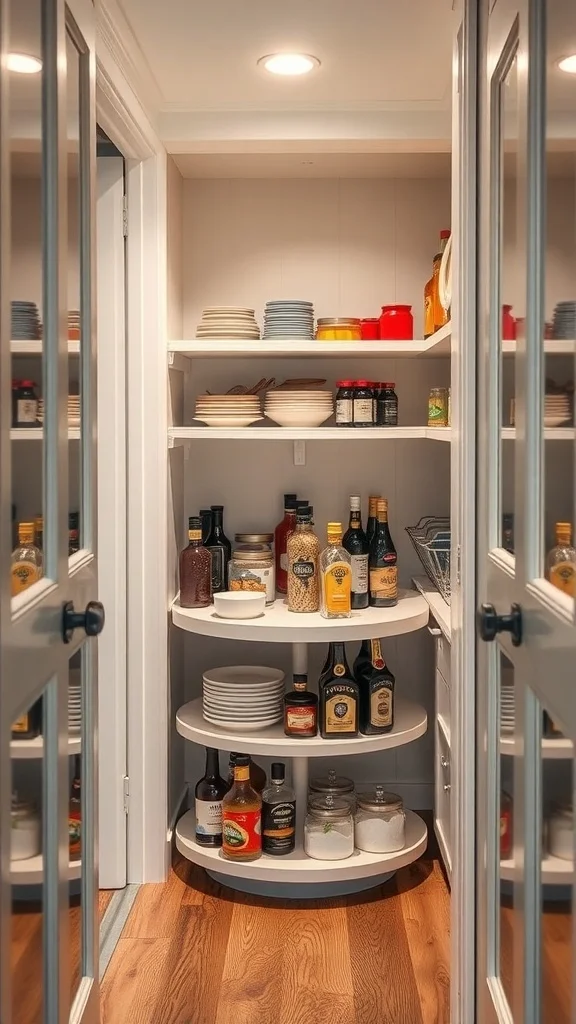
A round lazy Susan spins gently on the shelf. Bottles of oil and vinegar circle smoothly. Jars of condiments follow along. The rotation brings the back items forward effortlessly. It turns a deep corner into prime real estate.
No more stretching or knocking things over. Pure genius.
Choose a sturdy one that fits your shelf diameter. Place it on a middle or lower level for easy spinning. Arrange tallest bottles in the center. Group similar sauces together in sections. This tool makes narrow depths work like magic. You’ll wonder how you lived without it.
Using a Step Stool for High Shelves
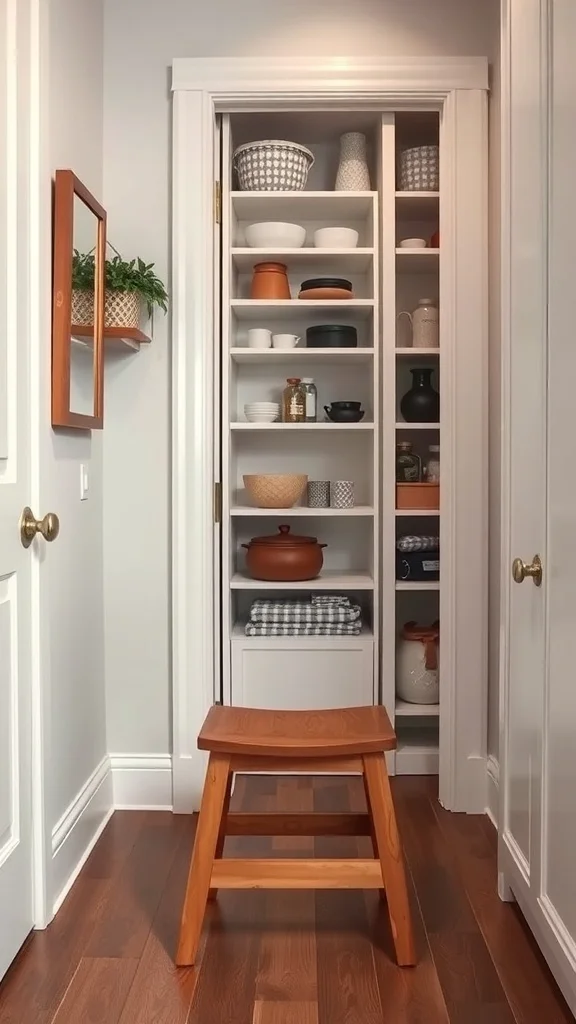
A compact wooden stool waits patiently in front. Top shelves hold seasonal extras and bulk bins. The stool’s warm tone matches the wood shelves perfectly. It invites you to reach higher without worry. The space feels fully used and welcoming.
Safety meets smart storage. You maximize every inch confidently.
Pick a foldable stool that tucks away easily. Choose one with non-slip feet for stability. Store less-used items up high like holiday baking goods. Keep everyday essentials lower. A sturdy stool opens up the entire height of your pantry. Essential for tall narrow spaces.
Using Airtight Food Storage Containers

Uniform clear containers stack in tidy towers. Rice grains gleam inside one. Flour sits smooth in another. Airtight seals keep everything fresh and crisp. The matching set creates a serene orderly display.
Your food stays perfect longer. It looks magazine-worthy too.
Invest in stackable containers with strong seals. Go for rectangular shapes to fit narrow shelves best. Decant bulk buys right away for neatness. Add labels with contents and dates. They prevent spills and extend freshness. A game-changer for any pantry.
Creating a Seasonal Ingredient Rotation
Jars and cans shift forward as seasons change. Pumpkin puree moves up in fall. Light teas claim space in summer. The rotation keeps things fresh and relevant. Your pantry evolves with your cooking naturally.
Nothing gets buried and forgotten. Meals stay exciting.
Review stock every few months. Move older items to the front. Store seasonal specialties like holiday spices higher up. Use clear containers to track what’s left. A quick check keeps waste low. This habit makes your pantry feel alive and current.
Creating a Beverage Station

Coffee pods line up beside mugs on a dedicated shelf. Tea tins stack neatly nearby. A small kettle waits ready. The corner feels like its own cozy cafe. Soft lighting makes morning routines inviting.
Your first cup happens faster. It sets a happy tone for the day.
Carve out one shelf or section just for drinks. Group pods, teas, and sweeteners together. Add hooks for mugs if space allows. Keep appliances accessible without crowding. A dedicated spot streamlines busy mornings beautifully.
Using Color-Coded Bins
Teal bins pop against neutral shelves. One holds pasta while another corrals snacks. The colors guide your eye instantly. The pantry feels fresh and fun without overwhelming the small space.
Organization looks beautiful. You enjoy opening the door more.
Select a few coordinating colors for bins. Assign each to a category like blue for baking. Add clear labels for backup. Stackable designs maximize vertical room. This adds personality while keeping things easy to find.
Creating a Weekly Meal Prep Zone
A designated shelf gathers grains and spices for the week. Clear bins hold chopped veggies ready to go. Labels note recipes in progress. The zone feels focused and inspiring. Meal prep flows without hunting around.
Cooking ahead becomes relaxing. You feel prepared and calm.
Claim one or two shelves for prep items only. Stock with basics like rice and beans. Use bins for pre-portioned ingredients. Refresh weekly to stay current. This setup saves time and reduces stress during busy days.
Adding a Mini Fridge for Fresh Items

A compact fridge tucks at the bottom perfectly. Fresh herbs and dairy peek through the door. Shelves above hold related dry goods. The setup keeps everything cool and close. Your narrow pantry now handles perishables like a pro.
Ingredients stay fresher longer. Cooking feels seamless.
Choose an under-counter model that fits snugly. Place it low for easy bending. Stock with herbs, cheeses, and opened jars. Use nearby shelves for matching containers. This addition cuts fridge traffic and boosts efficiency. A smart way to expand your pantry’s power.
by Clara Scott | Feb 21, 2026 | Uncategorized
A small dining table can completely change how you use your space. It gives you a dedicated spot for meals, coffee, work, and gathering with the people you love. You do not need a big dining room to have beautiful meals together. Even a tiny corner with the right table becomes somewhere special. Here are some ideas to help you find the perfect small dining table for your home.
Transforming Your Small Dining Table for Seasonal Decor

Orange napkins and mini pumpkins on a white table. Autumn leaves tucked between place settings. A round rug underneath adding warmth. A modern light fixture above tying the look together. The table feels festive and completely transformed with just a few seasonal swaps.
Seasonal decor keeps your small dining table feeling fresh all year. A few simple changes and the whole room feels different.
Keep your base table setting simple and neutral so seasonal pieces pop. In fall add small pumpkins, warm-toned napkins, and a few branches with leaves. In spring switch to fresh flowers and pastel linens. In winter use candles, pine sprigs, and metallic accents. In summer go with citrus, bright napkins, and a small succulent. Store off-season items in a small box and rotate every few months. These easy swaps make every meal feel like a celebration of the time of year.
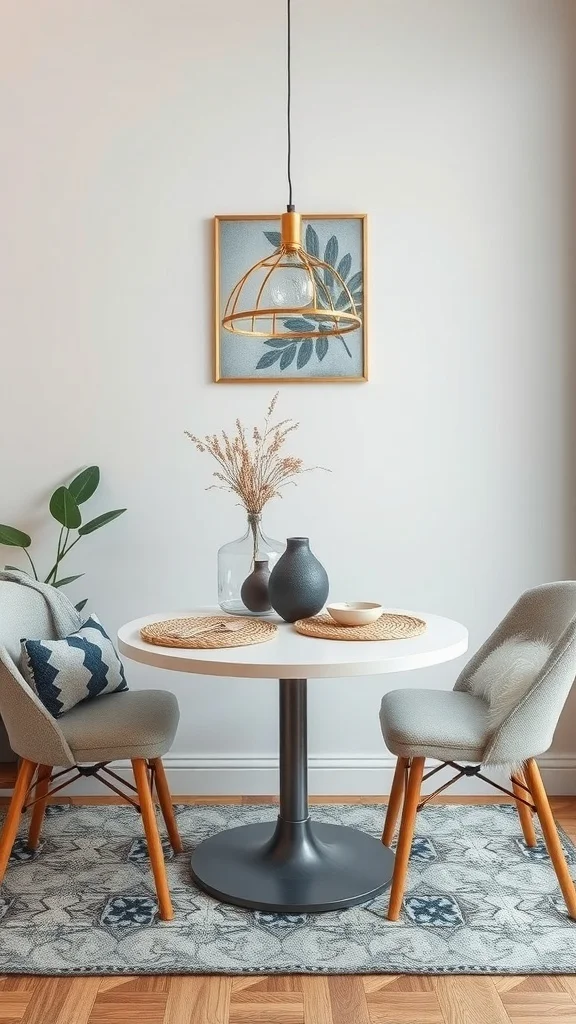
Best Styles of Small Dining Tables for Modern Homes
A sleek table with a warm wood finish and clean lines. Cozy chairs pulled up around it. A modern light fixture above. Plants and decorative items on nearby shelves adding personality without crowding the table.
A modern small dining table does not try to be big. It is confident in its size and makes the space feel designed rather than cramped.
Look for a table with slim legs and a simple top in natural wood, white, or black for a modern feel. Pair it with chairs that have clean lines and minimal bulk. Choose a pendant light above with a contemporary design to anchor the space. Add a shelf or a small sideboard nearby for decorative items so the table stays clear. Keep the overall palette limited to two or three tones for a cohesive modern look. This streamlined approach makes a small dining area feel intentional and stylish.
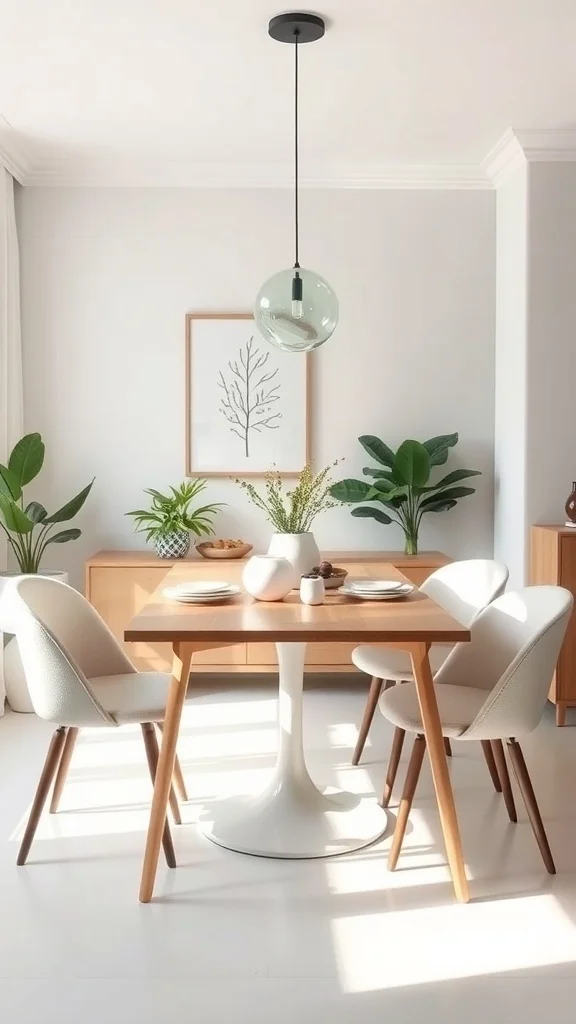
Maximizing Space with a Small Dining Table
A sleek dark table with a golden base making a bold statement in a compact room. Stylish chairs surrounding it. Plants and soft lighting creating a warm atmosphere. The table commands the space without overwhelming it.
The right small table fills a room with purpose. It anchors the area and gives it identity without making it feel tight.
Choose a table shape that suits your layout. Round tables work best in tight spots because they have no corners to bump into. Square tables tuck neatly against walls. Measure your space and leave at least 30 inches between the table edge and the nearest wall or furniture for comfortable movement. Pick chairs that push fully under the table so they disappear when not in use. A table with a pedestal base instead of four legs gives more legroom in a small space. This thoughtful sizing keeps the area open and easy to move through.
Versatile Small Dining Tables for Multi-Use Spaces
A round table with four comfortable chairs sitting in a room that serves as both dining area and workspace. Light wood finish adding warmth. Shelves in the background with plants and personal items. The table adapts to whatever you need it for.
A versatile small table does not have a single job. It is a dining table at dinner, a desk during the day, and a game table on the weekend.
Choose a round or oval table that seats four comfortably but fits in a room that serves multiple purposes. Go with a surface that works for both dining and working like smooth wood or laminate that is easy to wipe clean. Keep the chairs lightweight so you can rearrange for different activities. Add a small shelf nearby for items you need during meals or work so the table stays clear. This multi-use approach means one table handles everything and the room never feels overcrowded with furniture.
Incorporating a Small Dining Table into Your Kitchen
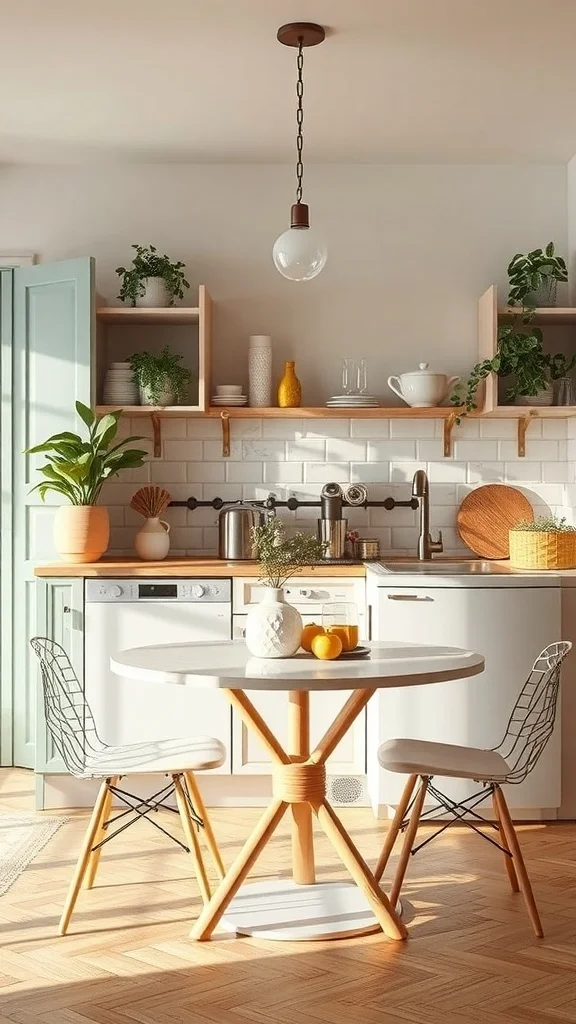
A round table tucked into a bright corner of the kitchen near a window. Light wood chairs. A vase of flowers and a bowl of oranges on the surface. Natural light pouring in. The kitchen now has a dedicated eating spot that feels cheerful and easy.
A small table right in the kitchen turns everyday meals into something more enjoyable. You eat where you cook and it just feels right.
Place a compact round table near the best window in your kitchen for natural light. Choose chairs in a finish that matches your kitchen cabinetry or countertops for a seamless look. Keep the tabletop minimal with just a small vase, a bowl of fruit, or a single candle. Leave enough clearance between the table and the counters for easy movement while cooking. Position the table so you can sit down with your coffee in the morning and watch the light come in. This kitchen table setup makes daily meals feel like a treat instead of a routine.
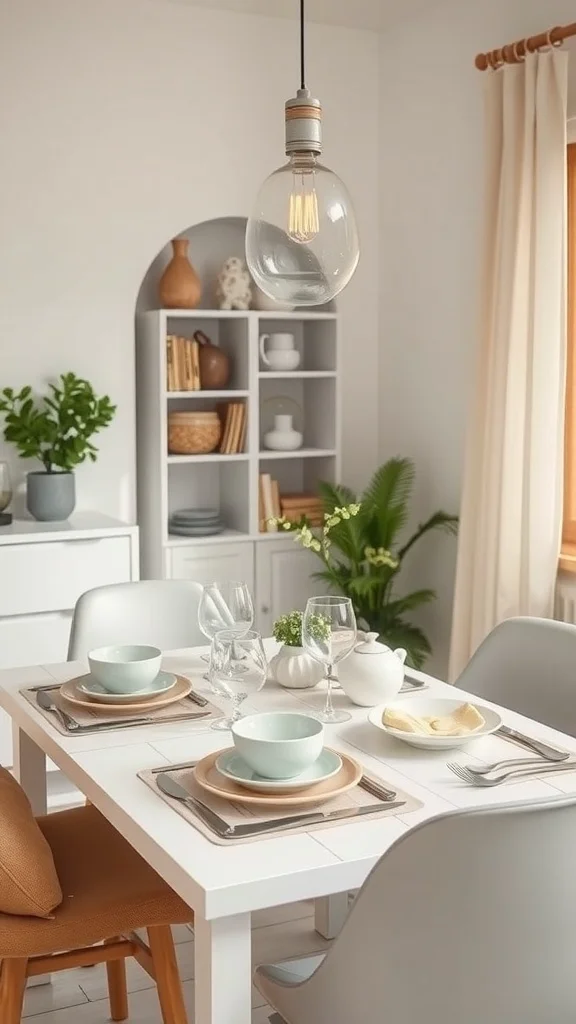
Creative Table Settings for Intimate Meals
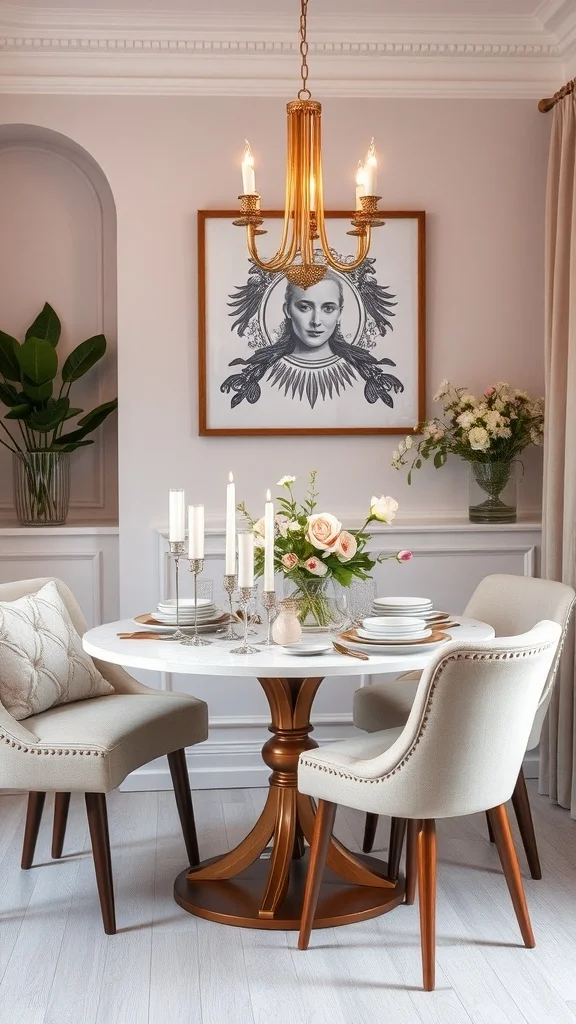
A round table set with delicate flowers and elegant candles in the center. Soft neutral-toned chairs. A chandelier above casting a warm romantic glow. The table is dressed simply but beautifully with layers of plates, glassware, and linen.
A thoughtfully set small table can feel more special than a huge formal dining room. The intimacy is the whole point.
Start with a simple tablecloth or placemats as the base. Layer a dinner plate and a smaller bowl on top for visual depth. Add simple glassware and classic cutlery. Place a small arrangement of flowers or a couple of candles in the center without blocking anyone’s view across the table. Use a chandelier or pendant with a dimmer above for adjustable mood lighting. Keep the color palette soft and coordinated. This layered setting turns even a weeknight dinner into a moment worth savoring.
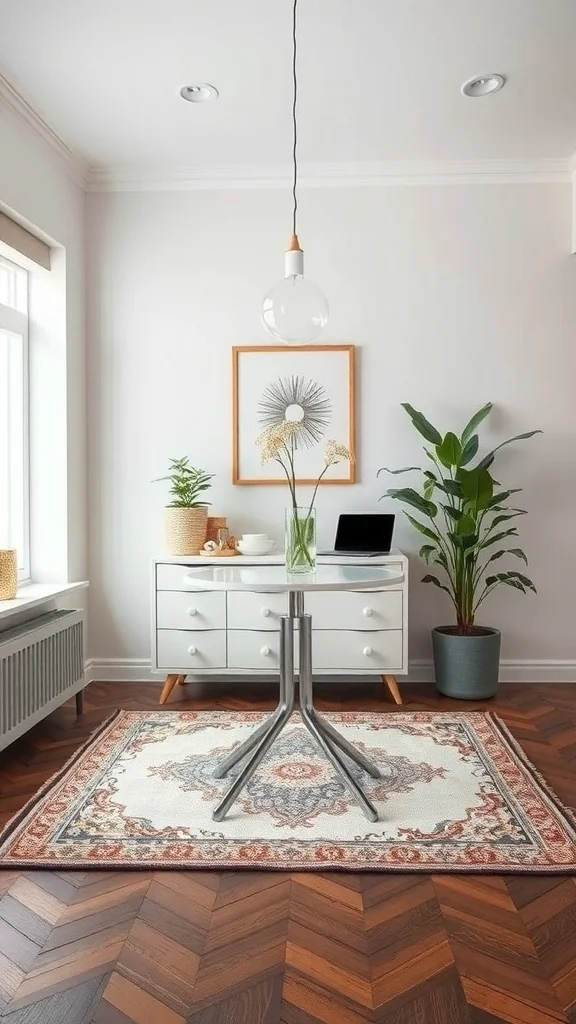
Finding the Perfect Size for Your Small Dining Table
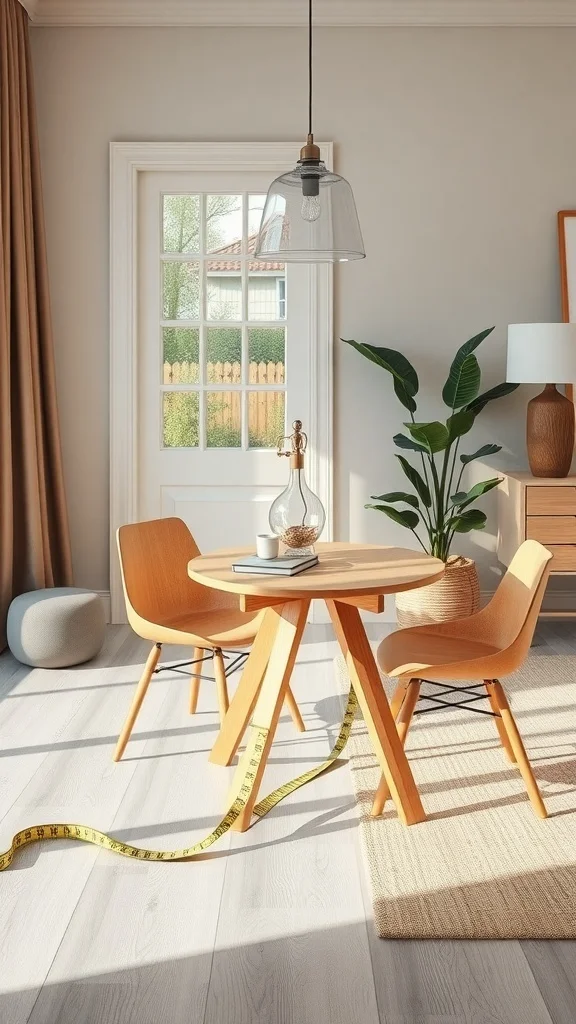
A cozy round table with two chairs fitting perfectly in a small space. Light wood tones creating warmth. A measuring tape on the floor as a reminder to measure before you buy. The table fits the room like it was designed for it.
Getting the size right is everything with a small dining table. Too big and the room feels cramped. Too small and it does not function well. Measuring first is the smartest step.
Measure your available floor space and subtract at least 36 inches on each usable side for comfortable chair movement. A round table between 30 and 42 inches in diameter works well for two to four people. For two people a 30-inch table is plenty. For four go closer to 42 inches. Check the table height which should be around 28 to 30 inches for standard dining and make sure the chairs fit underneath with room to spare. Bring these measurements when you shop and your table will fit perfectly the moment it arrives.
Choosing the Right Material for Your Small Dining Table
A round wooden table with a beautiful grain finish and a sturdy base. Metal-framed chairs adding contrast. The wood feels warm and the metal feels modern. Together they create a balanced look that works in almost any space.
The material of your table sets the mood. Wood brings warmth. Metal adds edge. Glass opens things up. The right choice depends on your style and your life.
Choose solid wood like oak or walnut for durability and warmth that ages beautifully. Go with a metal and wood combination for a modern industrial feel. Consider a glass top if you want the room to feel more open since it visually disappears. For families with young kids look for a surface that wipes clean easily and resists scratches. Match the table material to one other element in the room like your flooring or your kitchen hardware for a pulled-together look. The right material makes the table last longer and feel like it truly belongs in your home.
Mixing and Matching Tableware for Small Gatherings
Pale blue bowls stacked on beige plates. Elegant glassware beside linen napkins. A small vase with greenery in the center. The table looks layered and interesting without being fussy. Every piece coordinates without matching perfectly.
Mixed tableware gives a small table personality. It looks collected and intentional and turns a simple meal into something visual and special.
Choose a base plate in a neutral tone like cream, beige, or soft gray. Layer a bowl or a smaller plate on top in a complementary color like pale blue, sage, or dusty rose. Use simple clear glassware and classic silverware that goes with everything. Add a linen or cotton napkin in a tone that ties the colors together. Place one small decorative piece in the center like a mini vase with greenery or a single candle. This mixed approach feels curated and adds charm to even the simplest meal on the smallest table.
Maintaining a Clutter-Free Small Dining Table
A clean table surface with nothing but a small centerpiece and the essentials. Chairs neatly in place. The room feels open and calm. The table is ready for the next meal or the next project at any moment.
A clutter-free table makes the whole room feel bigger and more inviting. It is the simplest way to keep your small dining area looking great every day.
Clear the table completely after every meal. Keep only one decorative piece on the surface like a small vase, a candle, or a bowl of fruit. Use a nearby shelf, a sideboard, or a small cart to store things like salt, pepper, napkins, and serving pieces so they are close but not on the table. Resist the urge to pile mail, keys, or work items on the table. A clutter-free surface means the table is always ready for its next use and the space around it always feels calm.
Small Dining Tables for Outdoor Spaces
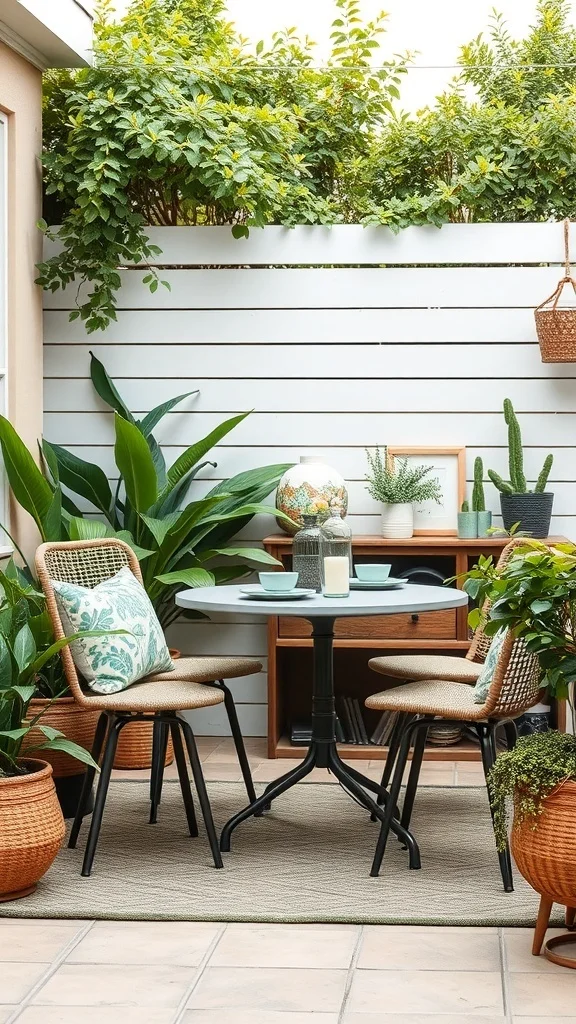
A round table on a patio surrounded by cushioned chairs. Plants and greenery framing the scene. The outdoor dining spot feels like a private garden cafe. Fresh air and sunshine making every meal taste better.
A small outdoor dining table gives you a reason to eat outside every single day. Breakfast in the sun. Dinner under the stars. It does not get better than that.
Choose a weather-resistant table in materials like teak, powder-coated metal, or all-weather wicker. Place it in the most sheltered spot on your patio or balcony with room for chairs to pull out comfortably. Add seat cushions in a weather-resistant fabric for comfort and color. Surround the table with potted plants to create a natural frame. Keep a small lantern or a candle on the table for evening meals. This outdoor setup turns a tiny patio into your favorite dining destination.
Incorporating Storage Solutions with Small Dining Tables
A dining table with a small sideboard or cart nearby holding dishes and accessories. The table surface stays clear while everything you need for a meal is just an arm’s reach away. Storage and style working together.
Smart storage around the table keeps the dining area functional without piling everything on the surface itself.
Choose a table with a small shelf underneath for books or a tray. Place a slim sideboard, a floating shelf, or a compact rolling cart nearby to hold serving dishes, napkins, and extras. Use decorative baskets or boxes on the sideboard to keep smaller items hidden. Pick chairs that tuck fully under the table to save floor space when not in use. Add a small plant or one decorative item on the storage piece to keep it looking styled. This storage-smart setup means the table stays beautiful and the area stays organized.
Color Schemes that Enhance Small Dining Areas
Soft peach walls. A white round table. A wooden sideboard with natural tones. A green plant adding freshness. A pendant light in a complementary finish tying the room together. The color palette is soft and warm and makes the small area feel open and inviting.
The right colors make a small dining area feel twice as spacious. Soft, light, and warm tones open the room up without any renovation.
Paint the walls in a soft warm tone like peach, pale blush, light sage, or warm cream. Keep the table and chairs in white or natural wood to stay light and airy. Add one accent piece in a richer tone like a wooden sideboard or a dark pendant light for depth. Use a plant to bring in natural green that works with any color scheme. Keep the overall palette limited to three or four tones so the small space stays harmonious. This thoughtful color approach makes a dining area feel bigger, warmer, and more designed.
Stylish Chairs to Pair with Your Small Dining Table

Four chairs in different bold colors pulled up around a round table. Orange, teal, and dark gray creating a playful lively contrast. Wooden legs matching the table base. A cozy rug underneath tying it all together.
The chairs you pair with your table define the personality of the whole dining area. Matching is nice but mixing colors and styles is even more fun.
Choose chairs that are comfortable for sitting through a full meal with supportive backs and the right seat height for your table. Mix colors for a playful look or keep them uniform for a clean modern feel. Make sure the chairs tuck fully under the table when not in use so they do not block the walkway. Match at least one element across all chairs like the leg style or the material so the mix feels intentional. Add a rug underneath the whole set to anchor the area. The right chairs turn a simple table into a dining spot people actually want to sit at.
DIY Ideas for Customizing Your Small Dining Table
A table refreshed with a new coat of paint. A colorful centerpiece on top. A pendant light above pulling the look together. The table feels brand new but it was all done at home with simple materials.
You do not have to buy a new table to get a new look. A weekend DIY project can give your existing table a completely fresh personality.
Sand your table lightly and apply a fresh coat of paint in a color that matches your room. Try white for clean modern appeal, a bold color for personality, or a two-tone effect with a different color on the legs. Swap out standard legs for hairpin legs or a new pedestal base for a completely different silhouette. Add a table runner or new placemats for an instant refresh without any tools. Hang a new pendant light above to complete the transformation. These simple DIY changes give your table new life and make the dining area feel like it was redesigned from scratch.
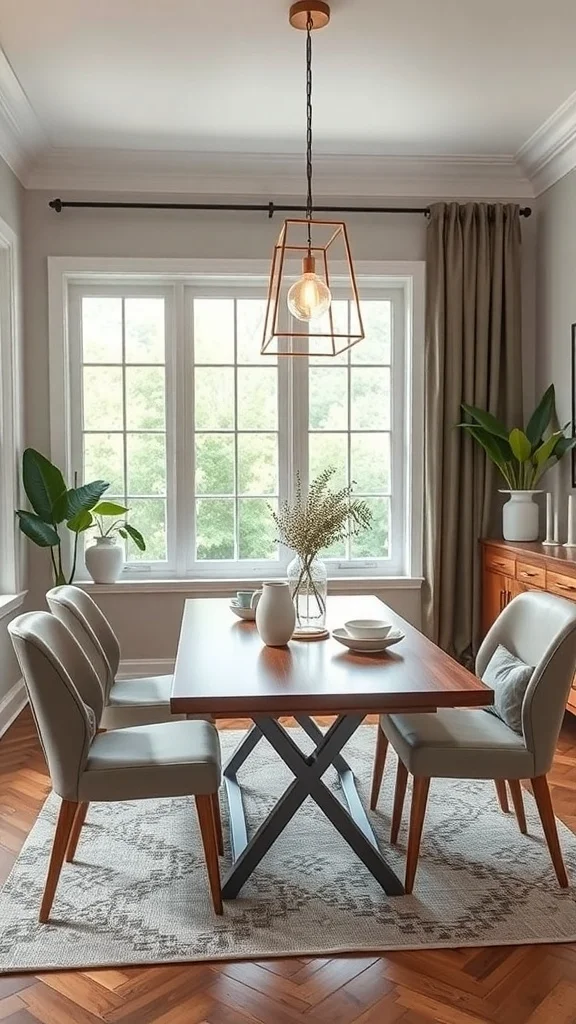
Choosing the Right Lighting for Small Dining Areas
A stylish pendant light hanging above a round table casting a warm focused glow. The light defines the dining area and makes the table feel like the centerpiece of the room. Everything below it glows with warmth.
The right light above a small table anchors the whole space. It tells the room this is where the eating happens and it makes every meal feel special.
Hang a pendant light centered above the table at about 30 to 36 inches from the surface. Choose a fixture that is proportional to the table size so it does not overwhelm the space. Use a warm white bulb for a cozy inviting glow. Install a dimmer if possible so you can go bright for everyday meals and soft for evening dinners. Consider adding a candle or two on the table for a layered lighting effect. The combination of overhead and table-level light creates the perfect dining atmosphere in any size room.
Inspiration from Small Dining Tables in Tiny Homes
A round wooden table in a tiny home placed near large windows. Simple chairs. Plates set and ready for a meal. Plants adding green. Natural light filling the space and making it feel open and alive.
Tiny homes prove that you can have a beautiful dining experience in the smallest space imaginable. It is about choosing the right pieces and letting the light do the rest.
Place the table near the largest window in your home for maximum natural light. Choose a round table in warm wood that feels inviting and takes up less visual space than a rectangular one. Use two to four simple chairs that complement the table without competing for attention. Set the table before meals to make the space feel intentional and cared for. Add a small plant or a vase with a single stem as a centerpiece. This tiny-home-inspired approach shows that a beautiful dining space has nothing to do with size and everything to do with thoughtfulness.
Using Rugs to Define Small Dining Spaces
A patterned rug placed under a round table and chairs creating a clear dining zone in an open room. The rug adds color, texture, and warmth. The dining area feels separate and defined without any walls.
A rug under a small table is the easiest way to make the dining space feel like its own room. It draws a visual boundary and adds comfort at the same time.
Choose a round or square rug large enough for the table and chairs to sit on even when the chairs are pulled out. Pick a pattern or color that adds interest without clashing with the table and nearby decor. Use a non-slip pad underneath on hard floors. Coordinate at least one tone in the rug with something else in the room like the chairs, the wall art, or the curtains. Vacuum regularly and spot-clean spills quickly. This rug creates a defined dining zone that makes the area feel thoughtfully designed and comfortably grounded.
Trendy Accessories for Small Dining Tables
Woven placemats adding texture. A sleek black pitcher and small vases on the table surface. A gold pendant light above. Framed artwork on the wall. A plant nearby adding freshness. The table looks like a styled photo in a magazine.
A few well-chosen accessories turn a plain small table into a styled centerpiece. It is the details that make people notice.
Add woven or linen placemats for texture and warmth. Place one statement piece in the center like a small pitcher, a decorative bowl, or a slim vase with greenery. Choose a pendant light above with a finish that adds a touch of metallic warmth. Hang a piece of framed art on the nearest wall to give the dining area a backdrop. Keep a small plant on the table or a nearby shelf for life and color. Limit the accessories to three or four items so the table stays functional. These finishing touches elevate a small dining table from simple to stunning.
Small Dining Tables in Minimalist Designs
A sleek round table with a glossy top and warm wooden legs. Soft gray chairs in a simple modern shape. Nothing extra on the surface. Clean lines and calm colors everywhere. The whole dining area breathes simplicity.
A minimalist small dining table proves that less really is more. The beauty is in the simplicity and the quality of the few pieces you choose.
Select a table with a clean simple shape and no unnecessary detailing. Choose a finish that reflects light like a polished top or a light lacquer to brighten the room. Pair with chairs in a single neutral tone that blends with the table. Keep the surface completely clear between meals. Let one design element stand out like the shape of the legs or the texture of the chairs. Avoid adding decorations that do not serve a purpose. This minimalist approach creates a dining space that is calm, beautiful, and effortlessly modern.
by Clara Scott | Feb 21, 2026 | Uncategorized
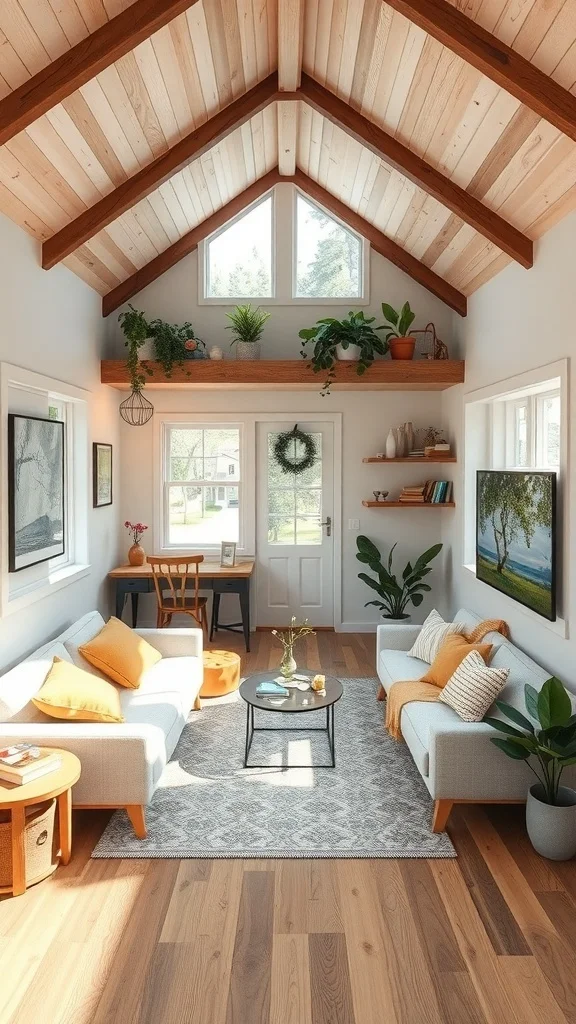
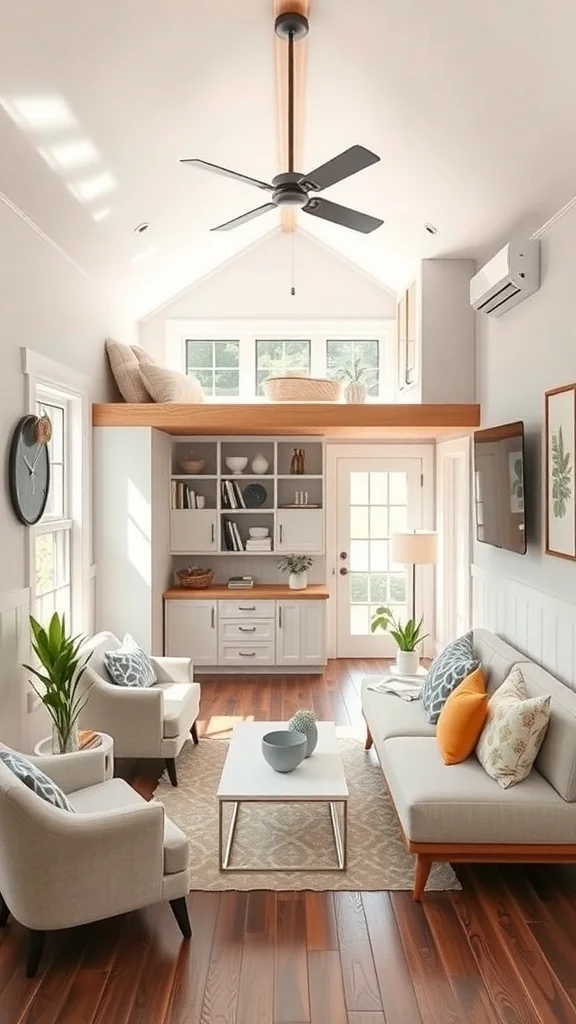
Tiny house floor plans unlock a world of possibilities for cozy and intentional living. Every square inch gets thoughtfully considered and beautifully designed. You will find layouts that fit your lifestyle whether you crave a weekend retreat or a full-time home.
The charm of tiny living waits for you to discover it. Here are some ideas to help you find the perfect layout for your needs.
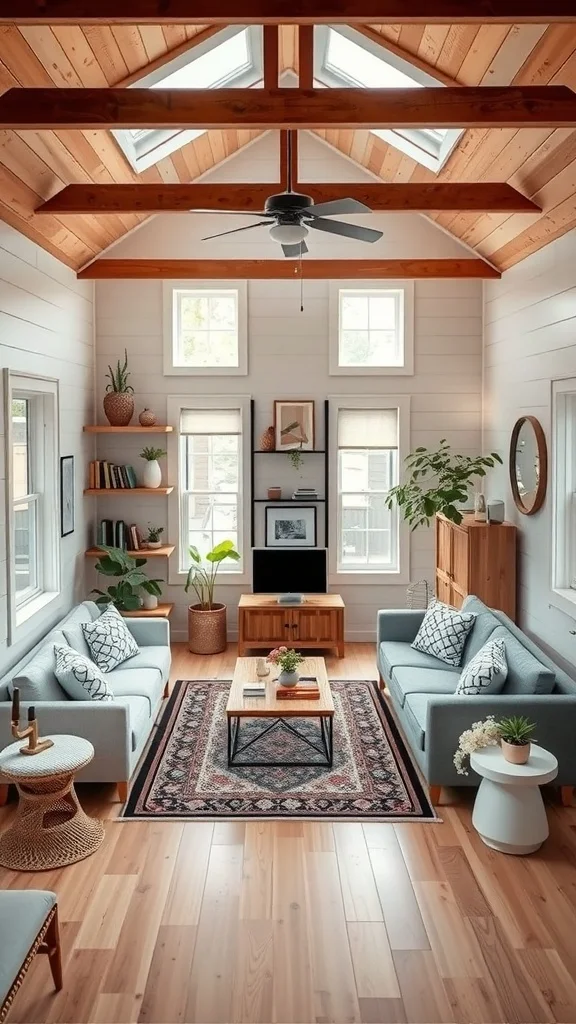
Open Concept Living for Maximum Space
A bright and airy living area unfolds before you. Sunlight pours through large windows and dances across the floors. The living, dining, and kitchen spaces flow together without walls or barriers. A cozy sofa and stylish chairs gather around a central coffee table. Pops of green from potted plants bring life to every corner.
This layout just feels right the moment you step inside.
Look for ways to remove unnecessary walls in your own tiny house. Choose furniture that sits lower to the ground to make ceilings feel higher. Stick with a simple color palette throughout the connected spaces. Pick multipurpose pieces like an ottoman that offers storage and seating. Place mirrors strategically to bounce light deeper into the room.
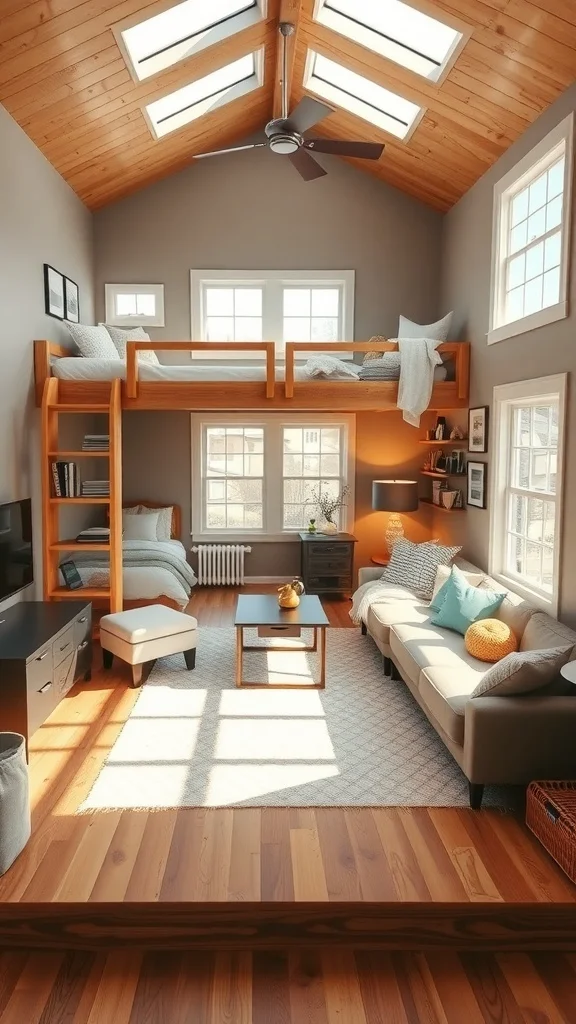
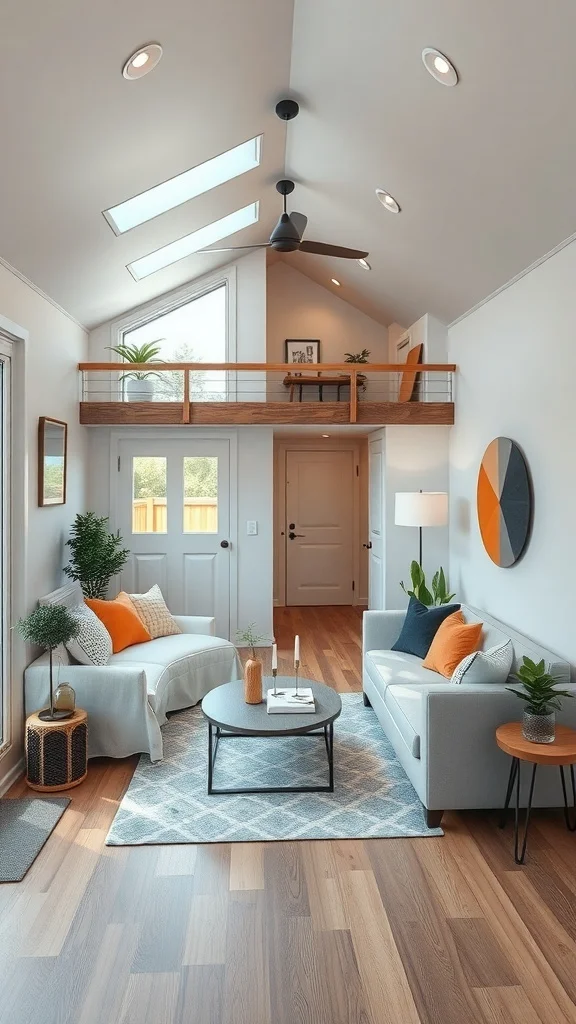
Lofted Bedrooms for Efficient Use of Vertical Space
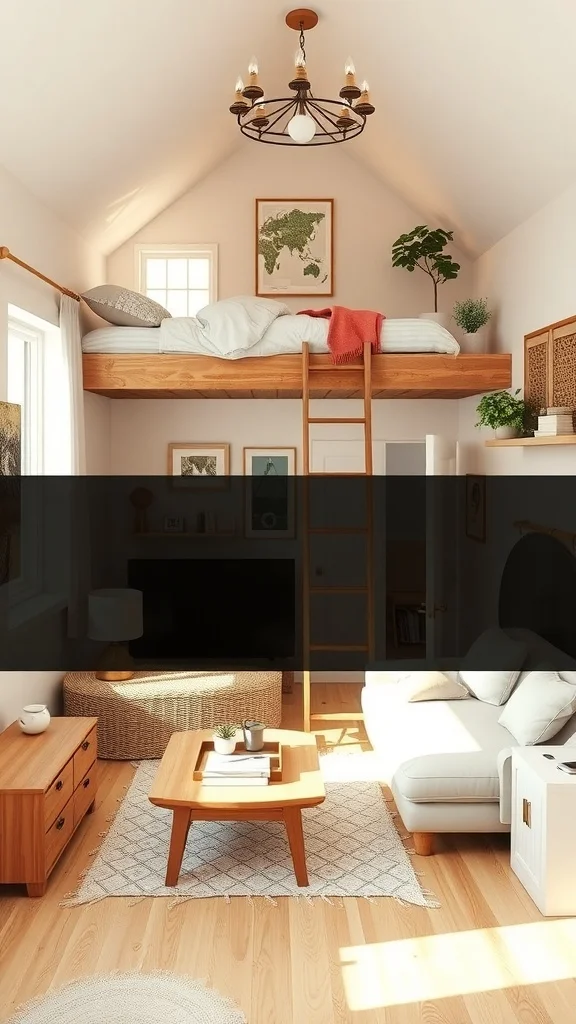
A charming sleeping nook sits tucked up near the ceiling. Warm wood tones wrap around the cozy loft space. Soft bedding invites you to climb the ladder and curl up for the night. Natural light streams through windows positioned perfectly below. The main living area stretches out underneath with room to breathe and move.
It feels like your own private treehouse inside the house.
Measure your ceiling height carefully before planning a lofted bedroom. Look for a sturdy ladder or space-saving stairs that fit your comfort level. Invest in good ventilation since heat rises toward the sleeping area. Choose low-profile mattresses to maintain sitting headroom. Add task lighting near the loft for nighttime reading.
Compact Kitchens with Smart Storage Solutions
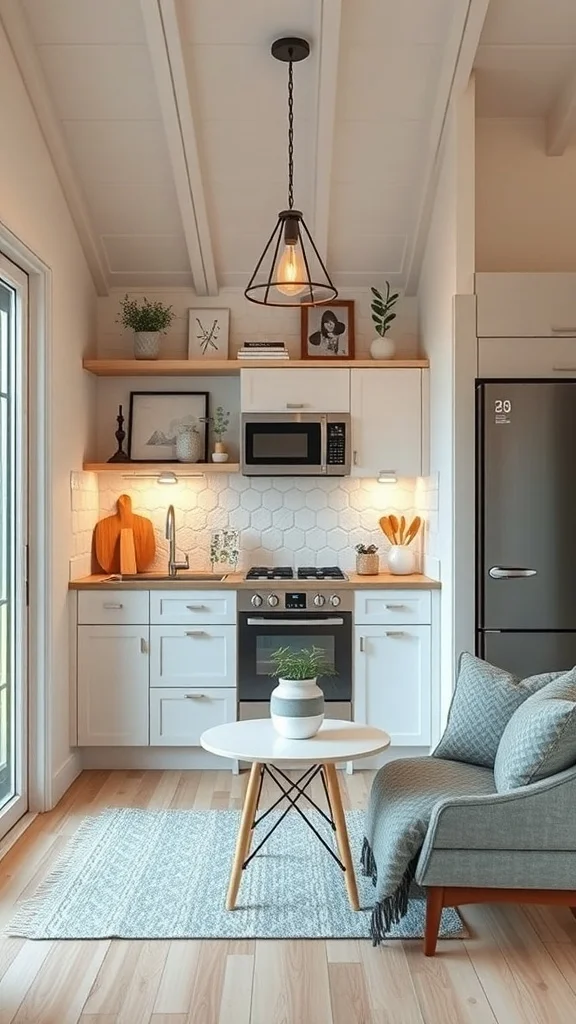
Light wood cabinets gleam against crisp white surfaces. Open shelving displays pretty dishes and tiny potted plants. Hexagonal tiles create a modern backsplash that catches your eye. The stove, microwave, and sink sit within arm’s reach of each other. A cozy dining spot tucks right around the corner.
Every inch works hard without feeling crowded or cramped.
Install open shelving to keep everyday items visible and accessible. Use vertical space with hanging racks for pots and utensils. Choose appliances sized appropriately for your cooking habits. Add pull-out drawers inside lower cabinets for easy access. Pick a deep sink that handles larger pots despite the compact footprint.
Outdoor Living Areas to Expand Usable Space
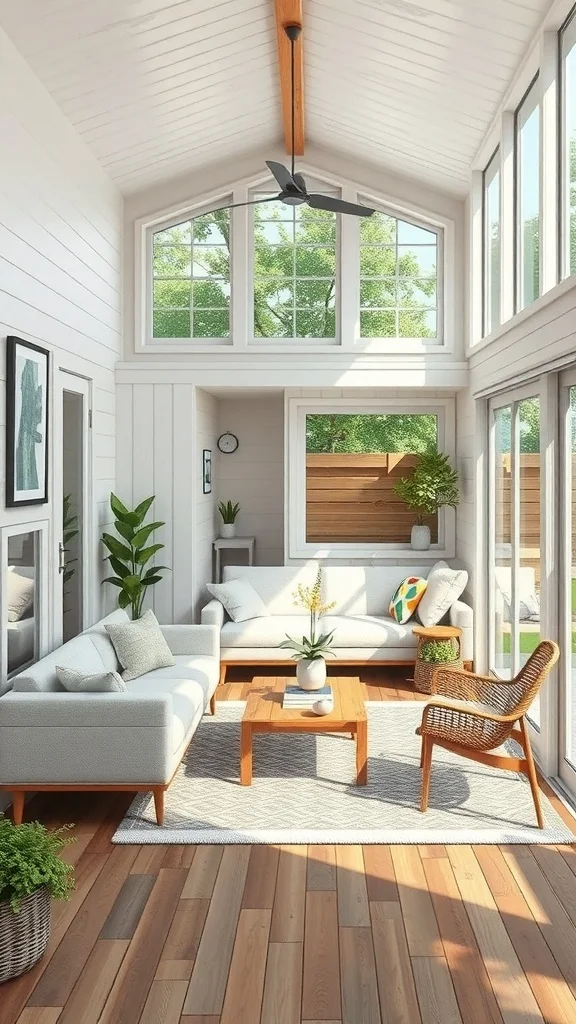
A bright sunroom stretches along the side of the tiny house. Large windows blur the line between inside and out. Comfortable seating invites you to sit and stay awhile. Plants bring fresh green life to the light-filled space. A simple coffee table holds drinks and books for lazy afternoons.
This spot becomes the favorite room in the whole house instantly.
Plan for covered outdoor areas that extend your living space season after season. Choose furniture rated for outdoor use even in protected spaces. Add screens or curtains for privacy and shade control. Run electricity to the area for lighting and device charging. Pick plants that thrive in the specific light conditions of your space.
Bathroom Designs for Small Spaces

White subway tiles stretch across the walls and catch the morning light. A sleek pedestal sink sits on delicate legs above the floor. Open shelving holds fluffy towels and self-care essentials. A large window lets sunshine pour in while keeping privacy intact. A small plant adds life to the windowsill.
It feels like a spa retreat hidden inside the tiny home.
Choose wall-mounted fixtures to keep floor space visible and open. Install a corner sink if your bathroom footprint is especially tight. Look for medicine cabinets with mirrors to combine two functions. Pick a shower curtain instead of a glass door for flexibility. Use clear glass for shelving to maintain that airy feeling.
Pet-Friendly Tiny House Layouts
A warm and welcoming space unfolds with furry friends in mind. Sunbeams stretch across the floor creating perfect napping spots. Soft rugs provide cozy places for pets to curl up. The open layout leaves plenty of room for toys and play. Plants sit safely on high shelves away from curious noses.
Dogs and cats settle right in like they have always lived here.
Choose durable and washable fabrics for all your upholstery pieces. Build a designated spot for food and water bowls. Install pet gates if you need to restrict access to certain areas. Pick flooring that resists scratches and cleans up easily. Create a cozy nook just for your pet under stairs or in a corner.
Sustainable Tiny House Designs
Natural wood beams stretch across the ceiling above you. Sunlight floods through windows positioned to capture passive solar heat. Plants thrive in every corner cleaning the air naturally. The warm wood floors feel good under your bare feet. Simple decor lets the materials speak for themselves.
Living here means living lighter on the planet every single day.
Choose renewable materials like bamboo or reclaimed wood for construction. Install energy-efficient windows with proper glazing for your climate. Add extra insulation during building to reduce heating and cooling needs. Look for energy-star rated appliances for all your major purchases. Position the house to take advantage of natural light and shade patterns.
Flexible Multi-Functional Rooms
Two comfortable sofas face each other across a simple coffee table. The room flows easily from conversation area to dining space to home office. Built-in shelving lines the walls holding books and decor. Natural light streams through windows making everything feel connected. The space transforms throughout the day to meet your needs.
One room becomes many rooms without any construction at all.
Choose furniture on casters that moves easily as your needs change. Look for nesting tables that tuck away when not in use. Install a Murphy bed or wall-mounted desk for instant flexibility. Use room dividers or curtains to create temporary privacy. Pick a consistent color palette so changes feel intentional and smooth.
Minimalist Tiny House Aesthetics
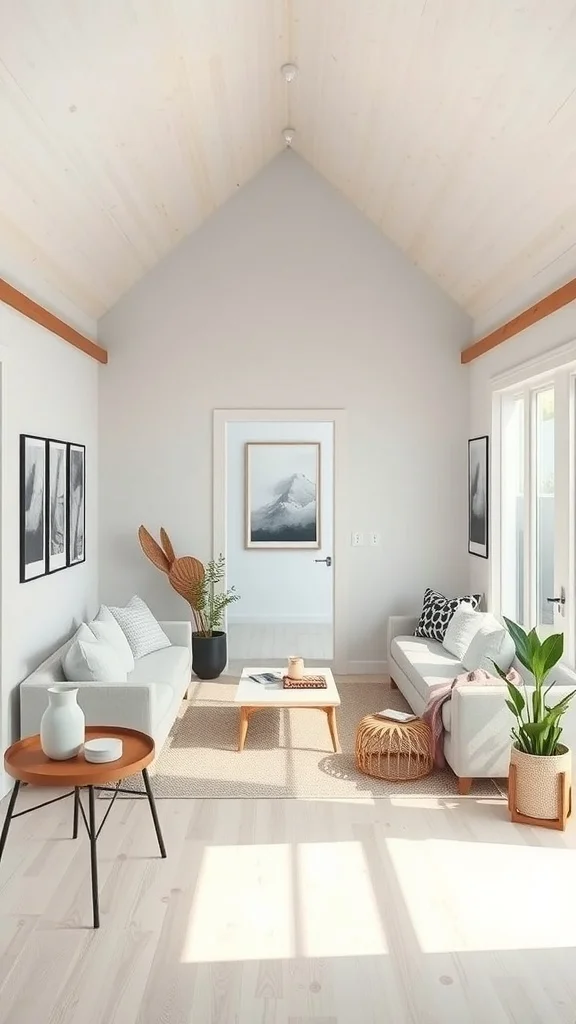
A sloped ceiling soars overhead creating an expansive feeling. Soft neutral colors wrap around the walls and furniture. Two simple sofas face each other in quiet conversation. A few carefully chosen pictures hang on the walls. Potted plants add the only pops of bright green color.
Everything present has a purpose and a place to belong.
Edit your belongings ruthlessly before moving into a tiny space. Choose quality over quantity for every single piece you keep. Stick to a neutral base and add texture instead of color. Keep surfaces clear and clutter-free for visual calm. Let negative space rest your eyes and clear your mind daily.
Efficient Use of Light and Windows
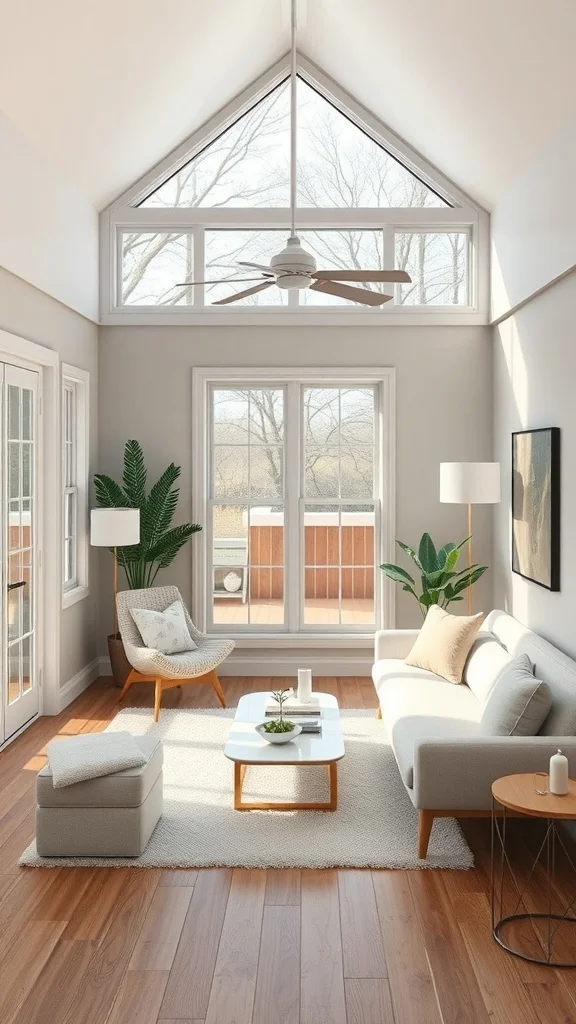
Light pours through a dramatic triangular window high above. The bright space feels open and connected to the outdoors. Plants soak up sunshine from their spots near the glass. The high ceilings amplify every ray of natural light. Warm wood tones glow in the afternoon sun.
Windows become the most valuable feature in the whole tiny house.
Place windows on multiple walls to capture light throughout the day. Consider skylights or transom windows for hard-to-reach spots. Choose window treatments that let you control light without blocking it. Position mirrors to reflect window views deeper into the room. Keep window areas clear of tall furniture that blocks precious light.
Tiny House with a Cozy Reading Nook
A comfortable chair nestles into its own special corner. Soft light filters through nearby windows onto the pages. Built-in bookshelves hold stories waiting to be discovered. A tiny plant adds life to the small side table. The space feels tucked away yet still part of the main room.
This nook calls your name every time you pick up a book.
Look for underutilized corners that could become a reading spot. Add good task lighting even if natural light is available. Choose a chair deep enough to curl up in for hours. Install shelves within arm’s reach of your favorite seat. Add a small surface for holding tea, books, or reading glasses.
Creative Storage Solutions in Tiny Houses

A cozy living area opens up below a sleeping loft above. The space feels open and uncluttered despite its small footprint. Light furniture keeps the visual weight low and airy. Plants add life without taking up precious floor space. Every piece serves multiple purposes throughout the day.
The storage hides in plain sight all around you.
Build stairs with drawers inside instead of open risers. Use the space under sofas and beds for sliding storage bins. Install cabinets that go all the way to the ceiling. Look for furniture with hidden compartments and built-in storage. Add hooks everywhere for hanging items off the floor.
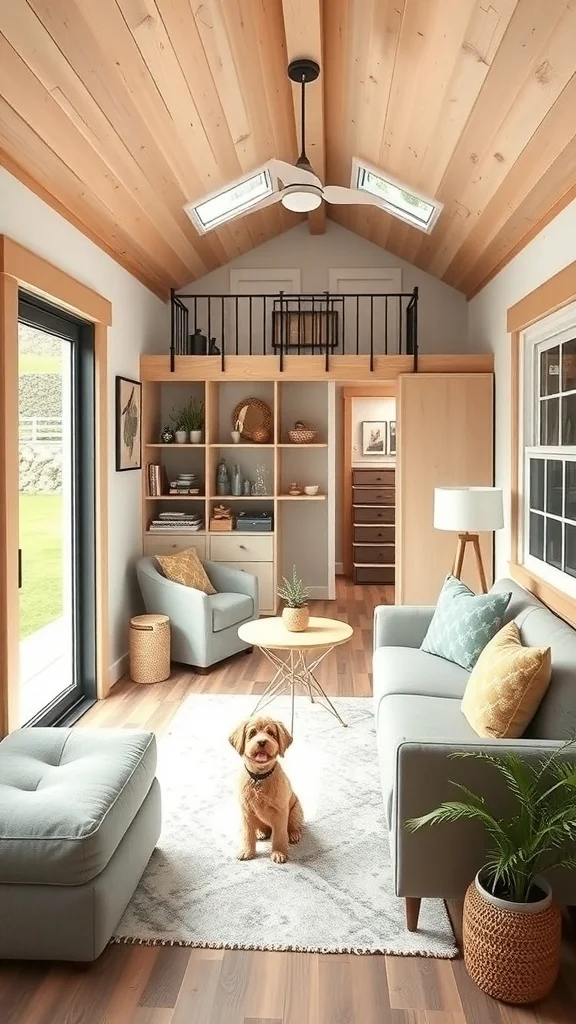
Family-Friendly Tiny House Configurations
A warm living space welcomes family time and togetherness. The loft above creates a cozy hideaway for kids or guests. Sunshine fills the room through large thoughtfully placed windows. Comfortable seating invites everyone to gather around together. The open layout keeps eyes connected across the whole space.
Families grow closer when they share space intentionally like this.
Plan for zones rather than separate rooms for family activities. Choose upholstery that stands up to daily use and cleans easily. Build storage specifically sized for toys and family gear. Consider bunk beds or lofts to give each child personal space. Create quiet corners for alone time even in the main area.
Accessible Tiny House Designs for All Abilities
An open and inviting space welcomes everyone who enters. Wide pathways allow easy movement throughout the main area. Natural light fills the room creating a warm and cheerful mood. Comfortable seating offers spots to rest and relax. The neutral palette soothes without distracting or overwhelming.
Accessibility and beauty come together naturally in this design.
Plan for doorways wide enough to accommodate mobility devices. Choose lever handles instead of knobs for easier operation. Install grab bars in bathrooms during initial construction. Consider a main-floor bedroom to avoid stairs entirely. Pick flooring that provides good traction even when wet.
Tiny House with Separate Workspaces
A dedicated desk area sits bathed in natural window light. The workspace feels distinct from the living areas nearby. Plants bring life to the productive corner of the home. A comfortable chair invites you to sit and focus on tasks. Shelving holds books and supplies within easy reaching distance.
Work and home life balance better with their own special spots.
Find a corner with good light and enough wall space for your setup. Choose a desk that fits your work style and storage needs. Add a comfortable ergonomic chair worth investing in for long hours. Use vertical space for shelving above your work surface. Create visual separation with a room divider or curtain if needed.
Tiny House with Built-in Furniture
A stylish living space features seating that fits perfectly. Colorful cushions add personality to the built-in sofa below. Shelving lines the walls holding books and treasured objects. A sleek coffee table anchors the seating arrangement beautifully. The loft above provides sleeping space accessed by a ladder.
Custom furniture makes every inch count in this tiny home.
Consider built-in benches with storage underneath for seating areas. Design shelves to fit your specific belongings not generic spaces. Build window seats that offer storage and a cozy spot to perch. Include hidden compartments in stairs and platforms throughout. Work with a builder who understands small space design and needs.
Innovative Tiny House Extensions
Warm gray walls create a calm backdrop for comfortable living. Pops of orange bring energy to the cozy seating area. High ceilings make the space feel larger than its footprint. A loft sleeping area adds function without taking floor space. Plants and art make the house feel like a real home.
This tiny house proves small spaces hold big style potential.
Look for ways to bump out walls for extra interior space. Consider slide-out sections that expand the house when parked. Add a greenhouse window for plants and extra counter space. Build a deck or patio that attaches securely to the main house. Plan for future additions during the initial design phase.
Tiny House with Community Living Spaces

An open and welcoming layout invites connection and conversation. High ceilings and large windows create an airy atmosphere. Comfortable seating encourages people to gather and linger. The modern kitchen opens to the living area for easy interaction. Soft colors and plants add warmth throughout the shared space.
This tiny house makes room for community despite its size.
Design common areas larger than private spaces in community-focused homes. Choose durable furniture that handles frequent use by many people. Build outdoor gathering spaces for warm weather socializing. Consider soundproofing between units in multi-house communities. Plan shared amenities like gardens, workshops, or laundry facilities.
Designing for Climate: Tiny Houses in Different Environments
A sun-drenched living space welcomes light through large windows. The high wooden ceiling keeps the room feeling cool and open. Simple furniture lets the architecture speak for itself. Plants thrive in the warm bright conditions near the glass. The design works with the climate not against it.
Nature becomes your partner in comfortable tiny living.
Choose insulation rated for your specific climate zone and conditions. Position windows to capture prevailing breezes for natural cooling. Add overhangs that shade summer sun but welcome winter light. Pick materials that handle local humidity and temperature swings. Design for disaster resistance if you live in storm-prone areas.
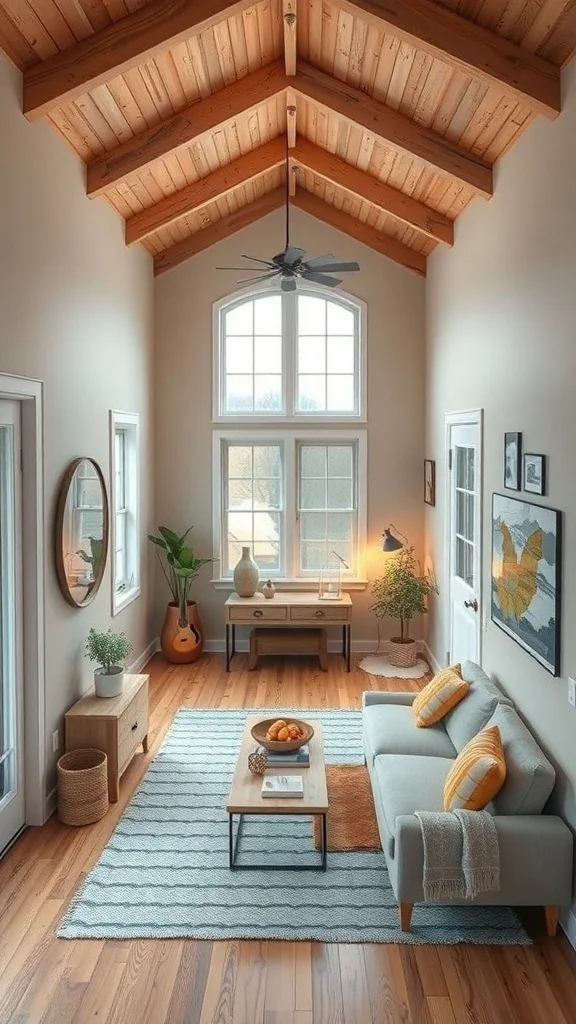
Tiny House Designs with Unique Architectural Features
A dramatic wooden ceiling soars overhead creating instant wow factor. Large windows flood the space with warm natural light. A circular coffee table softens the angles of the room. Plants add organic texture to the clean modern lines. The thoughtful layout balances style with everyday function beautifully.
Architecture becomes art that you get to live inside every day.
Look for ways to highlight interesting structural elements in your design. Consider a curved wall or unusual window shape for visual interest. Use natural materials like wood and stone for texture and warmth. Work with an architect who understands small space design. Let one or two special features become the focus of the whole house.
by Clara Scott | Feb 21, 2026 | Uncategorized
A small closet can work just as hard as a big one when you organize it the right way. Smart storage, a clear system, and a few clever tools turn a cramped space into something that actually makes getting ready easier. You do not need a walk-in to have a closet that works beautifully. Here are some ideas to help you organize every inch of your small closet.
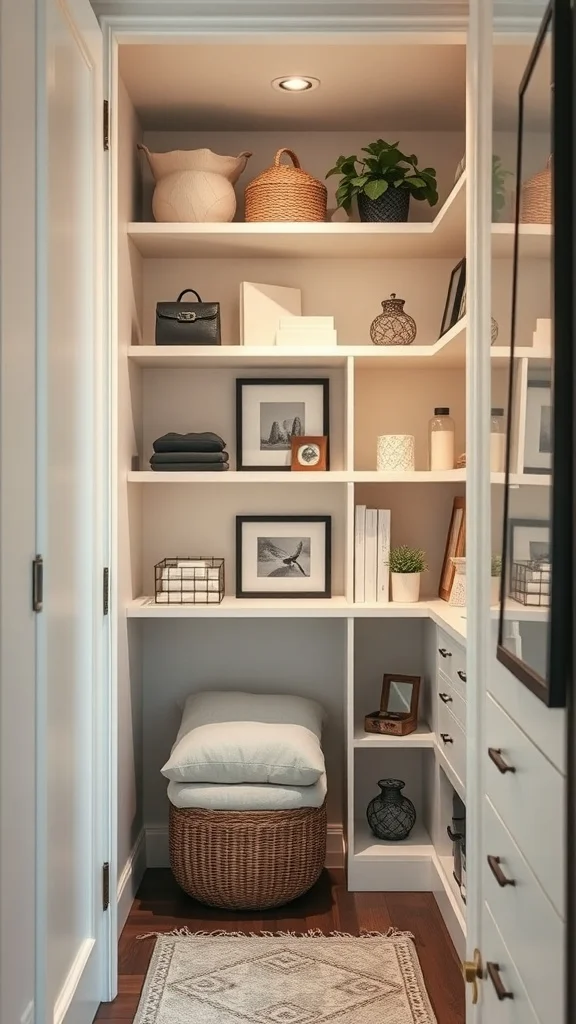
Maximizing Vertical Space
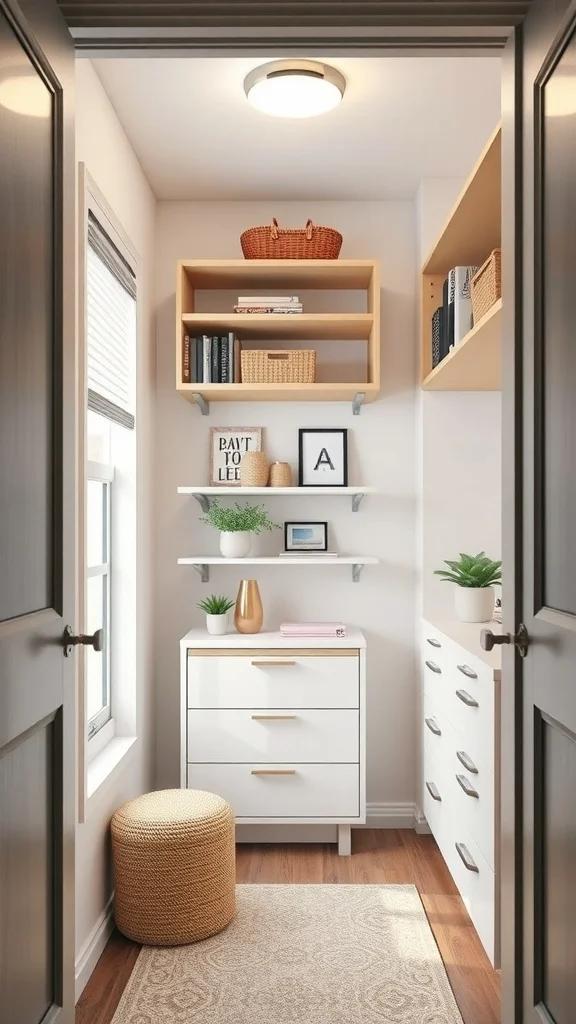
Shelves installed all the way up to the ceiling holding baskets, books, and a small plant. Drawers below keeping daily essentials organized. A stool tucked in for reaching the top shelf. Every inch from floor to ceiling doing something useful.
Most small closets waste the space above eye level. Going vertical changes everything and gives you storage you did not know you had.
Install shelves as high as the ceiling allows and use the top ones for items you do not need every day like seasonal pieces or spare linens. Place woven baskets on the highest shelves so items stay contained and easy to pull down. Use the mid-level shelves for daily items and a small decorative touch like a plant to keep the space feeling personal. Add drawers below for folded clothes and accessories. Keep a step stool inside the closet for comfortable access to the top. This vertical approach doubles your usable storage without expanding the closet footprint at all.
Over-the-Door Organizers
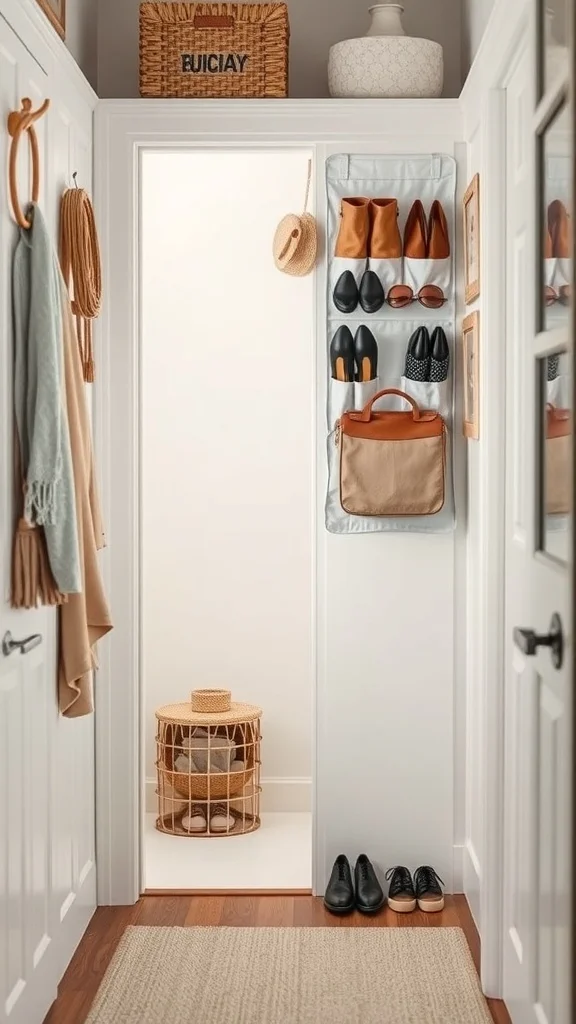
An organizer hanging on the back of the closet door with clear pockets holding shoes, bags, and accessories. Everything visible at a glance. Nothing lost at the bottom of the closet anymore. The door itself becomes a wall of storage.
The back of the door is prime real estate in a small closet and most people forget it is there. One organizer changes that instantly.
Hang an over-the-door organizer with clear or mesh pockets on the inside of your closet door. Use the top pockets for accessories like scarves, belts, and sunglasses. Fill the middle pockets with shoes you wear often. Use the bottom pockets for items like bags or hats. Choose an organizer with sturdy hooks that do not damage the door. This one addition frees up shelf and floor space inside the closet while keeping everything easy to find at a glance.
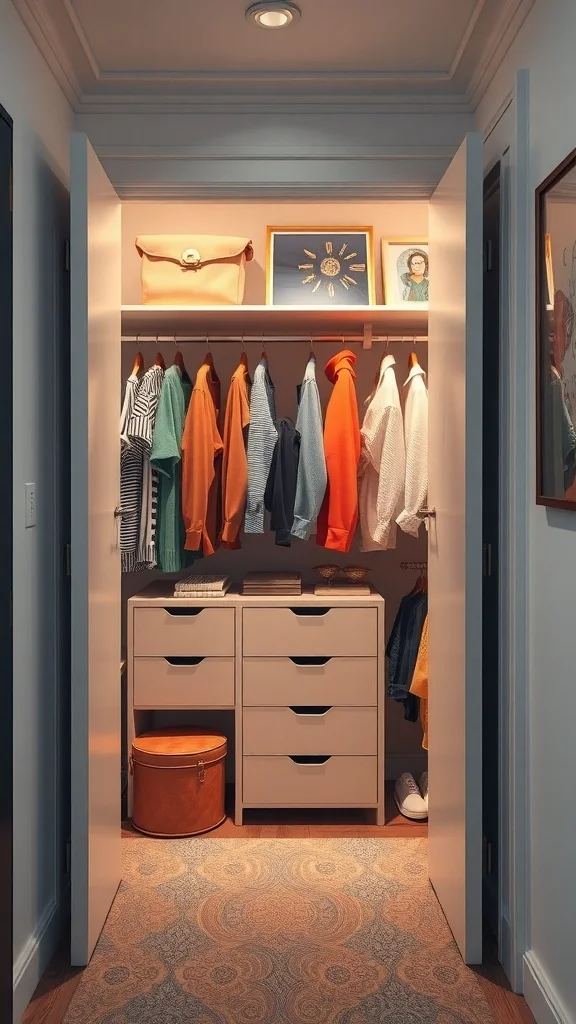
Drawer Dividers for Small Items
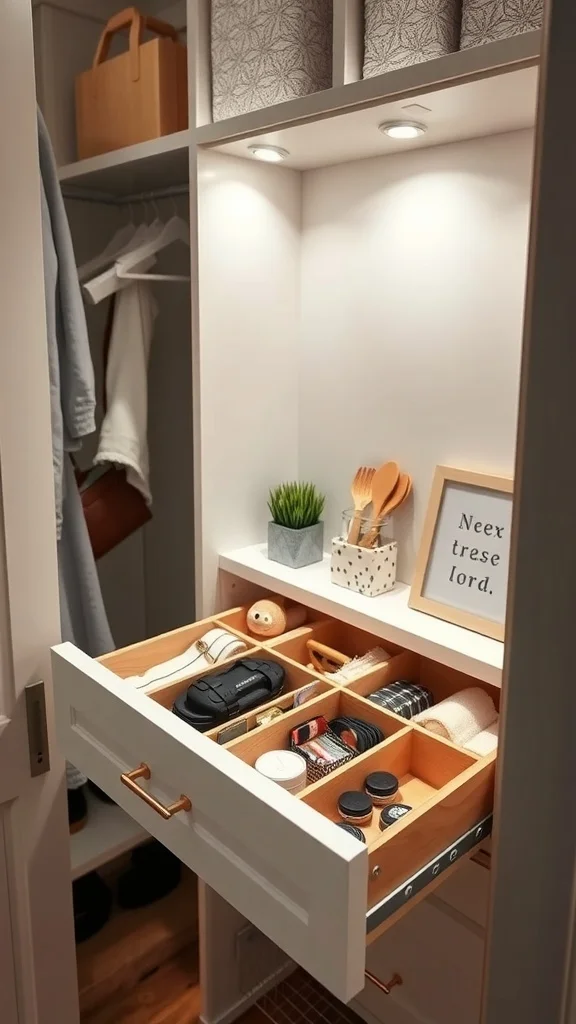
A drawer neatly divided into compartments holding socks, underwear, jewelry, and small accessories. Every item in its own slot. Nothing tangled or lost. You open the drawer and see exactly what you have.
Drawer dividers bring order to the messiest part of any closet. They turn a jumbled drawer into a system that saves you time every morning.
Buy adjustable drawer dividers or small compartment trays that fit your drawer dimensions. Assign each section a specific category like socks in one row, underwear in another, and accessories in a third. Fold or roll items neatly so they stand upright and stay visible. Replace dividers if they shift over time to keep the system tight. This simple organizational tool keeps small items from becoming a tangled pile and makes getting dressed a faster, smoother experience.
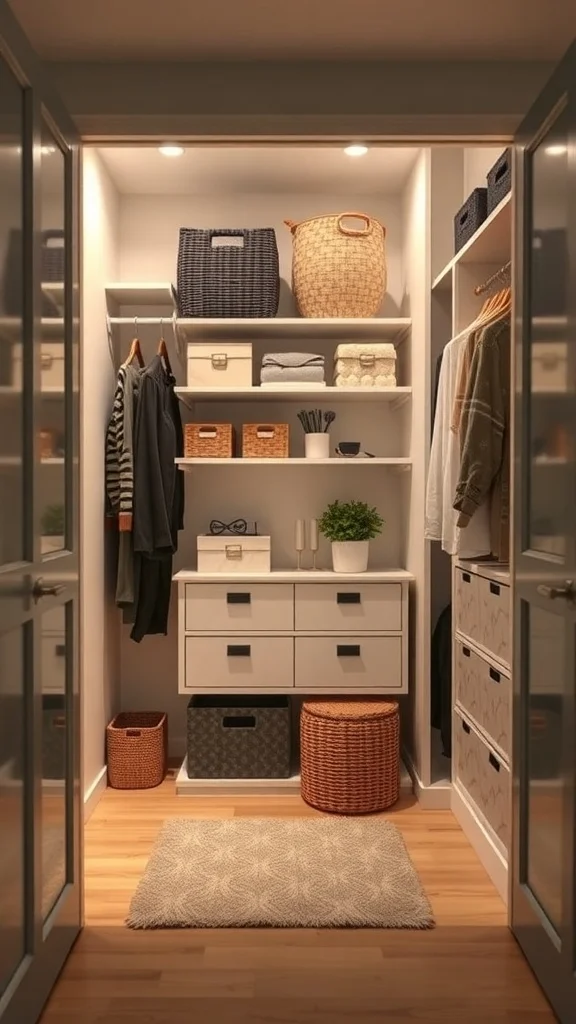
Baskets for Clutter Control
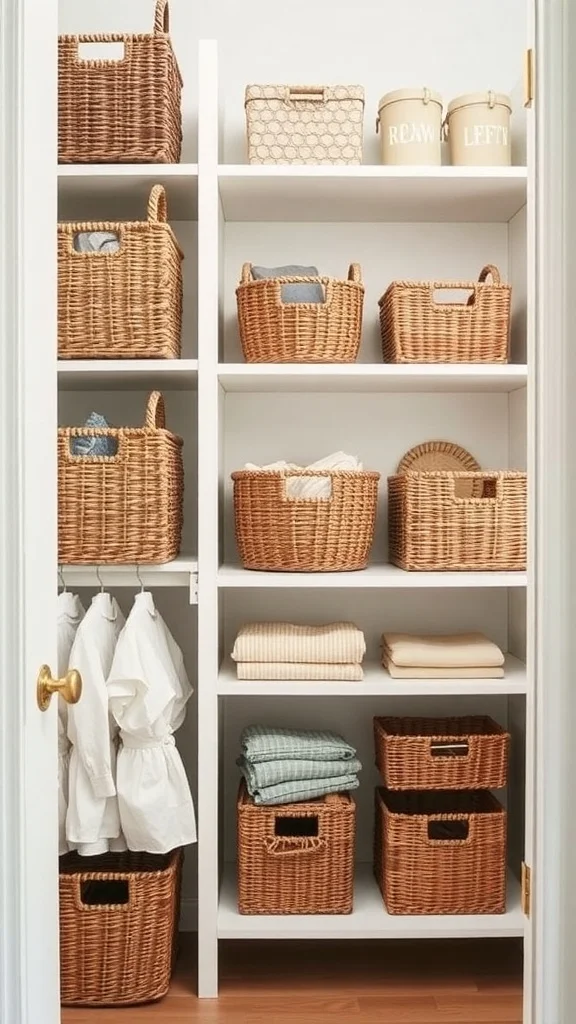
Woven baskets in different sizes sitting on shelves and the closet floor. Each one holding a category of items like linens, accessories, or seasonal clothes. Labels on the front making it easy to know what is inside without opening anything.
Baskets hide the mess while looking beautiful. They are storage and decor at the same time and they keep a small closet feeling calm.
Choose baskets in a consistent style like woven natural fiber or fabric bins that match your closet’s look. Assign each basket a specific purpose and label it so you always know where things belong. Place larger baskets on lower shelves for bulkier items and smaller ones on higher shelves for accessories. Use open-top baskets for items you reach for often and lidded ones for things you access less frequently. This basket system keeps everything contained and makes even the smallest closet look organized and intentional.
Clear Storage Containers
Clear plastic containers stacked neatly on shelves. Rolled towels in one. Decorative items in another. Everything visible through the sides without opening a single lid. The closet looks clean and you can find anything in seconds.
Clear containers take the guesswork out of storage. You see what is inside without searching and the uniform shape stacks perfectly.
Choose clear containers in matching sizes that stack well on your closet shelves. Group similar items together like one container for workout clothes, another for accessories, and one for extra linens. Label each container even though it is clear so the system stays consistent. Stack them vertically to use the full height of your shelves. Choose containers with snap-on lids to keep dust out and contents secure. This transparent approach keeps everything visible, protected, and neatly contained in even the smallest closet.
Utilizing Slim Hangers
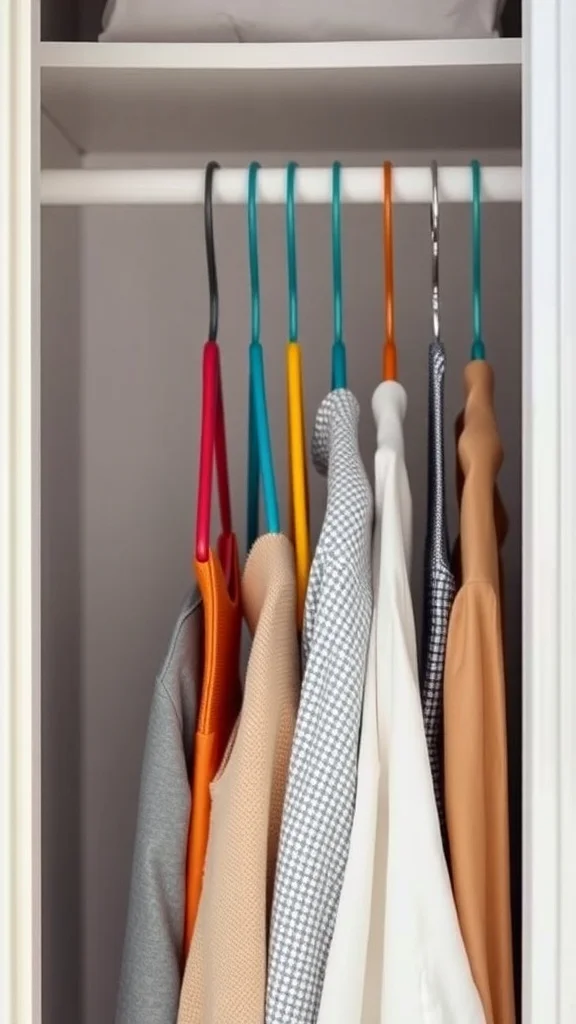
A row of slim velvet or plastic hangers holding shirts, jackets, and dresses in a tight neat row. So much more clothing fitting in the same space compared to bulky wooden hangers. Nothing slipping off. Everything hanging evenly.
Switching to slim hangers is the easiest closet upgrade you can make. You gain inches of extra hanging space overnight.
Replace all your mismatched bulky hangers with a uniform set of slim velvet or flocked hangers. The non-slip surface keeps clothes in place without clips. The thin profile creates more room between garments so you can fit significantly more in the same rod space. Use matching hangers throughout the closet for a clean cohesive look. Add hangers with clips for skirts and pants to keep them wrinkle-free. This one swap makes your closet feel instantly more spacious and organized.
Seasonal Storage Solutions

Labeled bins on the top shelf holding off-season clothing. Current-season pieces hanging neatly on the rod below. The closet only shows what you actually wear right now. Everything else is stored but easy to swap when the weather changes.
Rotating your wardrobe seasonally keeps a small closet from overflowing. You only see what is relevant and the rest waits its turn.
At the start of each season pack away clothes you will not wear for the next few months into labeled bins or vacuum-seal bags. Store them on the top shelf of your closet or under the bed. Keep only in-season items hanging and folded in the main closet space. Label each bin clearly with the season and contents so swapping is fast. This rotation keeps your closet feeling spacious and makes getting dressed easier because every item you see is something you can actually wear today.
Rotating Garment Rack
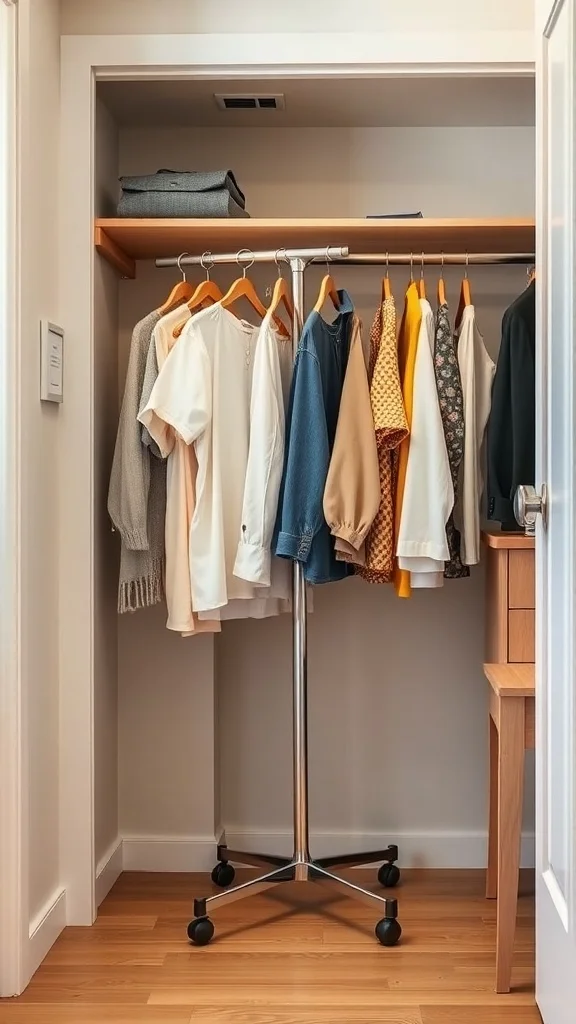
A spinning garment rack holding your most-worn pieces in a compact circle. You spin it and every item comes into view. No reaching to the back of the closet. No forgotten clothes hiding behind others.
A rotating rack brings every piece of clothing to you. It is like having a personal boutique inside your small closet.
Place a compact rotating rack inside your closet or in a corner of the bedroom if the closet is too small. Hang your most-worn items and current favorites on it for easy daily access. Keep the rack from being overcrowded so each piece is visible and wrinkle-free. Use it for the current week’s outfits and rotate fresh pieces in every Sunday. This spinning system makes getting dressed faster and ensures nothing in your wardrobe gets forgotten.
Space-Saving Shoe Racks
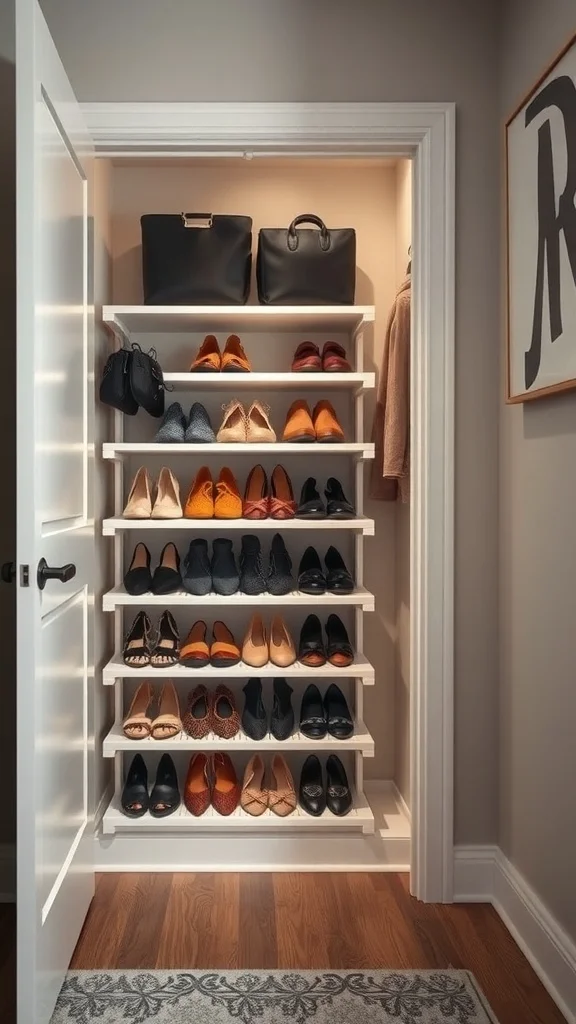
A slim multi-tier shoe rack on the closet floor holding pairs from heels to flats in neat rows. Every shoe visible and easy to grab. The floor stays organized instead of turning into a pile of mismatched pairs.
Shoes are usually the biggest source of closet chaos. A dedicated shoe rack solves that instantly and frees up floor space for everything else.
Choose a slim vertical shoe rack that fits the width of your closet floor. Stack your most-worn pairs at eye level and less-used ones at the top or bottom. Alternate the direction of each pair to fit more shoes per shelf. Keep the rack near the closet entrance for easy grab-and-go access. If floor space is tight use an over-the-door shoe organizer instead. A dedicated spot for every pair means no more digging through a pile to find the right shoes.
Under-Bed Storage Options
Slim storage bins tucked under the bed holding extra linens, accessories, and overflow from the closet. Out of sight but easy to slide out when you need something. The closet stays lean because the bed picks up the overflow.
Under-bed storage is like having an invisible extension of your closet. It handles the extras so the closet only holds what you use daily.
Measure the clearance under your bed and choose flat bins or rolling drawers that slide in and out easily. Use them for off-season clothes, extra bedding, or items that do not fit in the closet. Label each bin so you know what is inside without pulling it out. Choose bins with lids to keep dust away and wheels for easy access. Place the items you need least often furthest under the bed and the more frequently used ones at the front edge. This invisible storage system keeps your closet lean and your room clutter-free.
Multi-Functional Furniture
A bench at the base of the closet that serves as seating, shoe storage underneath, and a display surface on top. Hooks above it holding bags and jackets. A small shelf with framed art and a plant adding style. One piece of furniture doing three jobs at once.
Multi-functional furniture is the secret to making a small closet feel like it has everything without being crowded.
Place a slim bench or an ottoman with hidden storage inside the closet or just outside it. Use the top as a seat for getting dressed and the inside for storing shoes or accessories. Mount hooks on the wall above the bench for bags, hats, and scarves. Add a small shelf above the hooks for a framed print and a plant. This layered setup creates a mini dressing area that is functional, organized, and good-looking all at the same time.
Labeling for Easy Identification

Boxes and bins on the shelves each with a clear label on the front. You glance at the label and grab exactly what you need. No opening, no guessing, no wasted time. The closet runs like a system.
Labels are the finishing touch that keeps an organized closet organized long-term. Without them everything slowly drifts back to chaos.
Label every bin, box, and basket in your closet with its contents. Use a label maker for a clean uniform look or handwrite tags for a more personal touch. Attach labels to the front of each container at a height you can read easily. Label shelves too if you share the closet so everyone knows where things go. Update labels whenever you change the contents. This simple habit takes minutes but keeps the closet system running smoothly for months without a major reorganization.
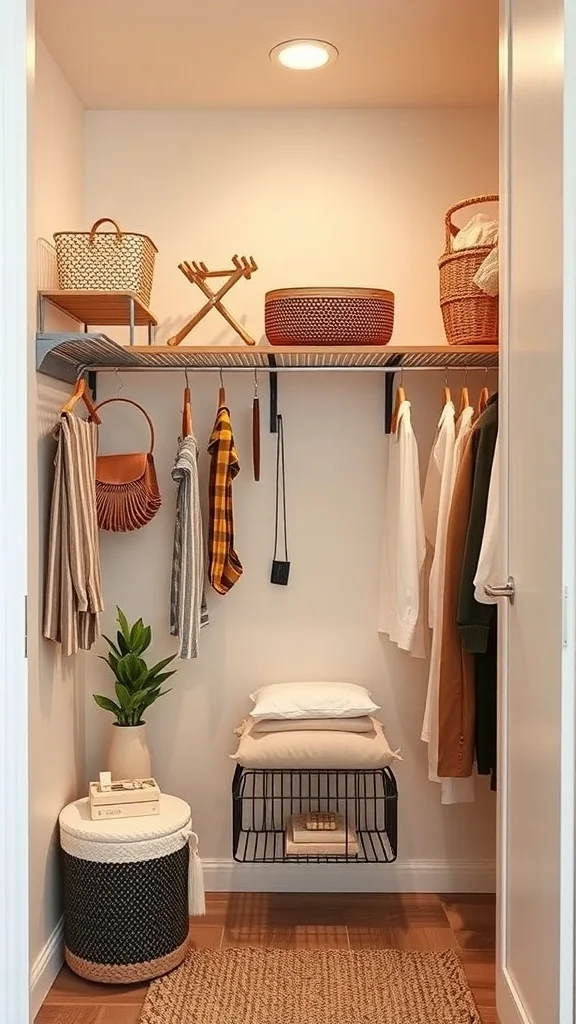
Hooks for Accessories
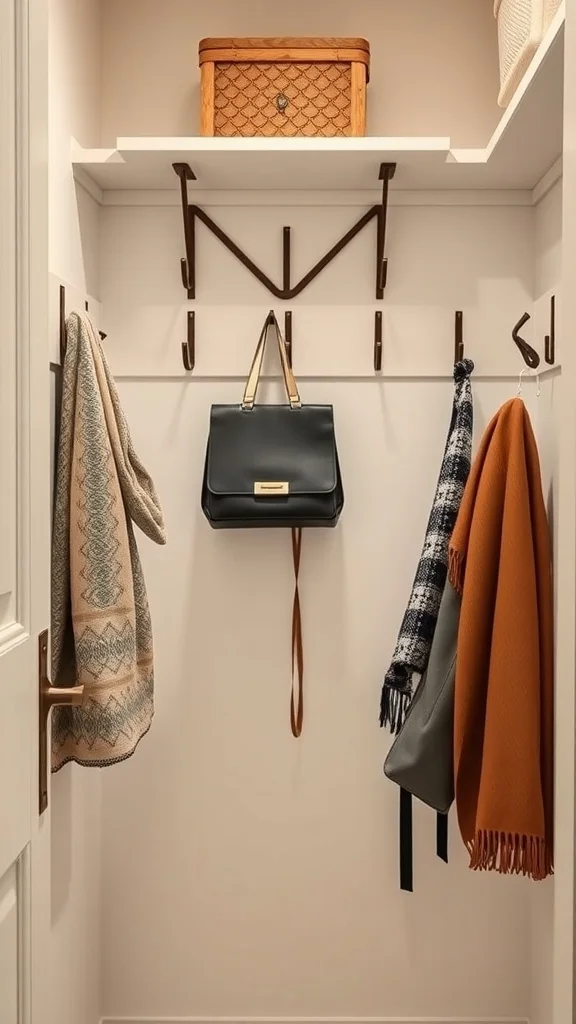
A row of hooks on the closet wall holding scarves, bags, belts, and hats. Everything hanging neatly and visible at a glance. No tangled necklaces or lost belts hiding in a drawer somewhere.
Hooks are the simplest addition to a closet and they solve the accessory problem instantly. Everything has a spot and everything is easy to grab.
Mount a row of hooks on the inside wall of your closet or on the back of the door. Assign each hook a specific type of accessory like one for bags, one for belts, one for scarves. Use smaller hooks or a jewelry organizer for necklaces and bracelets to prevent tangling. Space the hooks far enough apart so items hang freely without bunching. Choose hooks in a finish that complements your closet hardware. This wall-mounted system keeps accessories organized, visible, and wrinkle-free without using any shelf or drawer space.
Utilizing Corner Shelves
Corner shelves fitted into the angles of the closet where regular shelves do not reach. Baskets, folded items, and a plant sitting in spaces that would normally be wasted. The closet suddenly has storage in places you never thought to use.
Corners are the most overlooked part of any closet. Fitting shelves into those angles reclaims space that was just collecting dust.
Install small triangular or L-shaped shelves in the corners of your closet. Use them for folded items like sweaters or jeans, small baskets for accessories, or decorative pieces like a plant or a candle. Keep the corner items neatly stacked so they do not spill into the main shelving area. Match the shelf material to the rest of your closet for a seamless look. These corner additions give you extra storage without affecting the main hanging or shelving zones at all.
Foldable Storage Solutions
Fabric bins that collapse flat when empty and pop open when you need them. Stacked on shelves holding clothes, linens, and extras. Lightweight and easy to move. The closet stays flexible because the storage itself adapts.
Foldable bins give you storage when you need it and disappear when you do not. They are perfect for closets where the contents change with the seasons.
Choose collapsible fabric bins in a color or pattern that matches your closet aesthetic. Use them on shelves for categories like gym clothes, pajamas, and accessories. Fold them flat and store them when they are empty to free up shelf space. Label each bin so you can find contents quickly. Choose bins with reinforced sides so they hold their shape when loaded. This flexible storage system adapts to your changing needs and keeps the closet looking polished season after season.
Color-Coding Clothing
Clothes hanging on the rod arranged by color from light to dark. A rainbow flowing across the closet. Every item easy to find because you just look for the color you want. The closet looks like a boutique display.
Color-coding is as much about visual beauty as it is about function. It makes the closet a pleasure to open every morning.
Arrange all hanging clothes by color starting with whites and moving through pastels, brights, and darks. Within each color group organize by garment type if you want an extra layer of order. Step back and adjust until the flow looks smooth and balanced. Use matching slim hangers for a clean uniform look that highlights the color arrangement. Keep storage bins and drawers below organized by category to complement the color system above. This visual approach makes outfit selection faster and turns your small closet into something genuinely beautiful to look at.
DIY Closet Organization Hacks
Shelves, baskets, and drawer units assembled with simple materials creating a custom closet system on a budget. Everything labeled and arranged. A small rug on the closet floor adding comfort and style. It looks custom but it was all done at home.
You do not need an expensive closet system to get organized. A few smart DIY hacks give you the same result for a fraction of the cost.
Start with adjustable shelving brackets from a hardware store and cut shelves to fit your closet width. Add inexpensive fabric bins on the shelves for categorized storage. Use tension rods to create extra hanging space for scarves or tank tops. Repurpose small boxes or containers with labels for drawer organization. Add a small rug at the base of the closet for comfort. Mount hooks on any available wall space for bags and accessories. These affordable DIY solutions give you a fully customized closet without hiring a professional or spending a fortune.
Using Wall Space Effectively
Hooks holding bags on one wall. Shelves with baskets on another. Hangers on the rod using the center. A plant adding life. Every wall surface inside the closet working as hard as the shelves and the rod.
The walls inside your closet are free storage that most people ignore. Using them properly multiplies your available space.
Mount hooks on any open wall space for bags, belts, and robes. Install a slim shelf on a wall that does not have the main rod for extra folded storage. Use adhesive hooks on the inside of the closet door for lightweight items like jewelry or ties. Place a small plant on a shelf to keep the space feeling fresh. Keep the walls organized with consistent hardware finishes so everything looks intentional. This wall-focused approach adds significant storage capacity without changing the closet’s footprint.
Incorporating Mirrors for Illusion
A mirror mounted on the inside of the closet door or on the back wall reflecting light and making the closet feel twice as large. The reflection lets you see outfits from head to toe without leaving the room. The closet feels brighter and more open.
A mirror inside the closet is functional and transformative. It opens up a tight space and makes getting dressed easier at the same time.
Mount a full-length mirror on the inside of the closet door or on the back wall if space allows. Choose a frameless or slim-framed design to keep the look clean. Position it where it catches the most light from the room or the closet’s overhead fixture. If a full-length mirror does not fit try a round or half-length one at eye level. The reflection adds depth and brightness to even the smallest closet and gives you a practical spot to check your outfit before heading out.
Rotating Accessory Trays
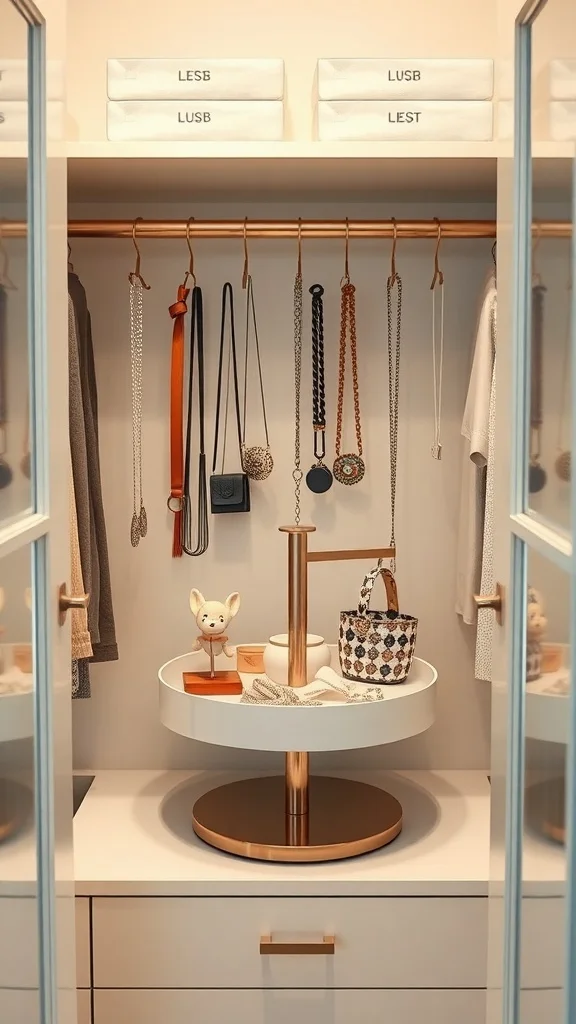
A spinning tray on the dresser or shelf holding necklaces, bracelets, rings, and earrings in organized compartments. One spin and everything is visible. No more tangled chains or missing earrings buried in a drawer.
A rotating tray is the jewelry box upgrade your closet needs. It keeps everything untangled, visible, and easy to grab in seconds.
Place a rotating accessory tray on a shelf, dresser, or inside the closet on a flat surface. Arrange jewelry by type with necklaces on one section, bracelets on another, and earrings in a compartment with dividers. Spin the tray each morning to find what matches your outfit. Choose a tray in a material that complements your closet like clear acrylic for a modern look or wood for warmth. Keep the tray from being overcrowded so each piece has breathing room. This spinning organizer turns your accessories into a display that is both practical and beautiful.
by Clara Scott | Feb 21, 2026 | Uncategorized
A narrow hallway does not have to be a forgotten space you just walk through. With the right colors, lighting, and decor, it can become one of the most charming parts of your home. Think of it as a long canvas waiting for your personal touch. Here are some ideas to help you transform your narrow hallway into something guests actually stop and admire.
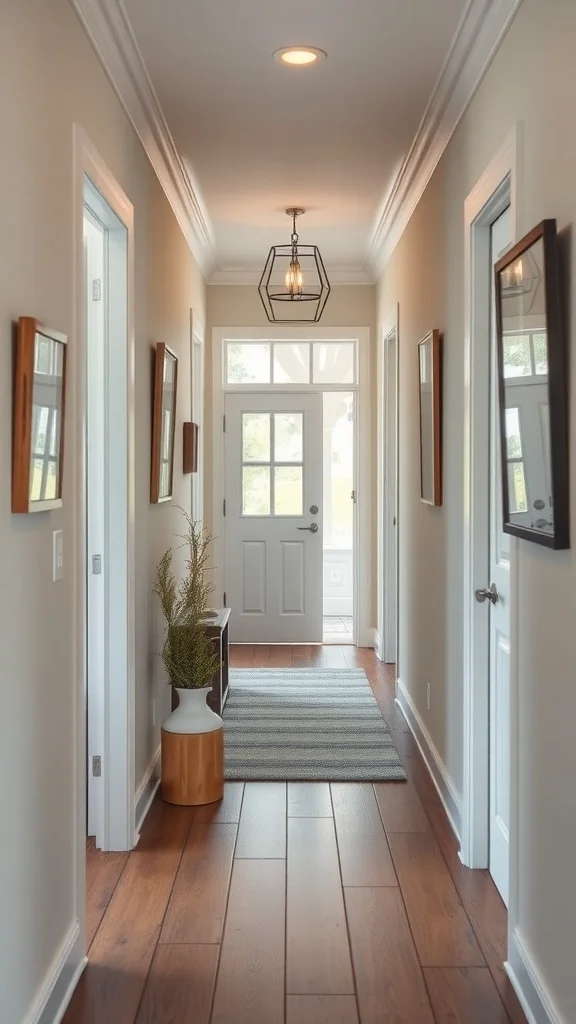
Adding Color with Paint or Wallpaper
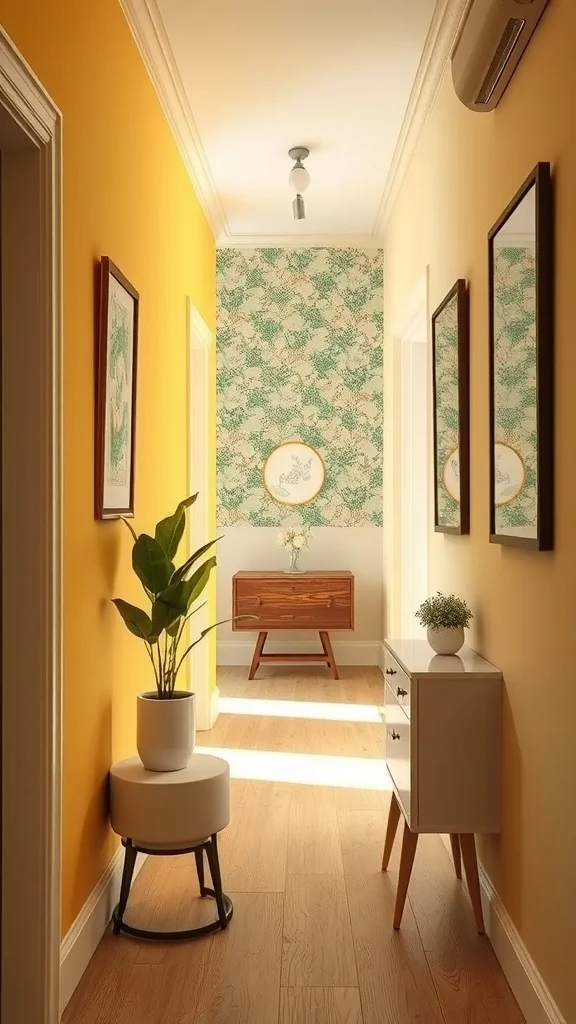
A bright yellow wall on one side instantly lifting the mood. A leafy wallpaper pattern on the other adding texture and depth. Plants and stylish furniture pulling the whole look together. The hallway goes from forgettable to the most fun part of the house.
Color turns a plain narrow space into something with real character. It welcomes people and sets the tone before they even reach the next room.
Pick one wall for a bold paint color like sunny yellow, deep teal, or warm terracotta and keep the opposite wall lighter or use a patterned wallpaper. The contrast between the two sides creates visual depth that makes the hallway feel wider. Add a small plant on a slim console or directly on the floor to bring freshness. Keep the flooring neutral so the walls stay the main event. This combination of color and pattern transforms a narrow hallway from a passageway into a design moment.
Choosing the Right Lighting Fixtures
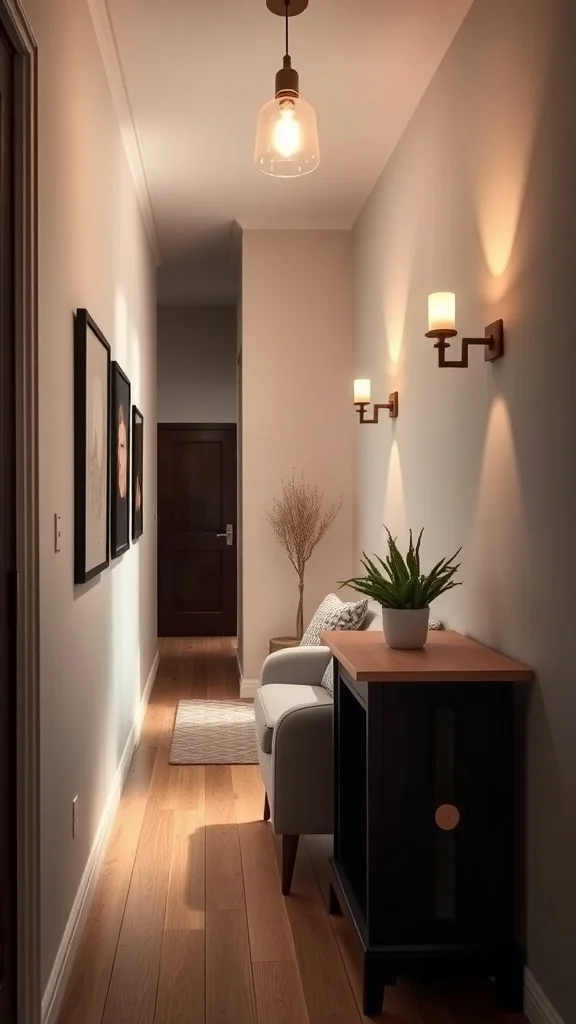
A pendant light hanging from the ceiling adding style and general glow. Wall sconces on either side providing soft focused light along the walls. The hallway feels warm and inviting rather than dark and cramped.
Good lighting changes everything in a narrow hallway. It makes the space feel wider, brighter, and more like a real room.
Hang a pendant light in the center of the hallway or at the entrance for a focal point that draws the eye upward. Add wall sconces spaced evenly along the hallway for a layered glow that lights the path without overwhelming the space. Choose warm white bulbs for a cozy atmosphere. If the ceiling is low, go with flush-mount fixtures instead of pendants. The combination of overhead and wall-level lighting creates depth and makes the narrowest hallway feel open and welcoming.
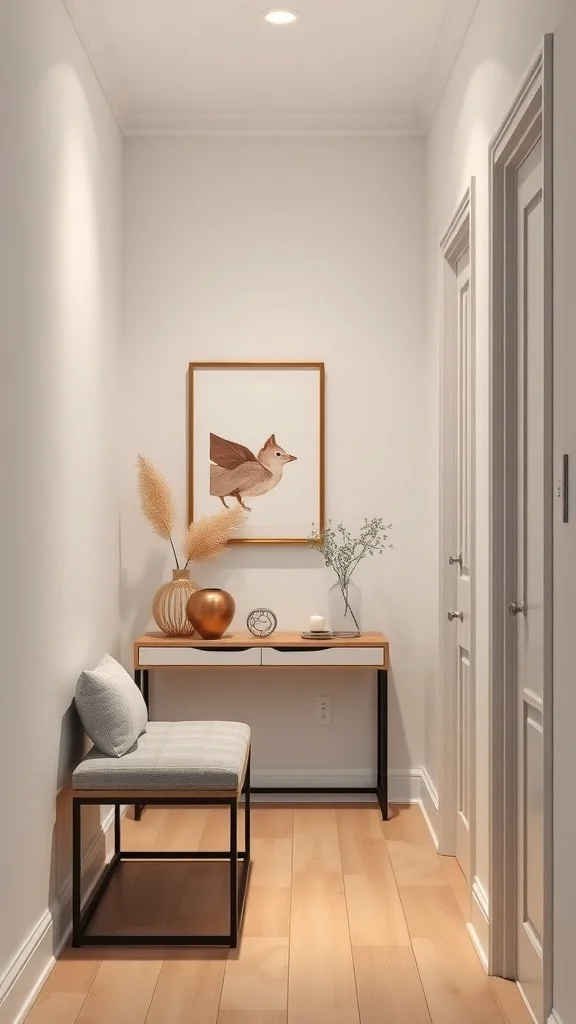
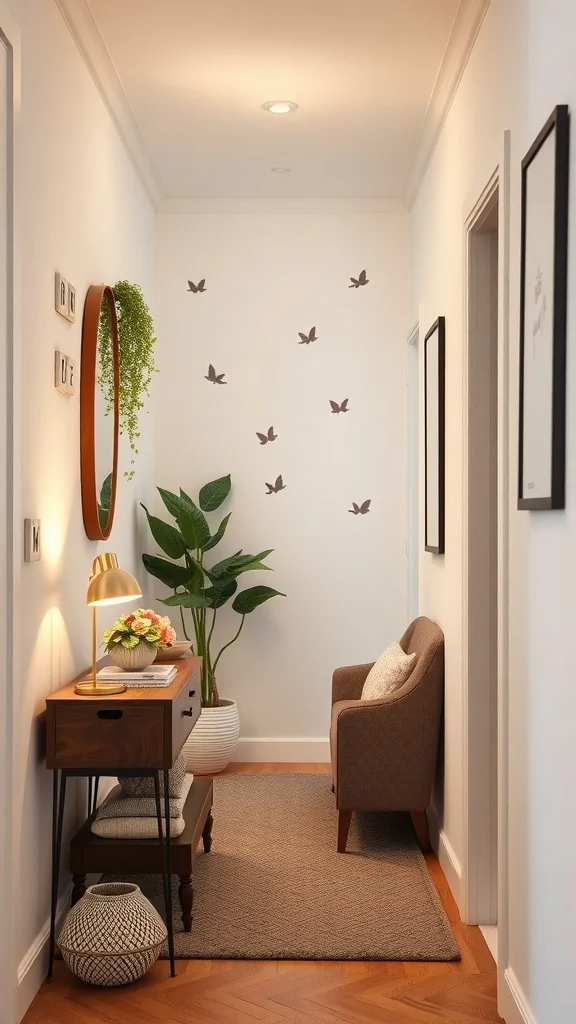
Creating a Cozy Reading Nook
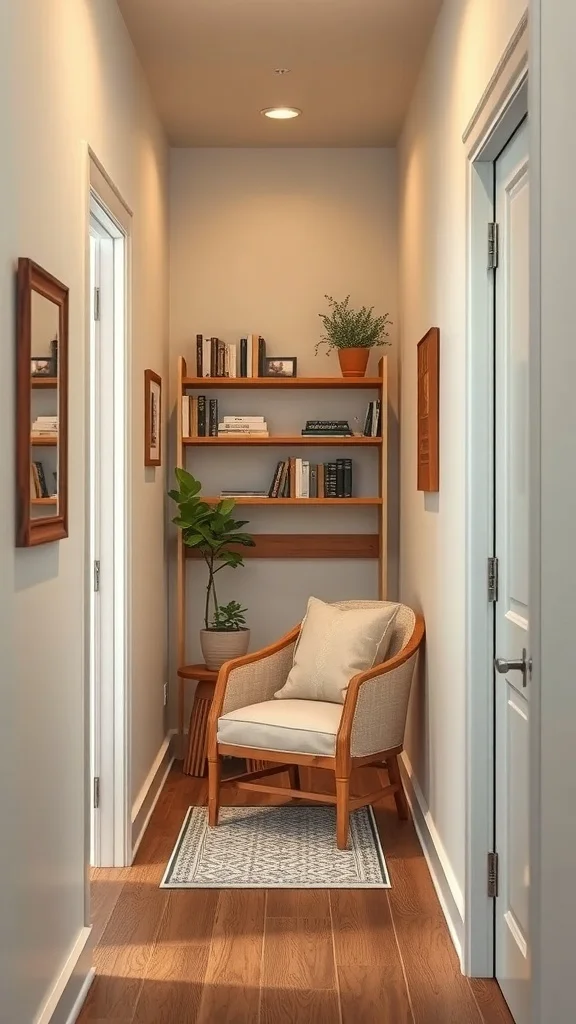
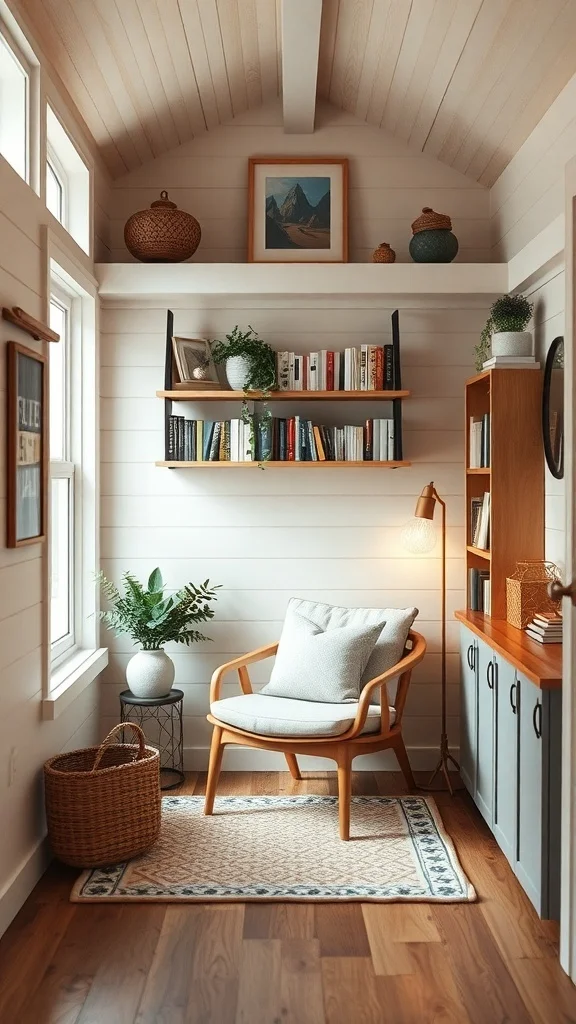
A comfortable chair tucked into the widest part of the hallway. A small shelf unit on the wall holding books within arm’s reach. A plant adding life. A soft rug underfoot defining the space. The hallway becomes a place where you actually want to sit and stay.
A reading nook in the hallway turns dead space into a destination. You walk by a hundred times a day but now you have a reason to stop.
Find the widest section of your hallway and place a compact chair or a small bench there. Mount a narrow bookshelf on the wall beside it for your current reads. Add a rug underneath to define the nook as its own little zone. Hang a light above or clip a reading light to the shelf for evening use. Keep the arrangement tight to the wall so the walkway stays clear. This unexpected nook transforms a hallway from a corridor into one of the coziest spots in your home.
Using Rugs to Define Spaces
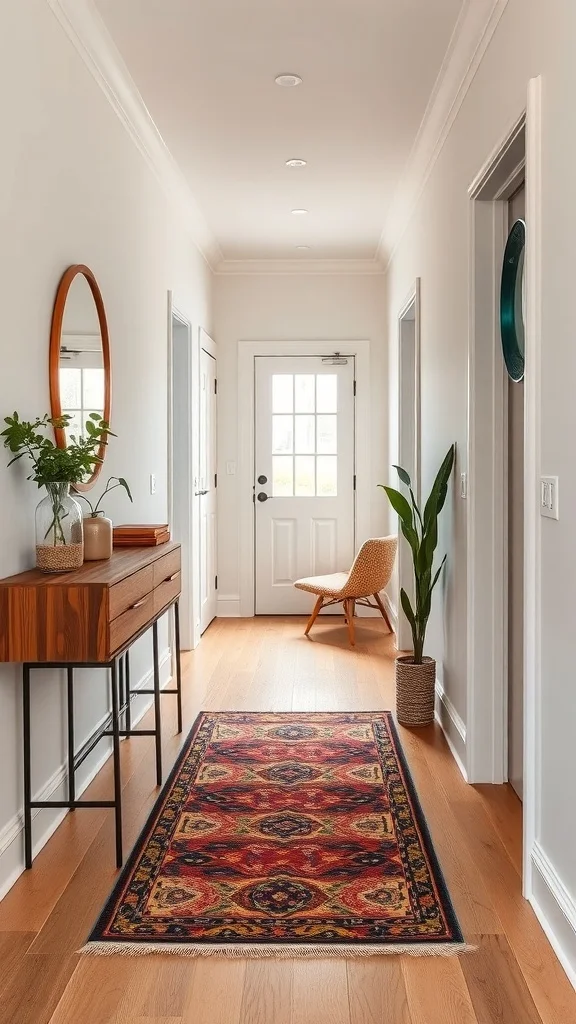
A long runner stretching the length of the hallway in rich colors and intricate patterns. It draws your eye forward and makes the space feel intentional and warm. Bare feet hit something soft instead of cold floor. The hallway feels like a room instead of just a gap between rooms.
A runner rug is one of the simplest upgrades for a narrow hallway and it makes an immediate difference in how the space looks and feels.
Choose a runner that stretches at least two-thirds of the hallway’s length. Pick a pattern or color that reflects your style and ties into the rooms on either end. Use a non-slip pad underneath for safety especially on hard floors. Leave a few inches of floor visible on each side for a clean framed look. Go with a durable low-pile material that handles foot traffic well. Vacuum it regularly to keep it fresh. This one addition gives the hallway warmth, personality, and visual direction all at once.
Utilizing Vertical Space with Shelves
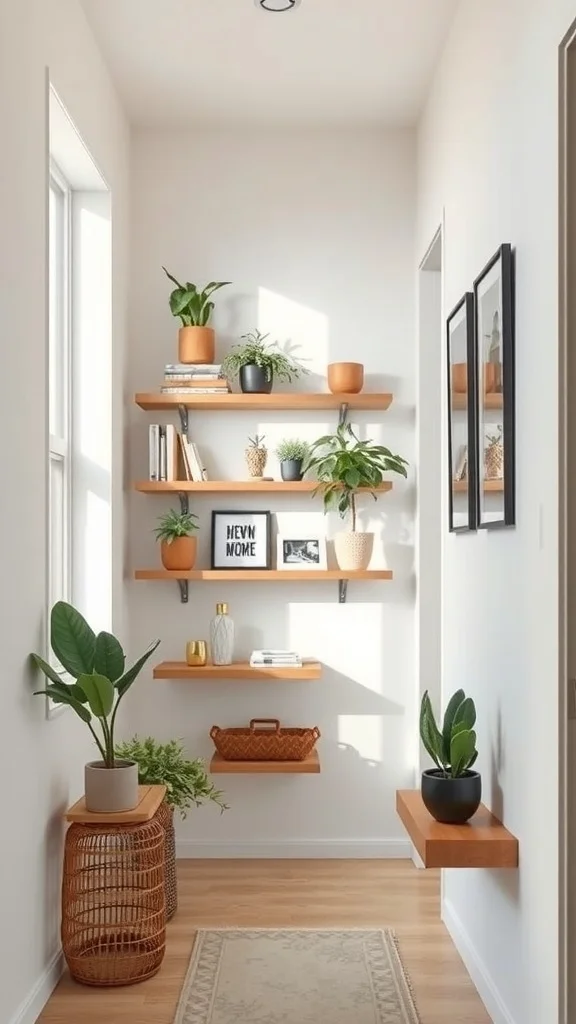
Floating shelves staggered along the hallway wall holding plants, books, and small decorative objects. The eye moves upward and the hallway feels taller. Warm wooden shelves contrasting with light walls. Nothing on the floor. All the character lives on the wall.
Vertical shelving turns a blank hallway wall into a display that adds personality and storage without taking up any walking space.
Mount floating shelves at different heights along one side of the hallway. Stagger them for a dynamic look rather than lining them up evenly. Place a mix of small plants, framed photos, books, and one or two decorative objects on each shelf. Keep the items small so the shelves do not feel heavy. Match the shelf material to your home’s existing wood tones. Leave the opposite wall clean or use it for a mirror to reflect the display. This approach makes the hallway feel like a curated gallery.
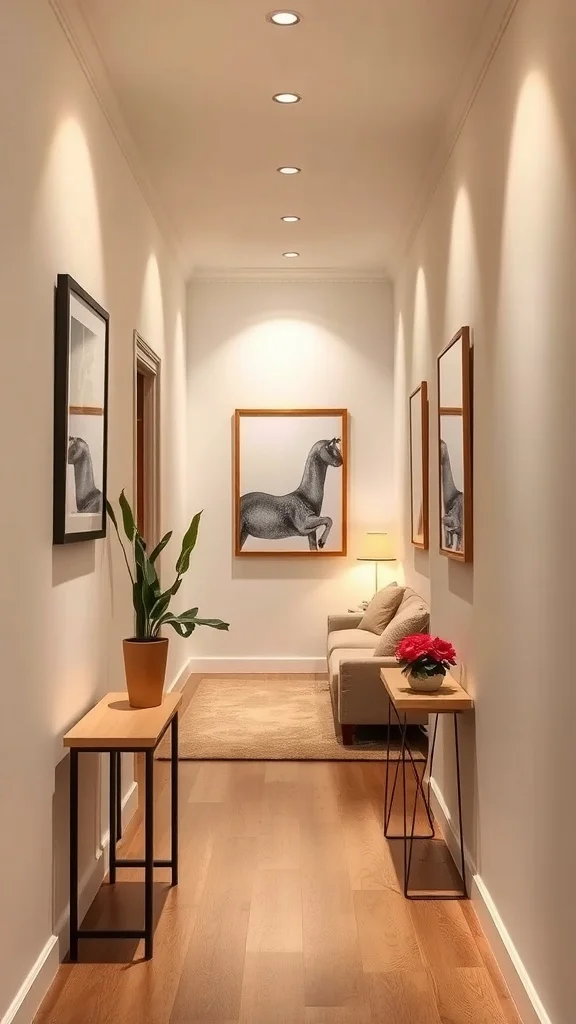
Creating a Gallery Wall
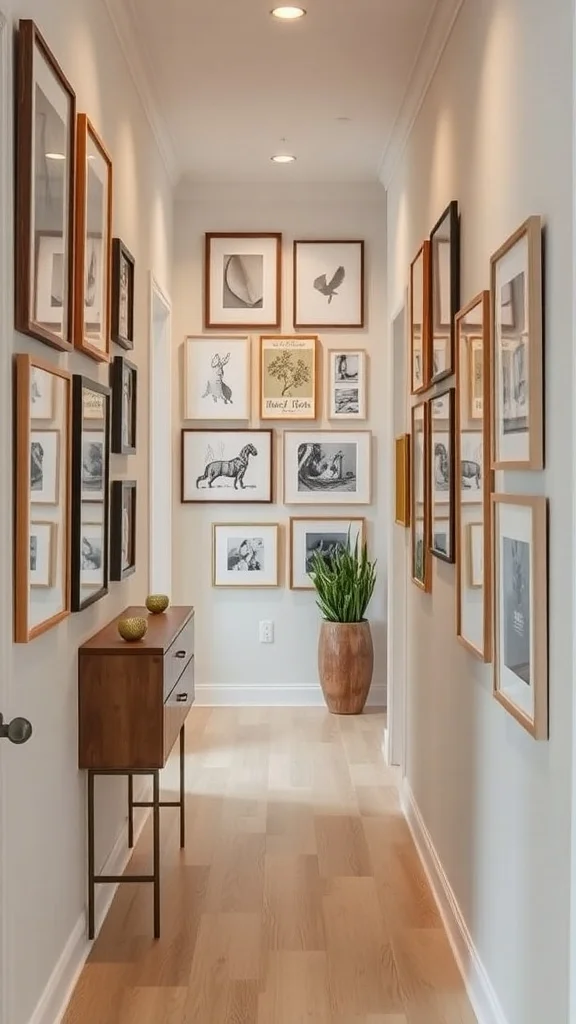
Framed art and photos arranged from one end of the hallway to the other. Different frame sizes and styles mixing together. A small console table below with a plant and a decorative piece. The hallway becomes a personal museum that tells your story.
A gallery wall turns the longest wall in your hallway into the most interesting feature in the house. Every guest slows down to look.
Collect a mix of artwork, personal photos, and prints in frames that coordinate in tone but vary in size. Lay them out on the floor first to find an arrangement you love. Hang the center of the grouping at eye level and build outward in both directions following the hallway length. Place a slim console table or a small shelf below part of the arrangement for a plant and one or two accessories. Keep the opposite wall simple so the gallery stays the star. This display makes walking down the hallway feel like a journey through your life and style.
Incorporating Functional Furniture
A slim bench against the wall. A narrow console table beside it holding a vase and a candle. Artwork above drawing the eye upward. The hallway is not just a walkway anymore. It is a styled space with places to sit and things to admire.
Functional furniture makes a hallway useful instead of just a passage. A place to sit, a surface to set things on, a spot that feels finished.
Choose a slim bench or a narrow console table that fits your hallway width with at least 30 inches of clear walking space remaining. Place it against the longest wall. Add a piece of artwork or a mirror above it. Set one or two decorative items on the surface like a plant, a candle, or a small tray for keys. If using a bench add a cushion for comfort and tuck a basket underneath for shoe storage. This functional furniture makes the hallway feel intentional and welcoming.
Incorporating Mirrors for Depth
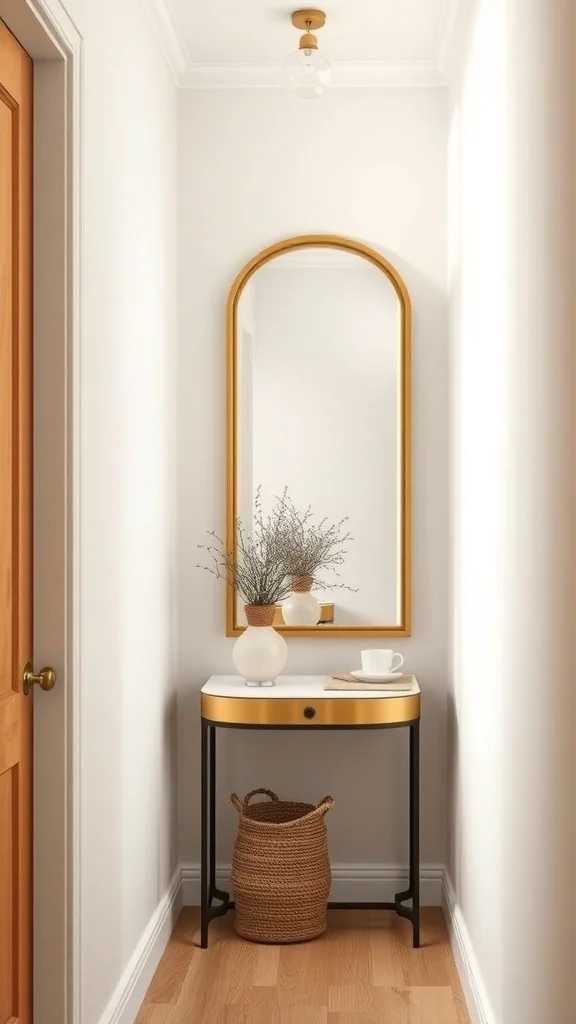
A large mirror in a warm gold frame hanging on the wall. The hallway reflected back on itself looking twice as deep. Light bouncing off the glass and brightening every corner. A small console table below with a simple decoration.
One well-placed mirror makes a narrow hallway feel like it opens into another room. It is the most dramatic transformation for the least effort.
Hang a large mirror on the wall at the end of the hallway or opposite a light source for maximum brightness. Choose a frame that complements your hallway’s style whether that is gold for warmth, black for modern contrast, or natural wood for a relaxed feel. Place a slim console table beneath it for a lamp or a small plant. If the hallway is very long consider two mirrors at different points to create a sense of rhythm and depth. This simple addition changes how the entire hallway feels.
Incorporating Plants for Freshness

Potted plants lining the hallway on shelves and the floor. Green leaves catching the light from a nearby window. The space feels alive and fresh instead of closed off and still.
Plants in a hallway bring nature into the most unexpected part of the home. They add color, clean the air, and make the space feel softer.
Place a couple of plants on floating shelves along the wall to keep the floor clear. Add one taller floor plant near the entrance or the end of the hallway where there is enough width. Choose low-light varieties like pothos, ZZ plants, or snake plants if the hallway does not get much natural light. Use pots that coordinate with your decor style. Rotate the plants toward the nearest light source occasionally to keep them healthy. Even two or three plants transform a narrow hallway into a green pathway that feels fresh and inviting.
Incorporating Artwork with LED Lighting
Framed artwork on the wall with recessed LED lights above making every piece glow. A small table at one end with a plant and flowers adding warmth. The hallway feels like a gallery with professional lighting.
LED lighting above artwork elevates a hallway from ordinary to stunning. The art becomes the focal point and the light does all the heavy lifting.
Hang two or three pieces of art along the hallway and install small recessed or picture lights above each one. Choose warm-toned LEDs so the art looks rich and inviting. Space the pieces evenly so the hallway has a rhythmic feel as you walk through it. Place a small table or shelf at one end with a plant or a vase of flowers for a finishing touch. Keep the walls light-colored so the art and the lights stay the focus. This combination turns a plain hallway into something that feels intentionally designed and gallery-worthy.
Using Colorful Accent Walls
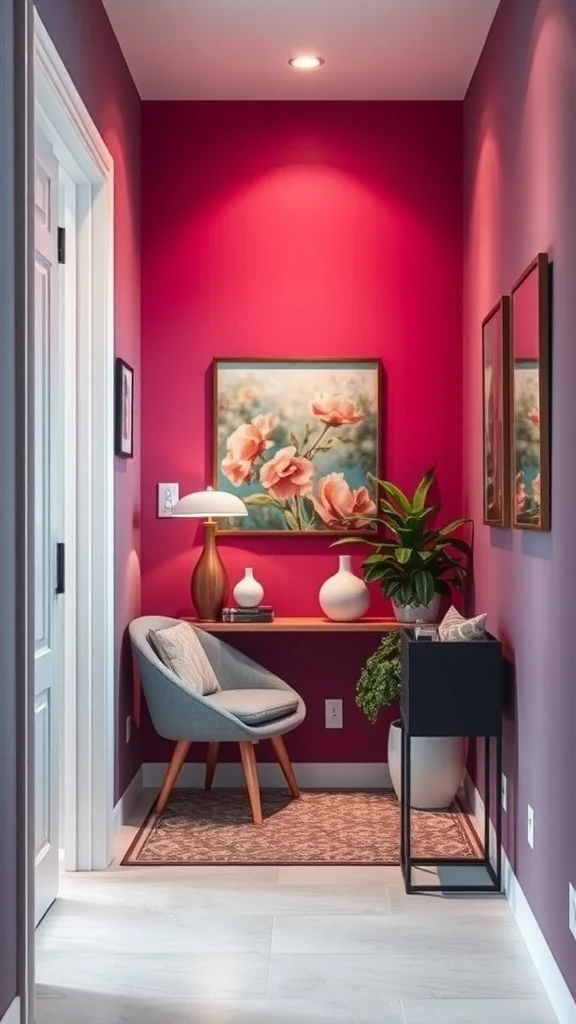
A rich warm pink wall at the end of the hallway pulling your eye forward. Soft floral artwork complementing the color. A small table with a lamp and a plant adding function and beauty. The whole hallway feels purposeful and warm.
A bold accent wall at the end of the hallway gives the space a destination. It draws you in and makes the narrow passageway feel intentional.
Paint the wall at the far end of the hallway in a bold color that resonates with your style like deep rose, forest green, or rich navy. Hang one piece of art or a mirror centered on the accent wall. Place a small table or a floating shelf in front of it with a lamp and a plant for layered decor. Keep the side walls neutral so the accent wall commands attention. This approach creates a visual anchor that makes the hallway feel shorter, warmer, and more designed.
Designing a Theme with Decor
A light airy hallway with framed pictures telling a personal story. A striped rug adding warmth and texture underfoot. A statement light fixture drawing the eye upward. A small plant tucked to the side keeping things fresh. Every element working together toward one cohesive look.
A themed hallway feels designed and deliberate. Every piece connects to the next and the space tells a story from one end to the other.
Choose a theme for your hallway whether that is coastal, modern, rustic, or classic and carry it through every detail. Pick a rug, art, and accessories that all belong to the same visual family. Hang a statement light fixture that reflects the theme. Add one or two framed pieces that support the mood. Place a small plant on a shelf or the floor for natural freshness. Keep the color palette limited so the hallway reads as one unified design rather than a collection of random items.
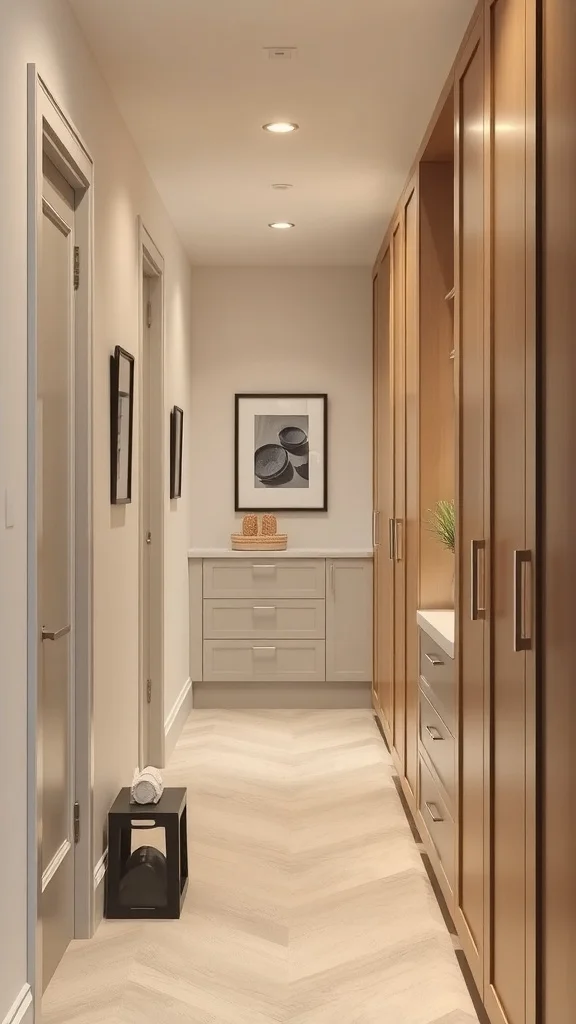
Maximizing Storage with Built-in Cabinets
Tall built-in cabinets running along one wall of the hallway. Light wood finish blending with the walls. Everything hidden behind smooth doors. A framed picture and a plant on top adding personality. The hallway stays completely clear and organized.
Built-in cabinets turn a hallway wall into a hidden storage system. Shoes, coats, bags, and household items all disappear behind clean doors.
Install built-in cabinets along the longest wall from floor to ceiling in a finish that matches or blends with the wall color. Use the lower section for shoes and bags and the upper sections for seasonal items or linens. Keep the doors smooth and handle-free for the cleanest look. Add a small decorative touch on top like a framed photo or a plant. Make sure the cabinets are shallow enough to leave at least 30 inches of walking width. This hidden storage keeps the hallway looking minimal and styled while holding everything you need behind closed doors.
Using Wall Decals for Unique Design
Charming bird decals scattered across the hallway wall adding whimsy and movement. The natural theme tying in with greenery and warm tones throughout the space. The wall feels alive without being heavy or permanent.
Decals are a commitment-free way to add personality to a hallway. Apply them today and change them whenever your style evolves.
Choose a wall decal design that matches the feel of your home whether that is birds, botanicals, geometric shapes, or something abstract. Apply them at eye level or in a flowing arrangement that moves along the hallway wall. Pair the decals with warm tones in the surrounding decor for a cohesive look. Add a small plant or a greenery element nearby to echo natural themes. Because decals are removable you can swap them out seasonally or whenever you want a fresh look. This playful approach adds interest to a hallway without committing to paint or wallpaper.
Adding Personal Touches with Family Photos
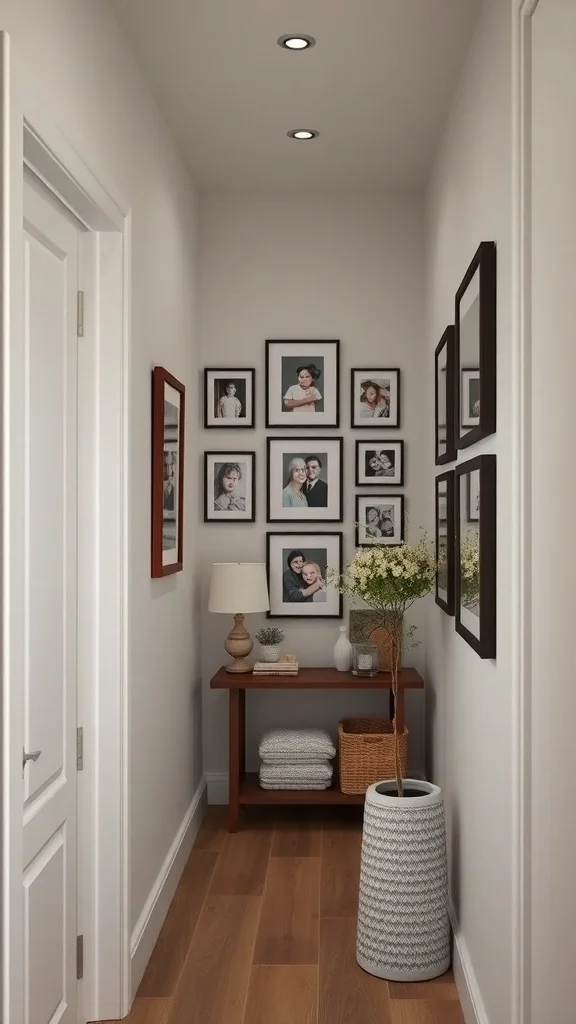
Framed family photos lining the hallway wall in a mix of frame styles. A small table with a lamp and a plant at one end. The hallway tells the story of your family with every step. It feels warm and personal and full of love.
Family photos in a hallway turn a simple walk through the house into a trip through your favorite memories.
Print your favorite family photos in a mix of sizes and frame them in coordinating styles. Hang them along one wall at a consistent center height so the display feels organized even with varied frame sizes. Mix candid moments with posed shots for a natural feel. Place a small table or a shelf at one end of the display with a lamp and a plant to anchor the arrangement. Leave the opposite wall clean to keep the hallway from feeling narrow. This personal gallery gives the hallway heart and makes it the most meaningful wall in the house.
Creating a Functional Mudroom Area
A bench with a cushion right inside the door. Hooks on the wall for bags and jackets. Storage boxes on a shelf for smaller items. A pendant light making the area bright. A plant adding freshness. Everything you need right when you walk in.
A mudroom zone in your hallway keeps the chaos of daily coming and going contained. Shoes stay off the floor and coats stop piling on chairs.
Place a slim bench near the entrance with a cushion for sitting and a couple of baskets underneath for shoes. Mount three to five hooks on the wall above for jackets, bags, and scarves. Add a small shelf above the hooks for storage boxes or decorative items. Hang a pendant light or install a wall sconce to keep the area well-lit. Place a small mat on the floor for dirty shoes. This functional setup keeps the hallway organized and makes the entrance to your home feel styled and welcoming.
Designing a Minimalist Aesthetic
Clean white walls. A small bench and a couple of slim side tables. Mirrors reflecting light. One tall plant in a woven pot. Everything reduced to the essentials and nothing more. The hallway feels calm, open, and effortlessly styled.
Minimalism in a narrow hallway is powerful. When you take away the clutter the architecture and the light become the design.
Keep the walls white or very light. Choose one or two slim furniture pieces with clean lines. Place a mirror on the wall to reflect light and add depth. Add a single tall plant for life and one small decorative item on a surface. Leave the floor as clear as possible. Avoid hanging too many things on the walls. Let the open space breathe. This pared-back approach makes a narrow hallway feel wider, calmer, and beautifully intentional.
Adding a Touch of Luxury with Textiles
Soft curtains framing a window at the end of the hallway. A plush rug running the length of the floor with a subtle pattern that draws you forward. A small chair for pausing. A plant beside it. The hallway feels like a high-end hotel corridor.
Textiles add softness and luxury to what is usually the hardest, coldest part of the house. They change everything about how the hallway feels underfoot and around you.
Add a quality runner rug in a soft material with a pattern that complements your decor. Hang sheer or linen curtains if there is a window at the end of the hallway for a flowing elegant touch. Place a small upholstered chair or a bench with a cushion if the width allows for a luxurious pause point. Add a plant beside the seating for freshness. Choose warm neutral tones for the textiles so the hallway feels sophisticated and serene. These textile layers turn a hard narrow space into something undeniably inviting.
Creating a Seasonal Display
A fall wreath on the wall in warm autumn tones. A small table below with dried branches, candles, and seasonal accents. Scattered leaves on the floor adding a playful finishing touch. The hallway celebrates the season and feels alive with change.
Seasonal displays in a hallway keep the space feeling fresh all year. A few swaps every few months and the whole house feels different.
Hang a seasonal wreath on the hallway wall or the front of a door visible from the hallway. Place a small table or a floating shelf below it and style it with seasonal items like candles and branches in fall, fresh flowers in spring, seashells in summer, or pinecones in winter. Keep the display compact so it does not block the walkway. Swap the items every season for a new look. Store off-season decor in a small box and rotate with just a few minutes of effort. This simple seasonal touch makes the hallway feel alive and connected to the time of year.
Incorporating Vintage Finds
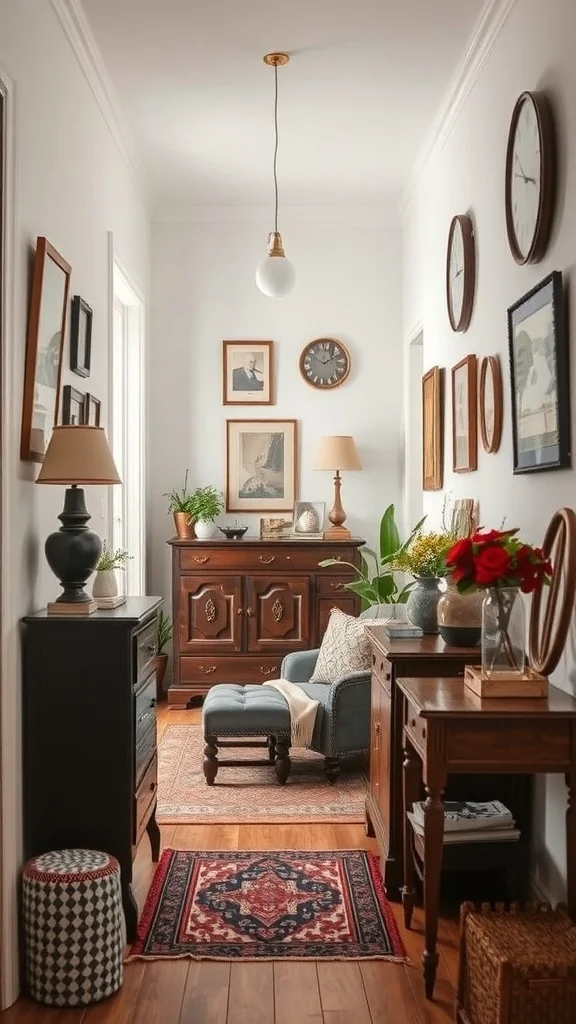
Dark wooden cabinets and small side tables with history. Framed artwork in classic styles lining the walls. A patterned vintage rug on the floor adding warmth. Fresh flowers bringing life. A simple pendant light tying the old and new together.
Vintage pieces in a hallway give the space a collected-over-time feel that new furniture cannot replicate. Every piece tells a story and the hallway becomes rich with character.
Search thrift stores, flea markets, and estate sales for a slim console table, a wooden cabinet, or a unique mirror with character. Place your best find against the hallway wall and style it with a plant, a candle, or a framed photo. Add a vintage rug on the floor for warmth and texture. Hang one or two pieces of classic art or old photographs on the wall above. Mix the vintage items with one modern element like a sleek light fixture to keep the look balanced and fresh. This blend of old and new makes a narrow hallway feel like the most interesting corridor in the house.
by Clara Scott | Feb 21, 2026 | Uncategorized
A tiny guest bedroom can still feel like a real retreat for the people you love. Smart furniture choices, thoughtful storage, and a few cozy details turn even the smallest room into a space where guests feel genuinely welcome. You do not need a big room to make a big impression. Here are some ideas to help you create a guest bedroom that is both beautiful and functional.
Multipurpose Furniture for Small Rooms
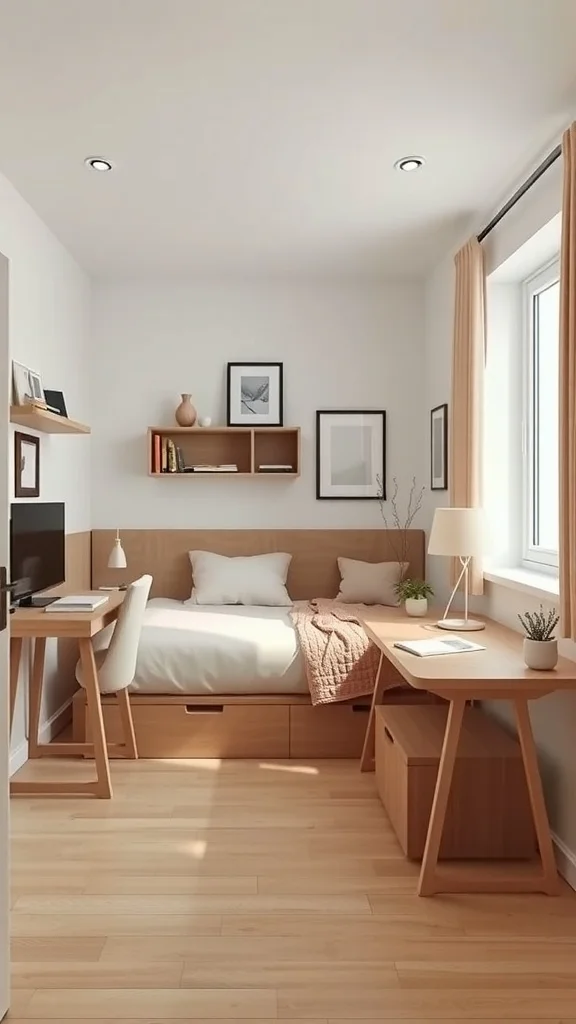
A bed with built-in storage drawers underneath. A compact desk on one side doubling as a workspace. Floating shelves above holding books and personal items. Light wood tones keeping the whole room feeling warm and open.
Every piece pulls double duty. Nothing just takes up space. The room stays uncluttered and the guest has everything they need within arm’s reach.
Choose a bed frame with drawers or a lift-up base for hidden storage underneath. Place a slim desk against one wall that works as both a vanity and a workspace. Mount two or three floating shelves above the bed for books, a small plant, and a decorative piece. Keep the color palette light and the furniture in matching tones so everything reads as one cohesive design. This multi-purpose approach gives the room full functionality without ever feeling crowded.
Utilizing Nooks and Crannies for Storage
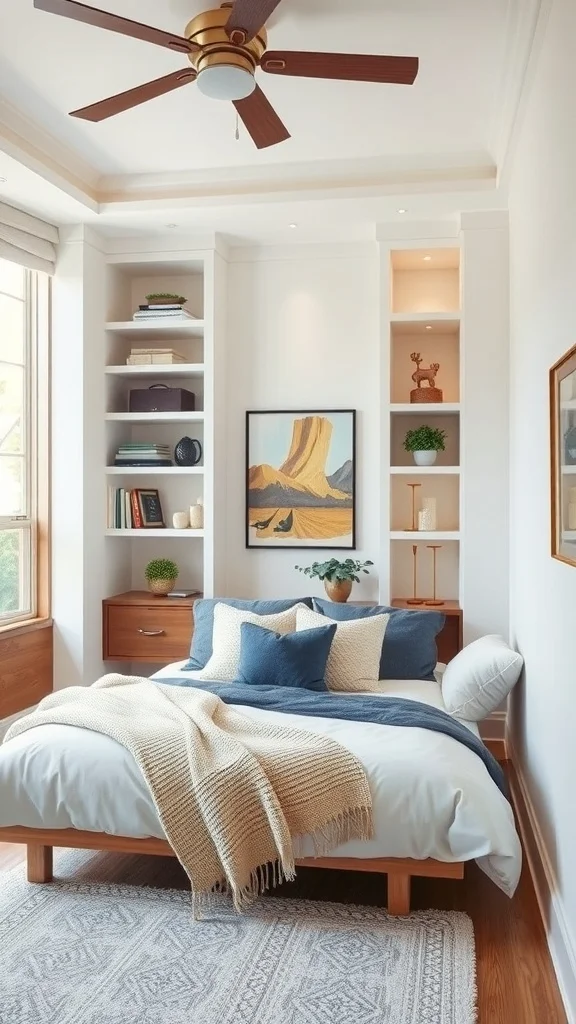
Built-in shelves beside the bed tucked into what would normally be wasted wall space. Drawers under the nightstand holding linens and extras. A simple shelf above the bed displaying a plant and a piece of art. Every nook doing something useful.
Small rooms have more hidden storage potential than you think. It is all about seeing the gaps and filling them with purpose.
Look at the areas beside, above, and behind the bed for unused space that could hold a shelf or a small cubby. Install narrow floating shelves in any gap wider than six inches. Use nightstands with at least one drawer for guest essentials like a phone charger, a notepad, and earplugs. Add a shelf above the headboard for decorative items that add charm without using floor space. These small storage solutions add up and keep the room feeling tidy and welcoming.
Incorporating Mirrors to Create Illusion of Space
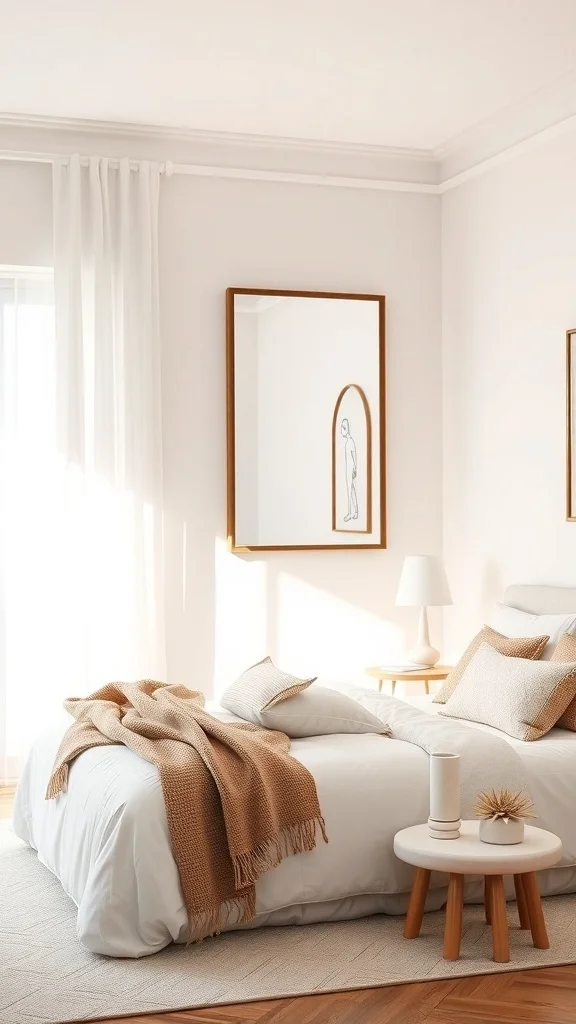
A mirror above the bed reflecting light back into the room. The walls seem to push outward. The space feels brighter and deeper than it actually is. A simple frame keeping the look clean and modern.
One well-placed mirror changes how the whole room feels. It is the oldest small-room trick and it still works every time.
Hang a mirror on the wall opposite the window or the main light source so it reflects maximum brightness into the room. Choose a size that fills the space without overwhelming it. A simple frame in white, wood, or thin metal keeps the look light. If the room has no window nearby, place the mirror above the headboard to add depth to the wall behind the bed. This single addition makes the guest bedroom feel significantly more open and airy.
Creative Bed Placement for Optimal Flow
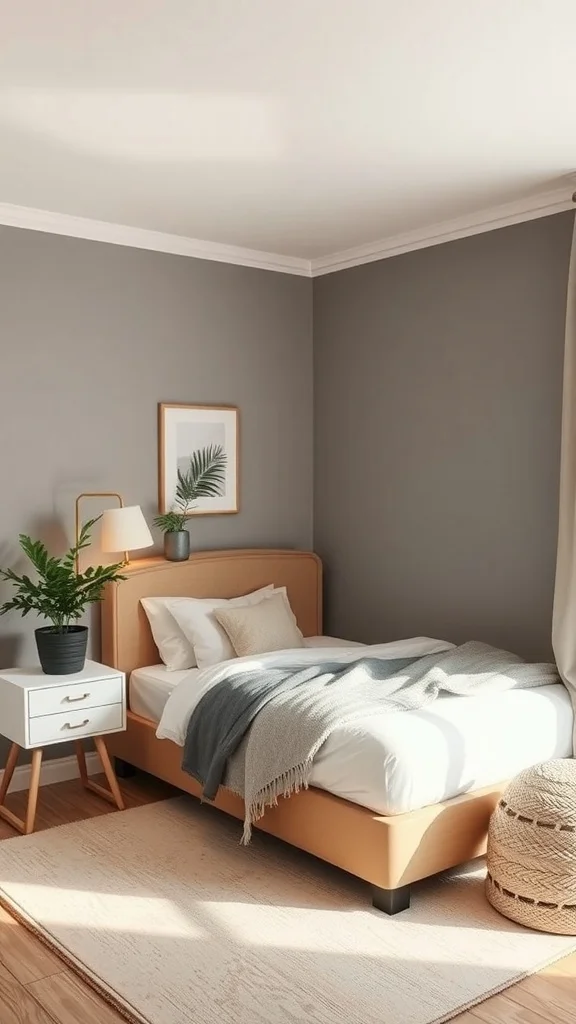
The bed pushed against the longest wall leaving the center of the room open. A nightstand placed right beside it for convenience. A rug under the bed anchoring the space. A plant and artwork adding personality without blocking the walkway.
How you place the bed determines how the whole room flows. The right position opens up space you did not know you had.
Push the bed against the longest wall so the main walking path from the door stays clear. Place a nightstand on the side that is easiest to reach from the bed. Leave at least 24 inches of clearance between the bed and the opposite wall or furniture for comfortable movement. Add a rug that extends slightly beyond the bed frame to define the sleeping zone. Keep the wall at the foot of the bed open or use it for a slim dresser. This placement keeps the room feeling spacious and easy to navigate.
Using Light Colors for a Bright Atmosphere
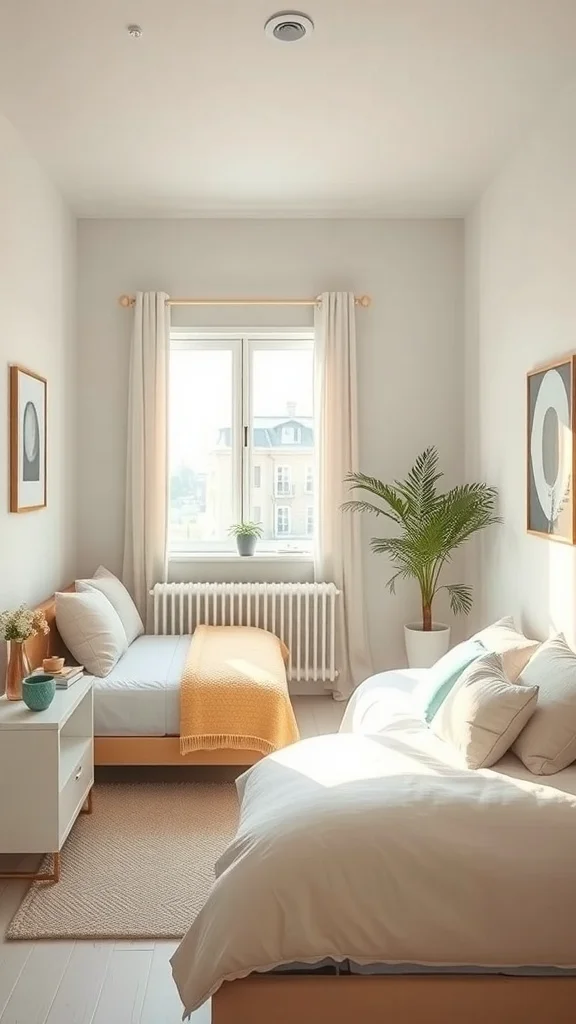
Soft whites and light pastels on the walls and bedding. Light wood furniture blending into the background. Natural light flooding through large windows. A potted plant adding the softest touch of green. The whole room glows.
Light colors open a small room up like nothing else. The walls seem to disappear and the space feels calm and endlessly inviting.
Paint the walls in a soft white, warm cream, or the palest shade of your favorite pastel. Choose bedding in white or light neutrals and add a gentle accent through a throw or a cushion. Use light-toned wood furniture that blends with the walls instead of contrasting heavily. Keep window treatments minimal or sheer so natural light fills every corner. Add one or two small plants for a fresh touch of color. This light palette makes even the tiniest guest room feel bright, open, and restful.
Maximizing Vertical Space with Shelving
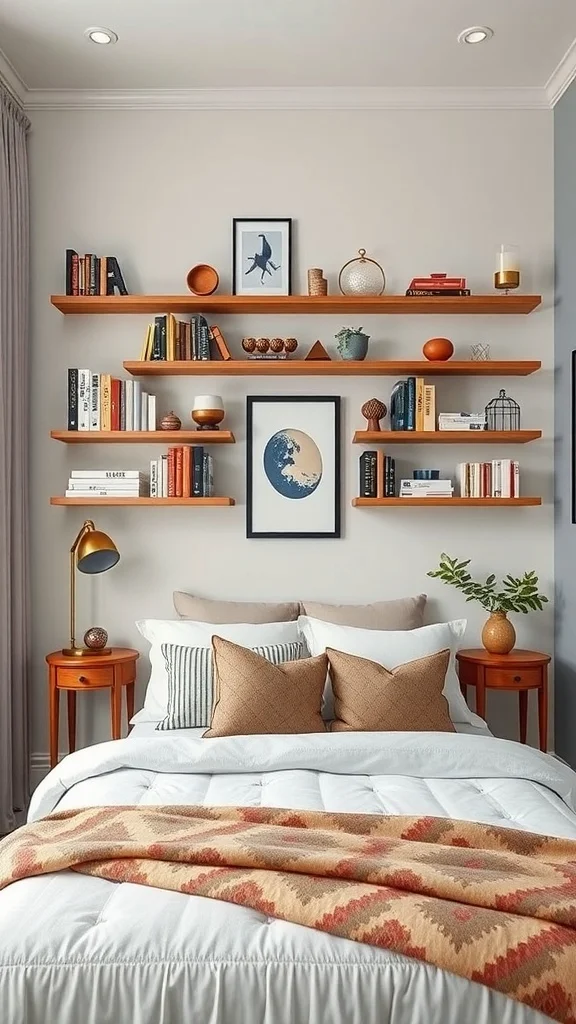
Shelves climbing the wall above the bed and desk filled with books, plants, and small decorative objects. The eye travels upward and the room feels taller. The floor stays completely clear for moving around.
When the floor is full the walls become your storage. Vertical shelving gives you space you never knew you had.
Install floating shelves at different heights above the bed, beside the door, or above a desk. Mix books with small plants and one or two personal objects for a styled look. Keep the shelves matching the wall color so they blend in seamlessly. Avoid overloading them so each shelf feels curated rather than cluttered. Use the highest shelf for decorative items and the lower ones for things guests might need like books or a small clock. This vertical approach keeps the guest room organized and visually interesting.
Under-Bed Storage Solutions
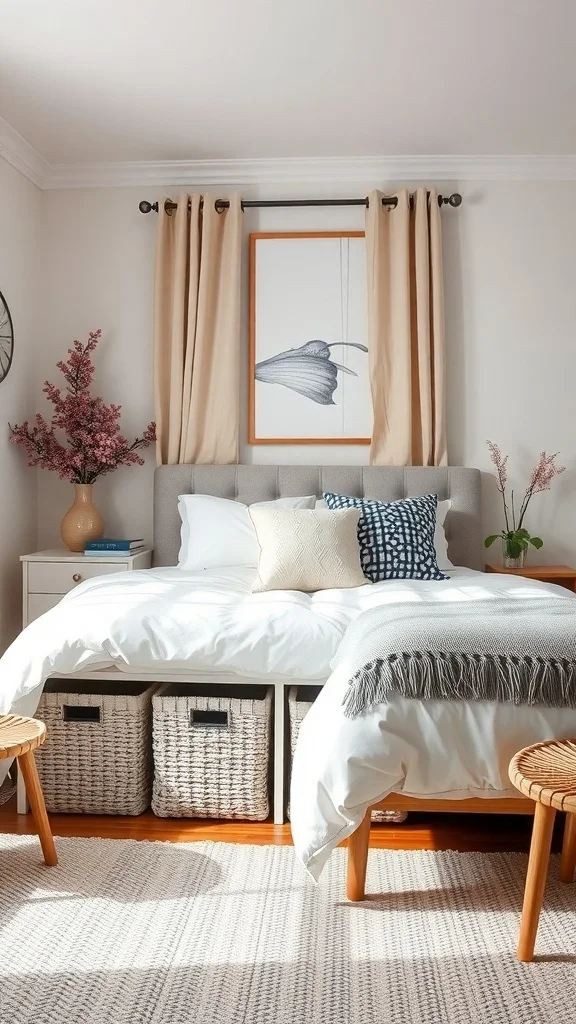
Woven baskets tucked neatly under the bed. Extra linens, seasonal blankets, and spare pillows all hidden but accessible. The room looks clean and the bed frame becomes a storage system.
The space under the bed is free storage just waiting to be used. Pretty baskets or rolling drawers turn it into something functional and good-looking at the same time.
Choose a bed frame with enough clearance for baskets or rolling bins underneath. Use matching woven baskets for a styled look that adds texture to the room. Assign each basket a purpose like extra blankets in one and spare toiletries in another. For a cleaner look choose slim rolling drawers that slide in and out easily. Keep the containers slightly smaller than the bed frame so they stay hidden from view. This under-bed storage keeps the room guest-ready without taking up a single inch of visible floor space.
Choosing the Right Window Treatments
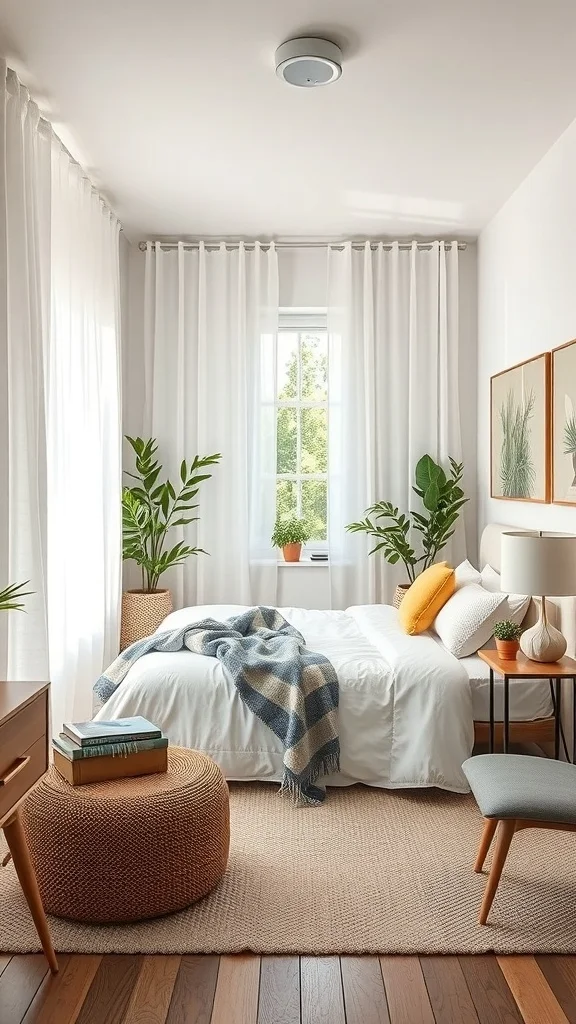
Sheer curtains filtering soft light into the room. Hung high above the window frame making the ceiling feel taller. The fabric is light and gentle and the room feels open and private at the same time.
The right window treatment controls light and mood without eating up space. In a tiny guest room that balance is everything.
Hang curtain rods as close to the ceiling as possible and extend them a few inches beyond the window frame for a wider look. Choose sheer or lightweight linen curtains that let natural light through during the day. For guest comfort layer a blackout roller blind behind the sheers so they can darken the room for sleeping. Keep the fabric in a neutral light tone that matches the walls. Let the curtains brush the floor for an elegant look. This layered approach gives guests full control over their light and privacy.
Creative Lighting Solutions for Ambiance
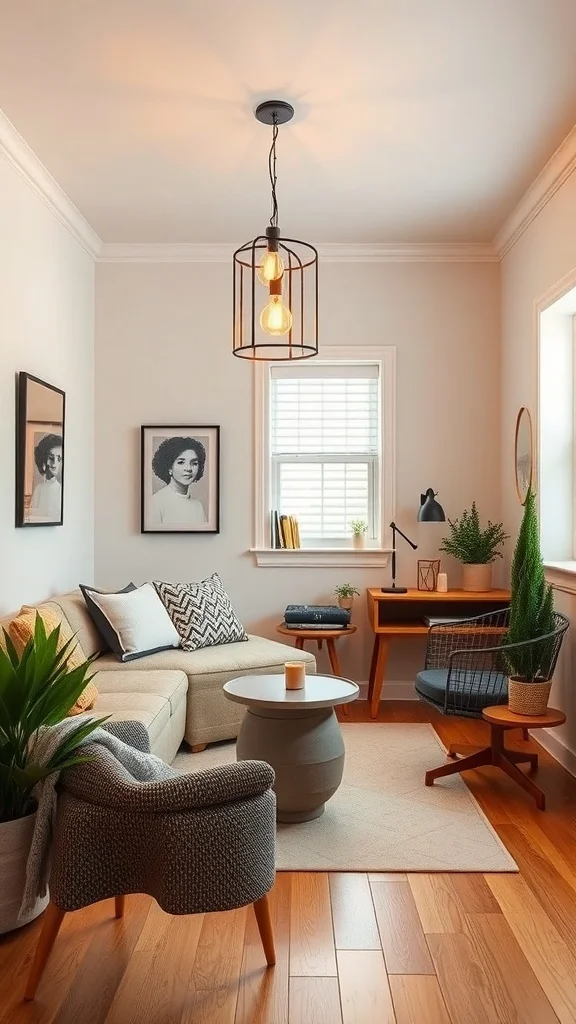
A stylish pendant light hanging from the ceiling casting a warm glow. A desk lamp in the corner providing focused light for reading or working. Natural light from the window brightening everything during the day. A plant in the room catching the light and adding freshness.
Layered lighting makes a small guest room feel warm and thoughtful. It says you cared about the details and it makes the space so much more inviting.
Hang a pendant light or install a flush-mount fixture for main overhead light. Add a bedside lamp or a wall-mounted reading light so guests can read without turning on the room light. Place a small desk lamp if there is a work area. Use warm white bulbs in every fixture for a consistent cozy glow. If possible add a dimmer to the main light so guests can adjust the brightness to their comfort. This combination of light sources at different levels gives the room depth and makes it feel like a real retreat.
Incorporating a Foldable Desk
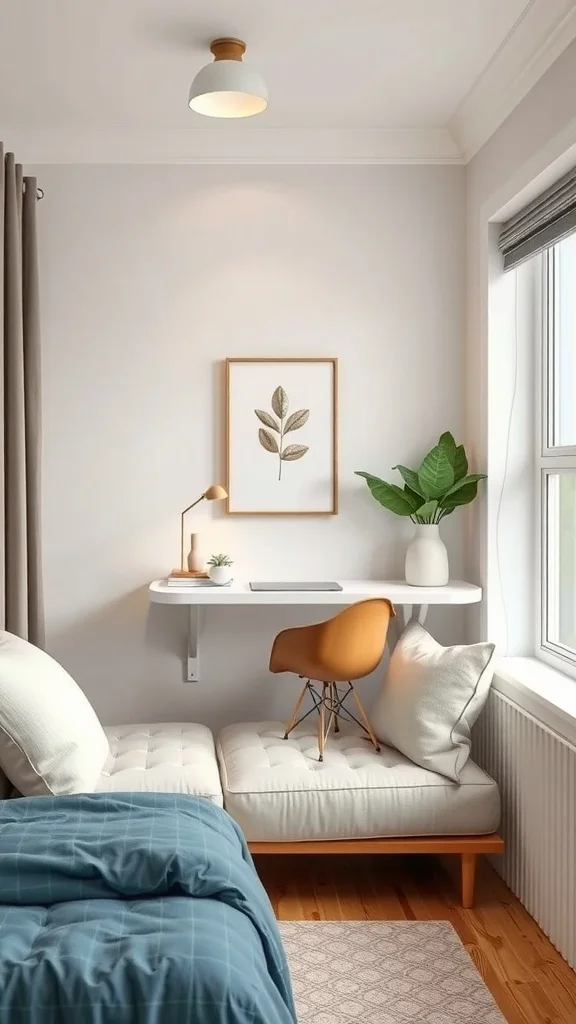
A wall-mounted desk that folds flat when not in use. A stylish chair beside it. Soft lighting and a small plant making the corner feel warm. When it is open it is a workspace. When it is closed the room feels completely open.
A foldable desk gives guests a place to work without permanently taking up floor space. It appears when they need it and disappears when they do not.
Mount a fold-down desk on the wall near a window or the best light source. Choose one in a finish that matches the room’s other furniture. Pair it with a slim chair that can tuck under or beside the bed when not needed. Add a small wall shelf above the desk for a lamp and a plant. When guests are not using it fold it up and the room returns to its open layout. This flexible feature makes the guest room feel thoughtful and adaptable to whatever your guests need.
Personalized Decor to Make Guests Feel Welcome
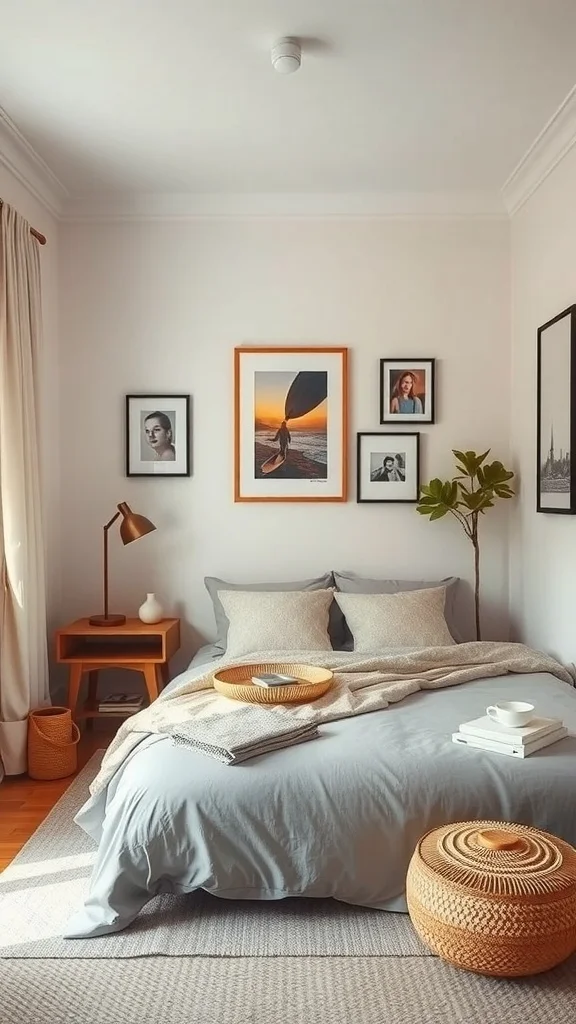
Soft gray bedding that feels luxurious. Framed photos on the wall that tell a story. A small plant bringing life to the nightstand. A stylish basket holding extra blankets and magazines. Every detail says welcome.
Personal touches are what separate a guest room from just a room with a bed. They make your visitors feel seen and cared for.
Hang two or three framed photos or prints that reflect your home’s personality. Place a small plant on the nightstand for freshness. Add a basket at the foot of the bed or beside it filled with an extra blanket, a magazine, and a small bottle of water. Set out a candle or a diffuser for a pleasant scent. Put a handwritten note on the pillow if you really want to go the extra mile. These little details cost almost nothing but make the guest experience feel genuinely special.
Layering Textiles for Comfort
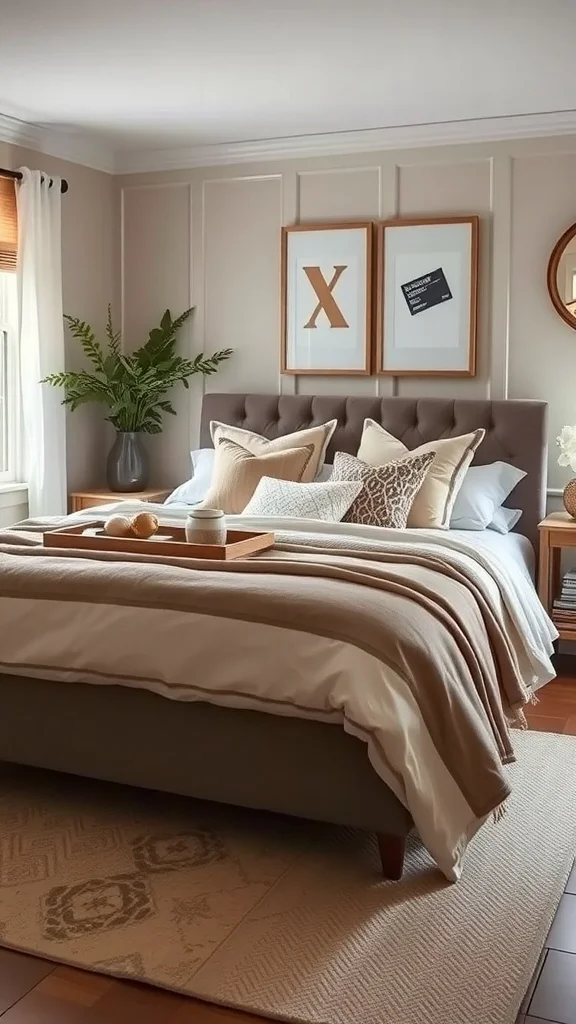
A plush duvet as the base. A textured throw blanket folded at the foot. Decorative pillows stacked against the headboard. Mixed fabrics like cotton and wool creating depth and warmth. A small tray on the bed with a candle and a decorative item finishing the look.
Layered textiles make a guest bed look and feel like a luxury hotel. It is the fastest way to make someone want to climb in and stay.
Start with high-quality sheets in a soft neutral tone. Add a fluffy duvet or comforter as the main layer. Fold a contrasting throw blanket at the foot of the bed for texture and extra warmth. Stack two or three decorative pillows in front of the sleeping pillows in complementary fabrics and colors. Place a small tray with a candle or a decorative object on the corner of the bed for a styled finish. Choose washable fabrics so everything stays fresh between guests. This layered approach turns a simple bed into the most inviting feature in the room.
Incorporating a Murphy Bed
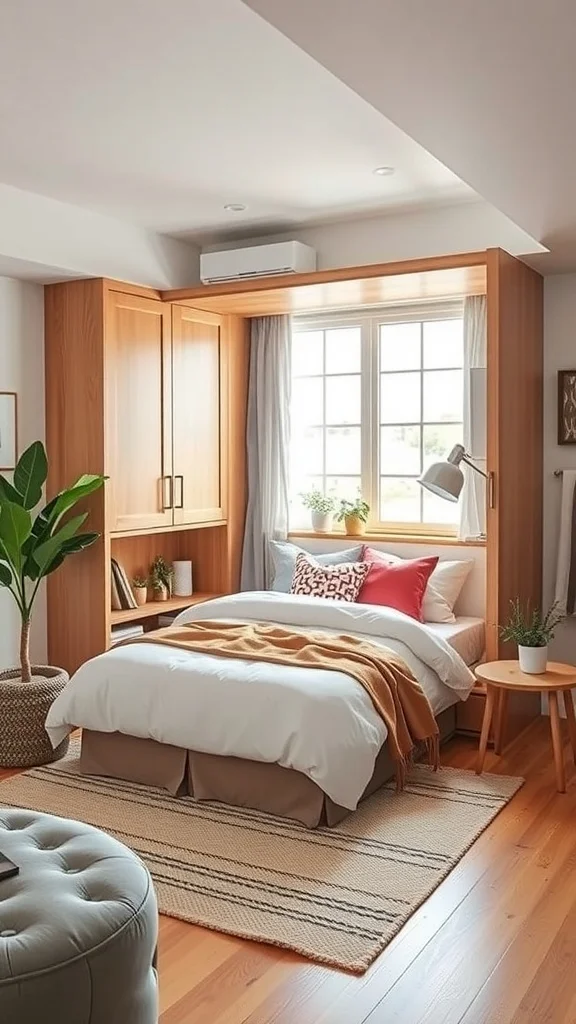
A bed that folds up into a stylish wooden cabinet when not in use. The room transforms from bedroom to open living space in seconds. When the bed is down it looks comfortable and inviting. When it is up the room is completely free.
A Murphy bed is the ultimate space-saving solution. Your guest room doubles as a home office, a studio, or whatever you need it to be during the day.
Choose a Murphy bed system that matches your room’s decor in a wood tone or painted finish that blends with the walls. Add decorative pillows and a throw that stay on the bed when it folds down so it is instantly cozy. Use the wall space around the cabinet for slim shelving or artwork. When the bed is up use the open floor for a desk, a yoga mat, or just breathing room. Make sure the mechanism is smooth and easy for guests to operate. A Murphy bed gives you a fully functional guest bedroom that takes up zero space when it is not in use.
Using Floating Nightstands
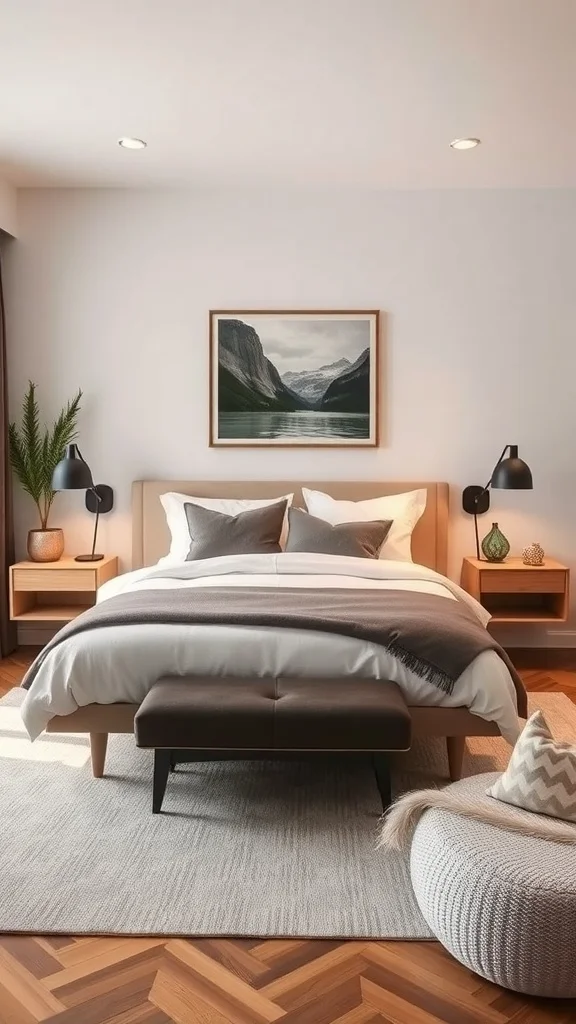
A slim shelf mounted on the wall beside the bed holding a lamp and a small plant. No legs touching the floor. The space underneath stays open and the room feels lighter. Warm wood tones matching the bed frame for a seamless look.
Floating nightstands give guests a surface for their essentials without adding any visual weight to the room. They look modern and clean and they save precious floor space.
Mount a small floating shelf or a wall-mounted nightstand on each side of the bed at mattress height. Choose a finish that matches or complements your bed frame. Keep the surface simple with just a lamp, a small plant, and enough room for a phone and a glass of water. If the shelf has a small drawer even better for holding a charger and earplugs. The open space below the nightstand makes vacuuming easy and the room feel bigger. Floating nightstands are one of the smartest upgrades for any tiny guest bedroom.
Accent Walls to Add Personality
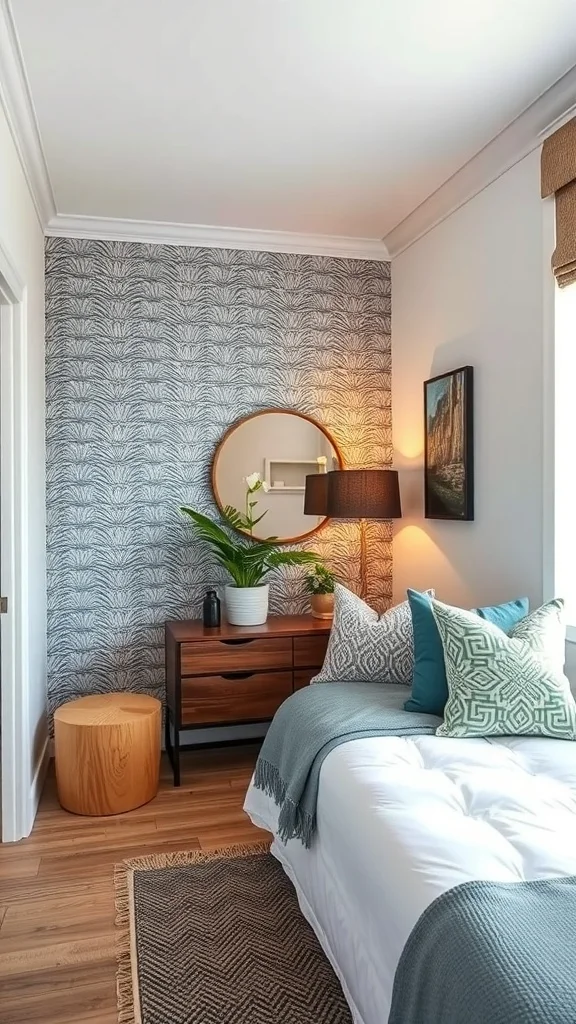
A bold patterned wallpaper on the wall behind the bed. Leafy designs in soft greens and blues creating a fresh natural vibe. Simple furniture and neutral bedding letting the wall be the star. Cushions and a throw picking up the wall’s colors for a tied-together look.
One accent wall gives the room instant personality without overwhelming a small space. It is the design statement that makes guests feel like they are staying somewhere special.
Choose one wall, usually the one behind the headboard, and apply a bold wallpaper or a rich paint color. Pick a pattern or shade that complements the bedding and furniture. Keep the other three walls neutral so the accent wall stands out. Echo one or two of the wall’s colors in cushions, a throw, or a small accessory. Use simple furniture and minimal decor on the other walls to keep the room balanced. This single accent wall transforms the guest bedroom from plain to unforgettable.
Using Area Rugs to Define Spaces
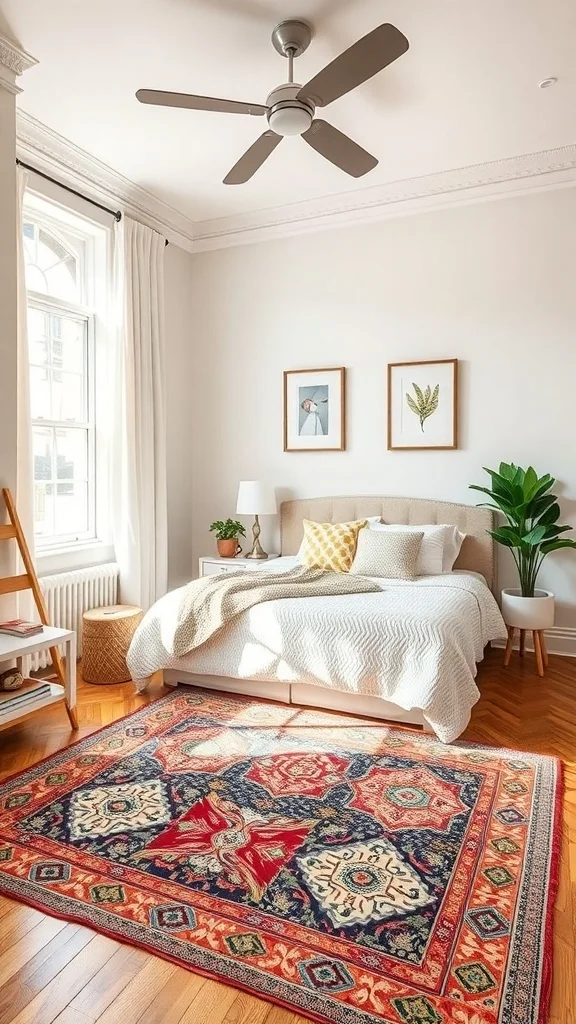
A colorful patterned rug placed under and around the bed. Vibrant tones contrasting with light walls and bedding. The bed area instantly feels defined and warm. Bare feet hitting something soft first thing in the morning.
A rug anchors the bed and gives the room warmth and personality. It makes the guest bedroom feel finished and thoughtfully designed.
Choose a rug large enough to extend at least 18 inches beyond each side of the bed so guests step onto softness when they get up. Pick a pattern or color that adds energy to the room without clashing with the bedding. Place the rug centered under the bed with equal amounts visible on all accessible sides. Use a non-slip pad underneath for safety on hard floors. A well-chosen rug adds texture, color, and comfort to the room and makes the sleeping area feel like its own cozy zone.
Creating a Cozy Reading Nook
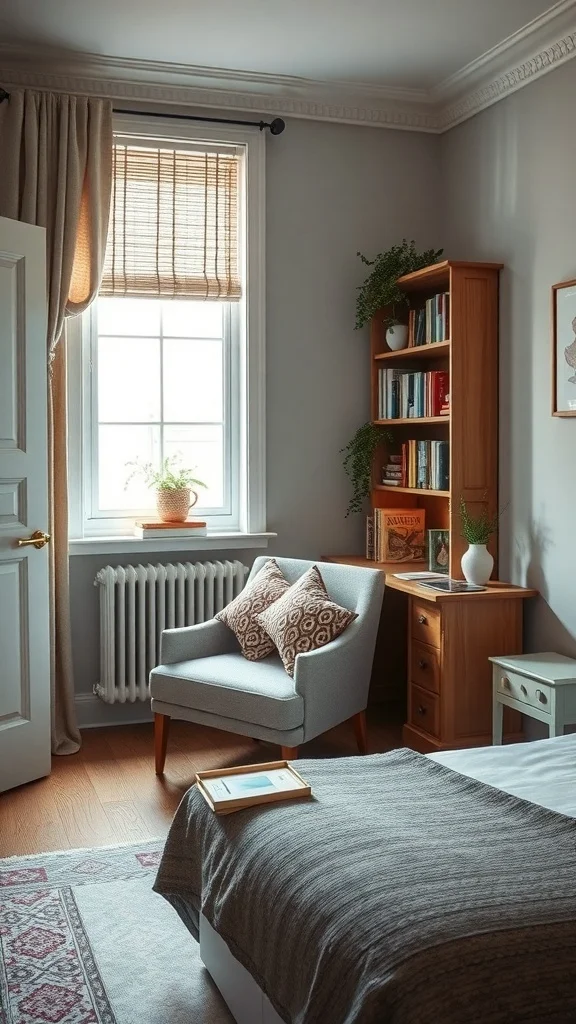
A light gray armchair in the corner by the window. A couple of decorative pillows making it extra comfortable. A wooden bookshelf beside it loaded with reads. A small plant on the windowsill and a blanket on the bed nearby. Natural light making the whole corner glow.
A reading nook in the guest room gives visitors a reason to relax beyond just sleeping. It turns the room into a real retreat.
Place a compact armchair in the corner nearest the window where natural light is best. Add a small side table for a cup of tea or coffee. Set up a small bookshelf or a stack of books within easy reach. Drape a throw blanket over the arm of the chair for chilly reading sessions. Add a plant on the windowsill to bring freshness to the corner. This dedicated reading spot makes the guest room feel generous and thoughtful even when the square footage is small.
Incorporating Plants for a Fresh Look
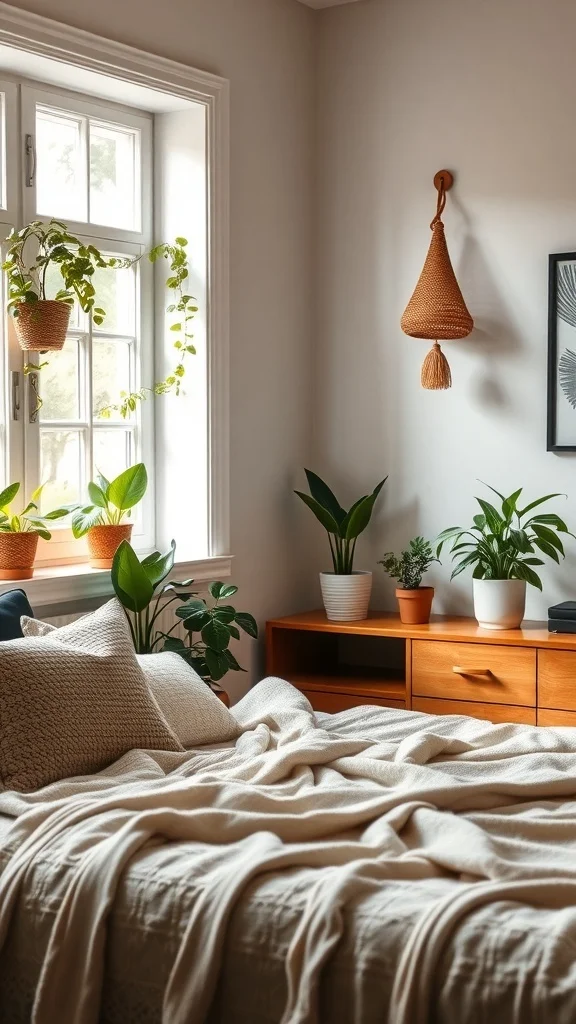
Small pots on the windowsill catching the light. A taller plant beside the bed adding height. Green on the nightstand, the shelf, and the dresser. The room feels alive and fresh and connected to nature.
Plants in a guest room are a welcome detail that most people do not expect. They clean the air, add color, and make the space feel cared for.
Place a couple of small pots on the windowsill where they will get natural light and thrive. Add one taller plant on the floor beside the bed or in a corner to add vertical interest. Set a tiny succulent or a small trailing plant on the nightstand for a gentle touch of green. Choose low-maintenance varieties that look great without daily attention. Use pots that coordinate with the room’s color palette. Three to four plants at different heights give a tiny guest room a fresh, lived-in feeling that guests notice and appreciate.
Utilizing Colorful Bed Linens for a Pop

A soft pink throw over the duvet. Patterned pillows in blue and white creating playful contrast. Floral artwork on the wall tying the colors together. The bed becomes the brightest, most inviting part of the room.
Colorful linens give the guest bed personality and warmth. They make the whole room feel cheerful and welcoming without changing a single piece of furniture.
Start with a neutral base like white or light gray sheets and a simple duvet. Add a colorful throw blanket folded at the foot of the bed for a pop of warmth. Layer two or three patterned pillows in tones that complement the throw and any artwork in the room. Do not be afraid to mix patterns as long as they share a common color. Hang a piece of art above the bed that echoes the linen colors for a pulled-together look. Swap the linens seasonally for a fresh new feel every few months.
Smart Use of Hooks and Racks
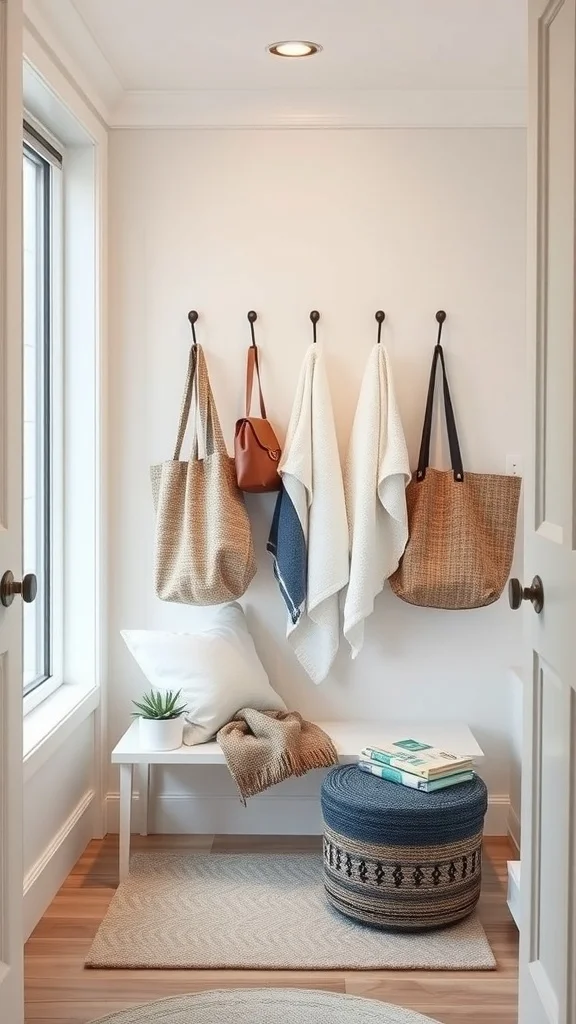
A row of hooks on the wall near the door holding bags, robes, and a decorative throw. Everything off the floor and easy to grab. The room feels open and organized. The hooks themselves styled to match the decor.
Hooks are one of the simplest additions to a guest room and one of the most useful. Guests always need a place to hang things and hooks solve that instantly.
Mount a row of three to five hooks on the wall near the door or behind it for bags, jackets, robes, and scarves. Choose hooks in a finish that matches your hardware like matte black, brushed brass, or white. Add one hook on the back of the door for a robe or a towel. Consider a small wall-mounted rack with a shelf above for a plant and hooks below for hanging. Keep the wall around the hooks clear so the area does not feel busy. These simple additions give guests a place for everything and keep the small room feeling neat and welcoming.