by Clara Scott | Feb 21, 2026 | Uncategorized
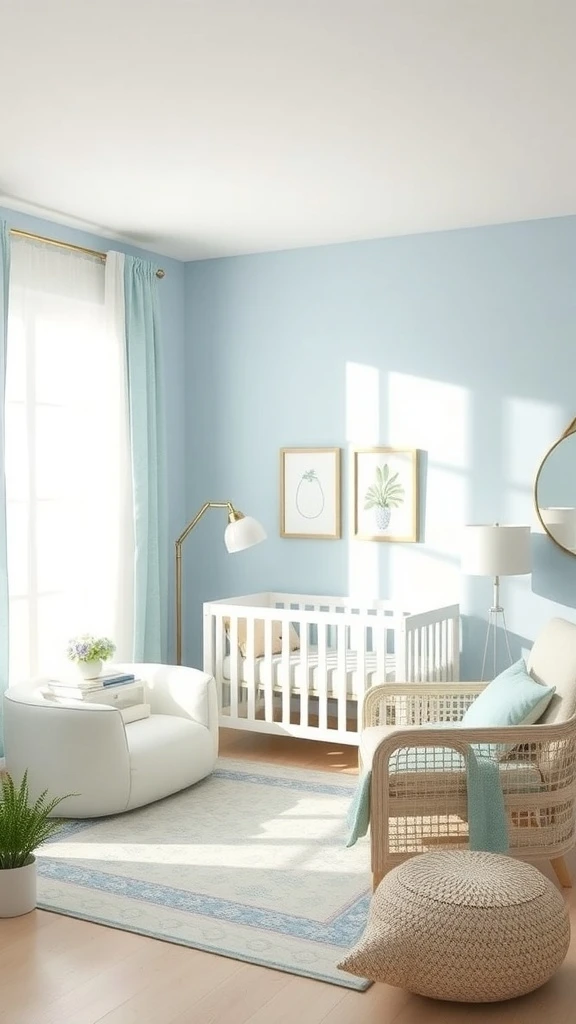
Designing a small nursery is one of the most rewarding creative challenges. Every inch matters and every choice counts. But a tiny room can still feel warm, magical, and perfectly set up for your little one. Smart storage, soft textures, and thoughtful details turn even the smallest space into a dream nursery. Here are some ideas to help you make it happen.
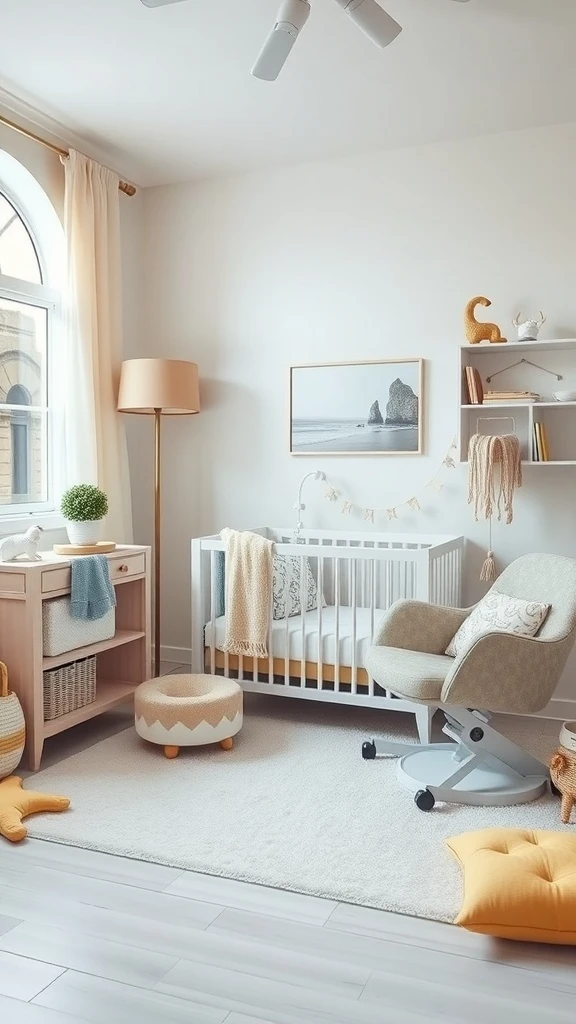
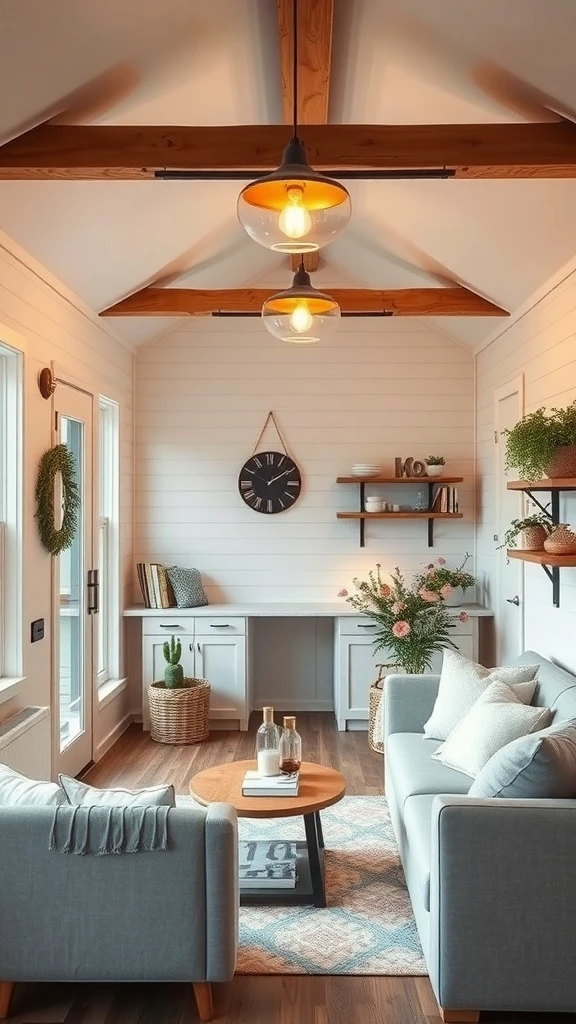
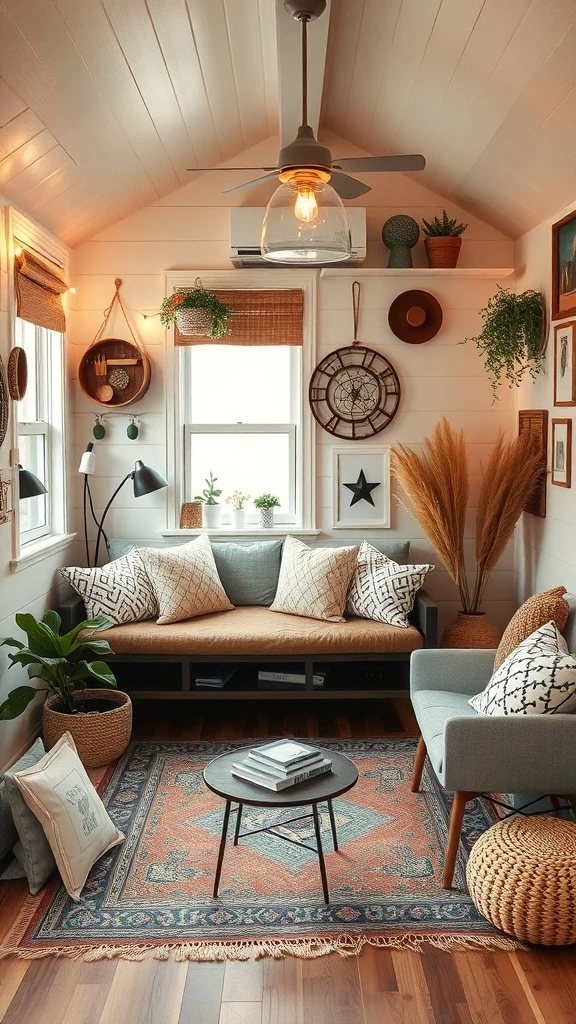
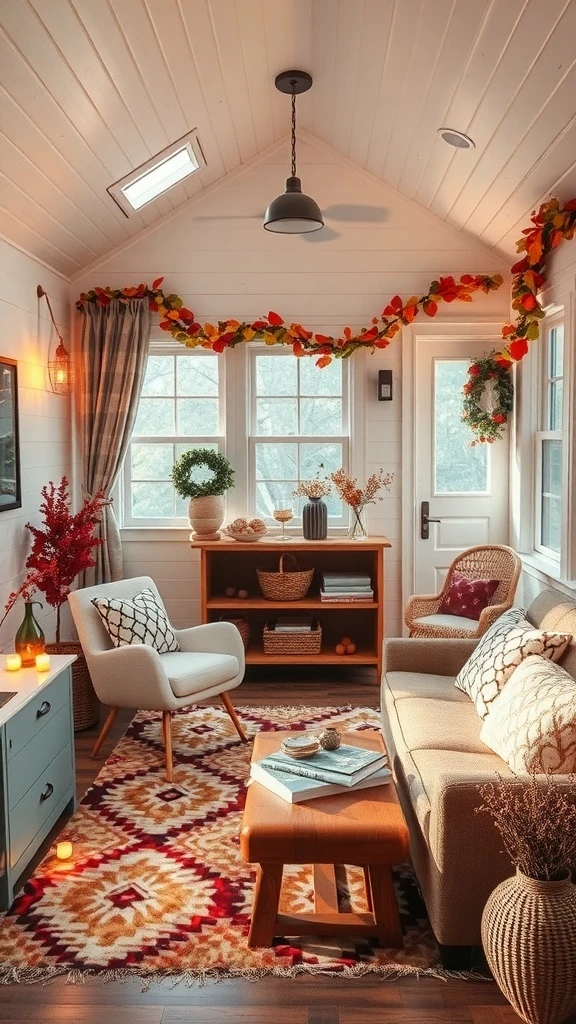
A Reading Nook They Will Love Growing Up In
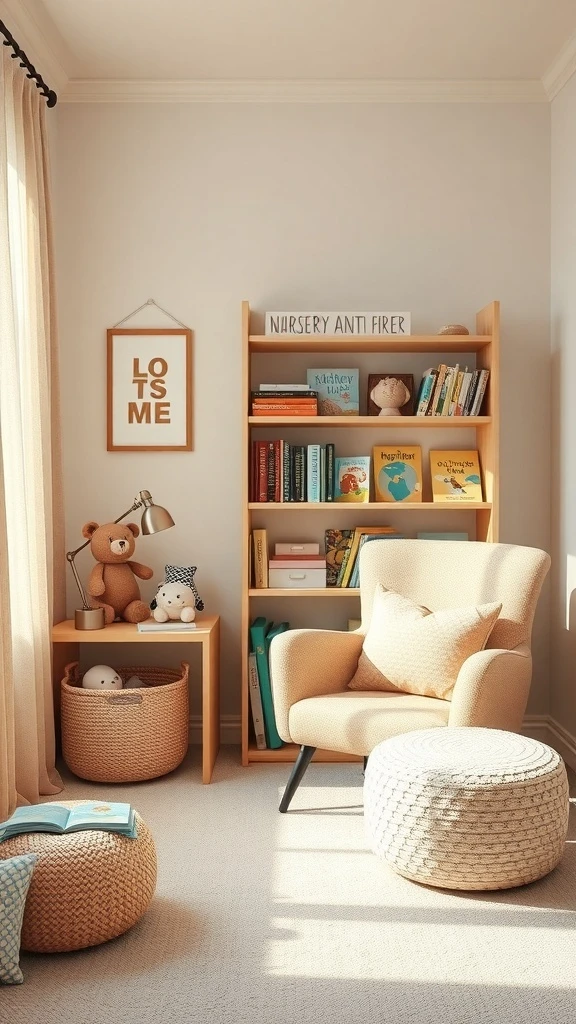
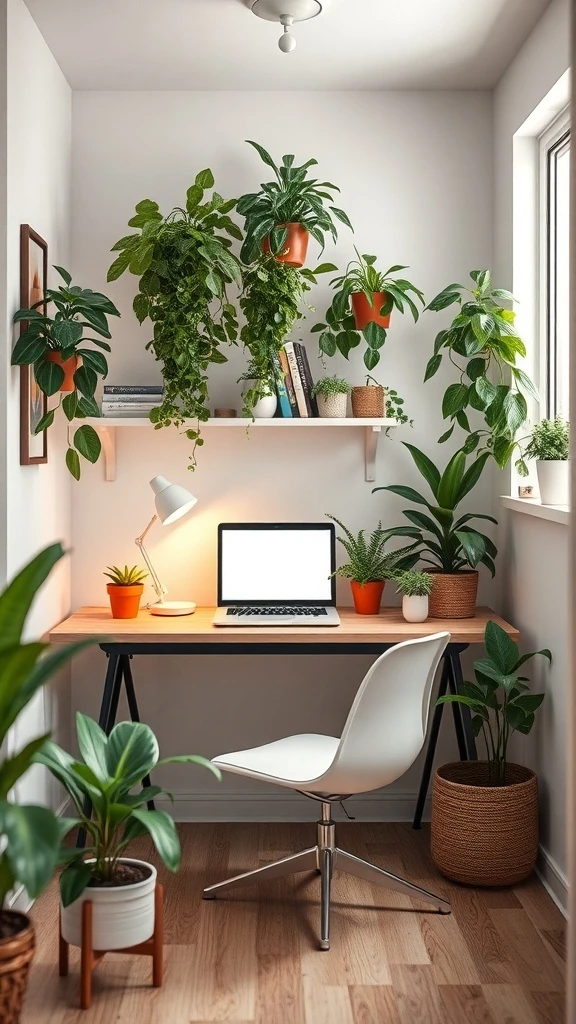
A soft chair tucked into a corner with a small bookshelf right beside it. Colorful books lined up and ready to be grabbed. Stuffed animals piled nearby. A gentle lamp casting just the right glow for bedtime stories.
This little nook becomes the place where you and your baby bond over books every single night. It takes up almost no room but it creates the sweetest memories.
Choose a compact armchair or a wide glider that fits snugly into a corner. Place a low bookshelf within arm’s reach so you can grab books without getting up. Add a soft pouf or a floor cushion for older toddlers who want to sit on their own. Keep a small basket nearby for stuffed animals and a cozy blanket draped over the arm of the chair. A warm-toned lamp on a nearby shelf completes this reading corner and makes it the most loved spot in the nursery.
Furniture That Works Twice as Hard
A crib that has a built-in changing area right on top. A small side table holding everything you need within reach for late-night changes. A pouf that doubles as a footrest during feedings and extra seating when guests visit.
Every piece pulls its weight. Nothing is just sitting there looking pretty without also doing something useful. That is how a small nursery stays functional and open.
Look for a crib with an attached or convertible changing table so you skip the need for a separate piece of furniture. Choose a side table with at least one shelf for diapers, wipes, and a small lamp. Add a fabric pouf in a neutral tone that works as a footrest, a seat, and a soft surface for tummy time. Place a small plant on the windowsill for freshness. This multi-purpose approach keeps the nursery spacious while giving you everything you need in arm’s reach.
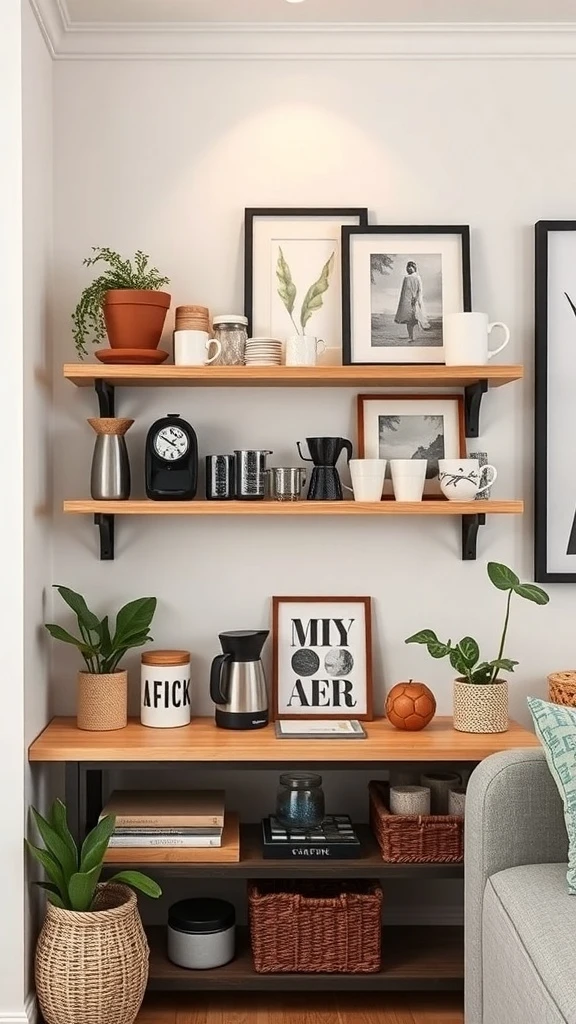
Wall Shelves That Save the Floor
Two floating shelves on the wall holding toys, books, and a couple of cute decorative pieces. Everything at a height where you can reach it easily but the baby cannot pull it down. The floor below stays completely clear for crawling and playing.
The shelves draw the eye upward and make the room feel taller. A small nursery instantly feels more open when the walls do the storage work.
Mount two or three floating shelves on the wall above the changing area or beside the crib. Use them for books displayed with the covers facing out so they double as wall art. Add small baskets or bins on the shelves for tiny items like pacifiers, socks, and hair bows. Mix in one or two decorative pieces like a small stuffed animal or a framed print for charm. Keep the shelf color matching the wall so they blend in and never make the room feel heavy.
Soft Textures That Make Everything Cozy
A fluffy area rug on the floor. Plush cushions on the chair. A light airy curtain letting sunshine through while softening the whole room. Every surface you touch feels gentle and warm.
Soft textiles turn a nursery from a room with baby furniture into a space that actually feels nurturing and calm. They are the secret ingredient that makes everything come together.
Lay a thick soft rug in a neutral or pastel tone under the main seating area for warmth and comfort during floor play. Add two or three cushions to your nursing chair in gentle fabrics like cotton or muslin. Hang sheer curtains that filter natural light and create a dreamy atmosphere during nap time. Drape a lightweight blanket over the arm of the chair for late-night feedings. Choose washable fabrics everywhere because tiny nurseries need textiles that are as practical as they are pretty.
Calming Colors That Set the Mood
Soft blue walls. White furniture. Light wood floors. Natural light filling the room. The whole nursery feels like a deep breath. Calm and peaceful and exactly right for a baby who needs rest and a parent who needs peace.
A simple soothing palette does so much of the work. It keeps the space feeling open and serene without trying too hard.
Paint the walls in a soft muted tone like pale blue, sage green, lavender, or warm blush. Keep all furniture in white or light natural wood so it blends into the calm backdrop. Add texture through a cozy rug and soft cushions in tones that complement the walls. Let natural light do the heavy lifting during the day with sheer curtains or simple blinds. Place one or two small plants on a shelf for a natural pop of green. This simple palette creates the most peaceful nursery environment for everyone in the room.
Storage Hiding Under the Crib
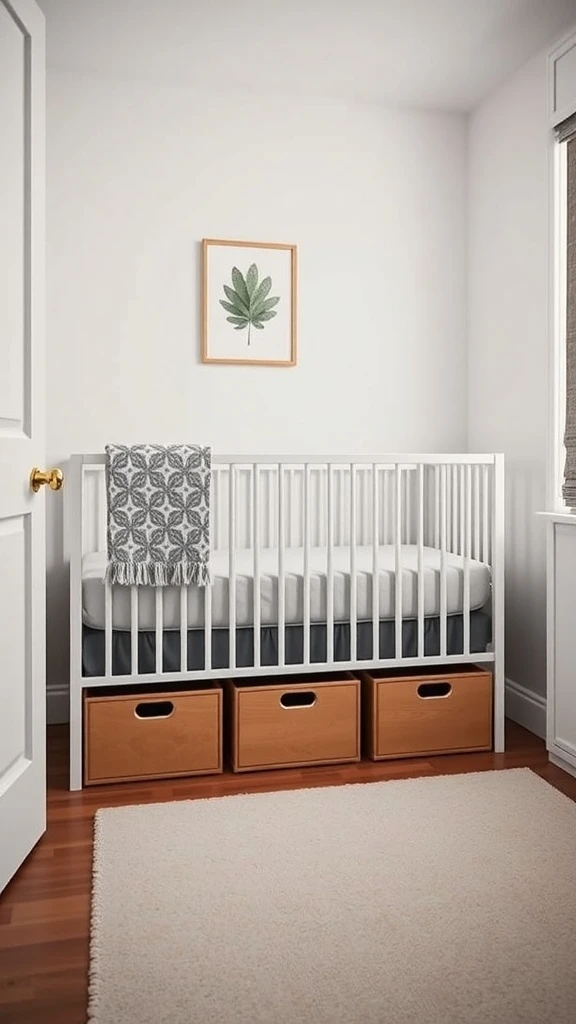
Three wooden bins tucked neatly under the crib holding diapers, blankets, and extra clothes. Out of sight but always within reach. The nursery stays clean and calm because the clutter has a hidden home.
This under-crib space is free storage just waiting to be used. It is one of the smartest hacks for a tiny nursery.
Measure the clearance under your crib and find bins or baskets that slide in and out easily. Assign each one a category like diapers and wipes in one, extra blankets in another, and spare clothes in the third. Choose containers that match the nursery’s color scheme for a polished look. Label them with small tags if it helps you stay organized during busy moments. Swap out the contents as your baby grows so you are only storing what you actually need right now.
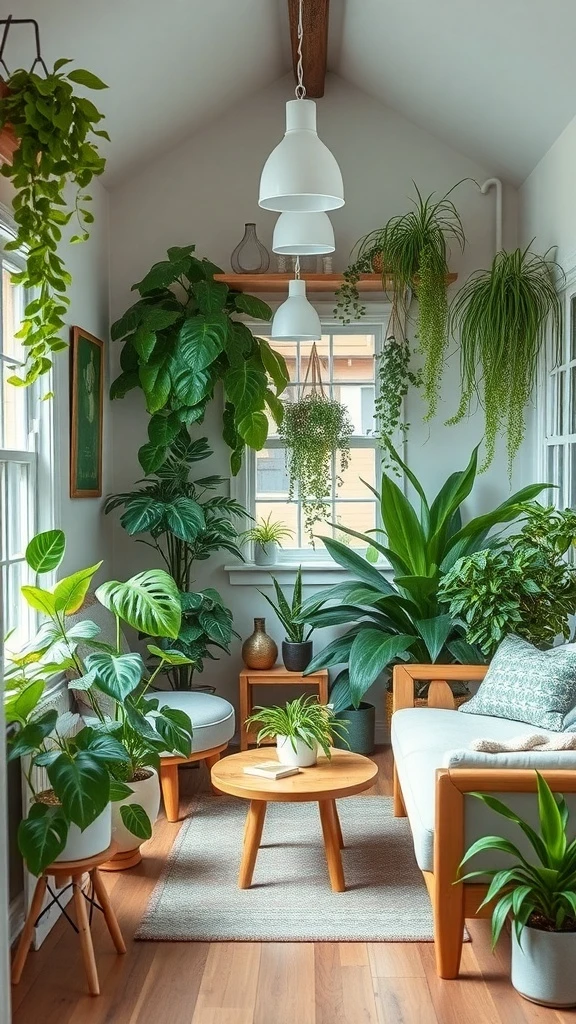
Green Plants That Freshen the Room
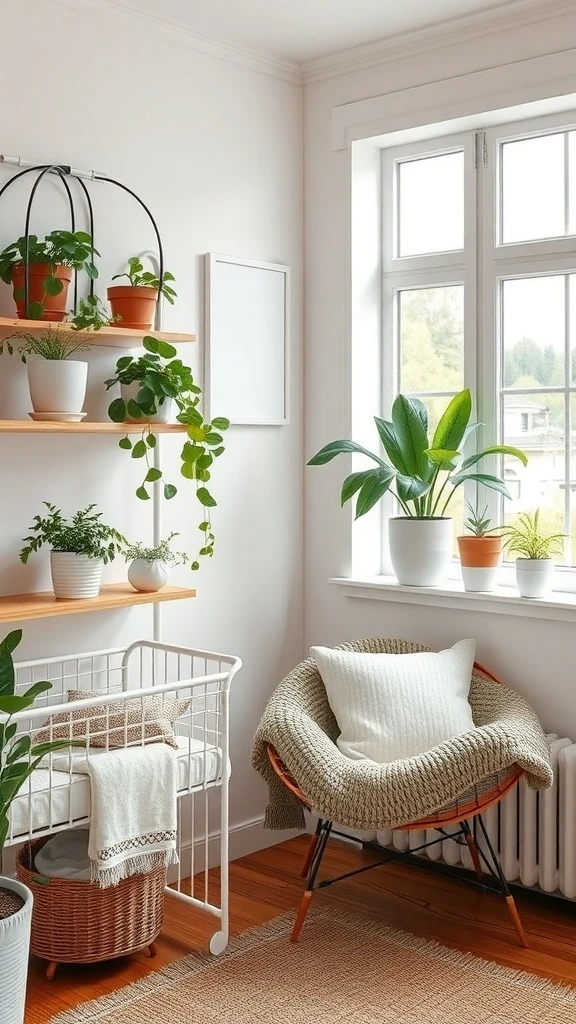
A few plants arranged on a wooden shelf in the corner. A cozy chair with a soft blanket draped over it right beside them. Natural light streaming in making the green glow. The nursery feels fresh and alive and connected to nature.
Plants bring calm to a room in a way that nothing else can. The air feels cleaner and the space feels softer.
Place plants on a high shelf or a windowsill where they are safely out of the baby’s reach. Choose non-toxic varieties like spider plants, Boston ferns, or calatheas that are safe for homes with children. Use simple pots in white, ceramic, or natural woven baskets that match the nursery decor. Keep the total to two or three so the room feels fresh without being overcrowded. Water on a simple schedule and enjoy the natural beauty they bring to your baby’s space every day.
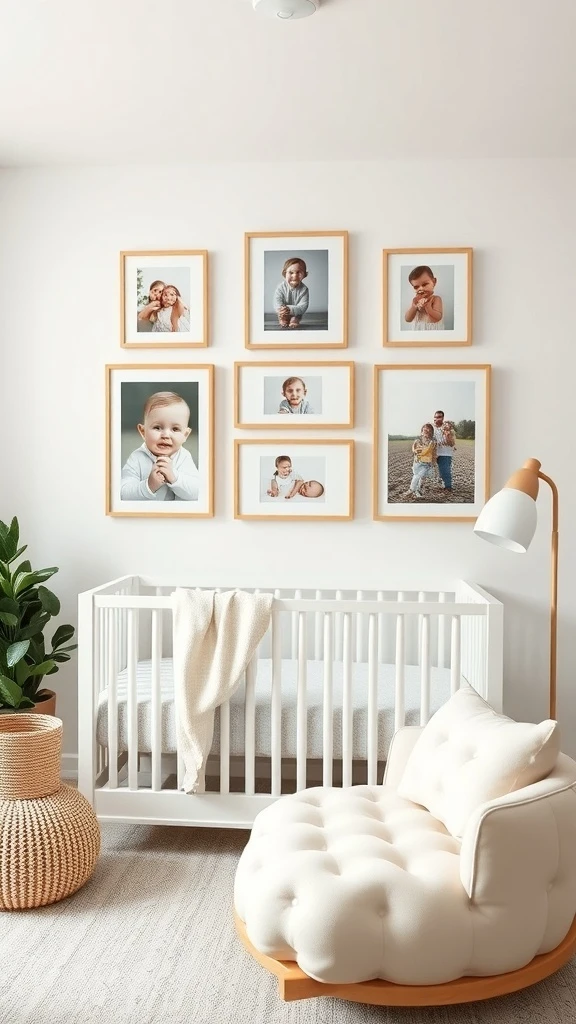
Playful Wall Art That Sparks Wonder
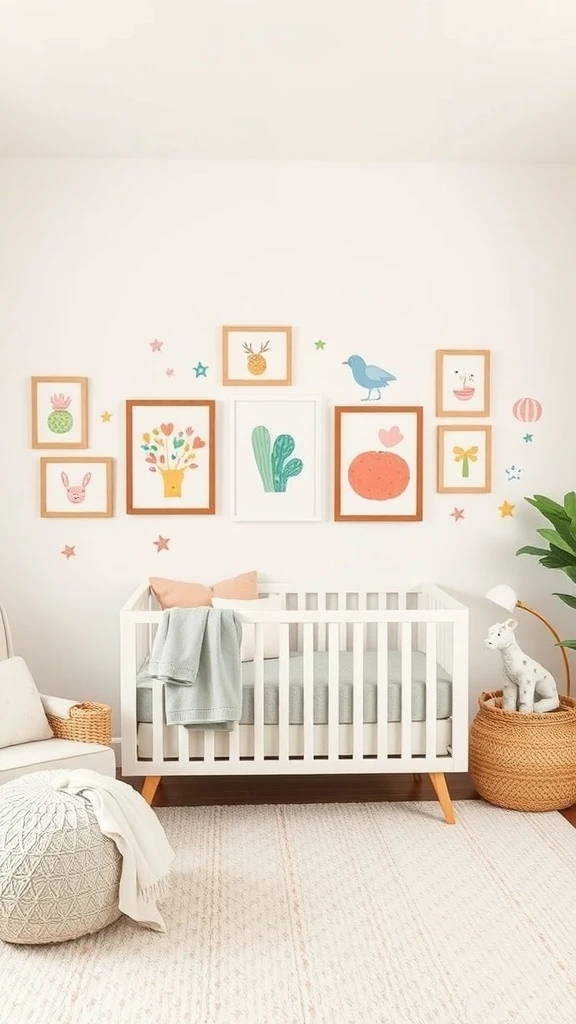
A collection of colorful prints in mismatched frames on the wall above the crib. Flowers, animals, and whimsical shapes. Little star decals scattered around the frames. The whole wall feels like a storybook page come to life.
Your baby gazes up at it from the crib and their eyes light up. It is the kind of art that grows with them and sparks curiosity from day one.
Choose four to six small prints in cheerful colors and playful themes like animals, nature, or alphabet letters. Frame them in a mix of styles and sizes for an eclectic feel. Arrange them in a loose cluster above the crib or the changing area. Add a few removable wall decals like stars or clouds around the frames for extra magic. Keep the frames lightweight and securely mounted for safety. This gallery wall adds personality and visual stimulation without taking up any floor space at all.
A Closet Organized to Perfection
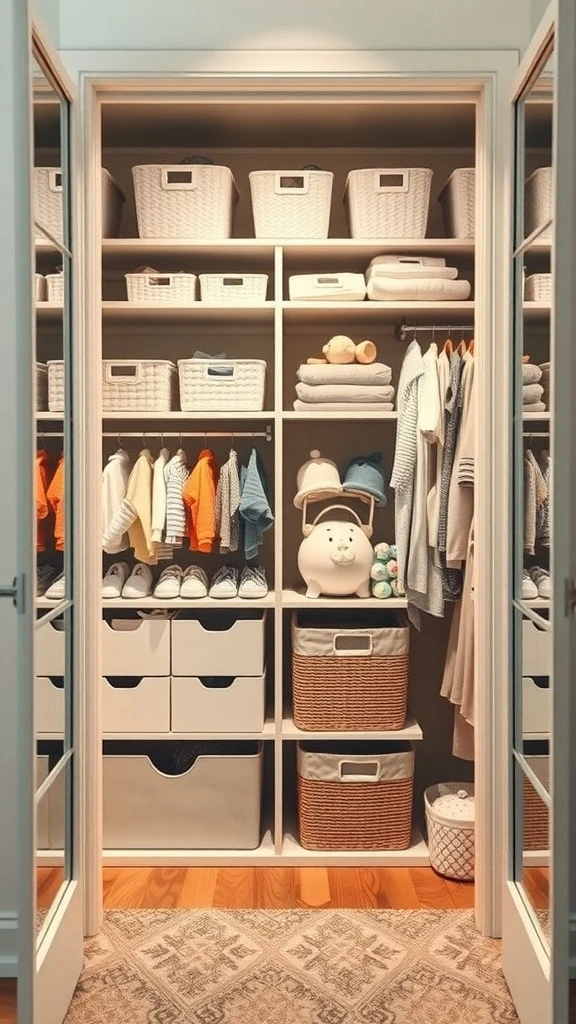
Neat shelves lined with labeled baskets. Tiny outfits hung in a row showing off the cutest clothes. Folded blankets stacked perfectly. Everything visible and easy to grab even when you are holding a baby in one arm.
A well-organized nursery closet saves you time and stress every single day. You know where everything is and getting dressed becomes the easiest part of the morning.
Install a double hanging rod in the closet with the lower rod at baby-clothes height so tiny outfits hang neatly without wasted space above. Add a small shelf unit on one side for baskets holding diapers, socks, and accessories. Use woven or fabric bins with labels so everything has a designated spot. Fold blankets and linens on a higher shelf. Keep a small basket on the floor for laundry. This system keeps the closet organized and the rest of the nursery free from overflow clutter.
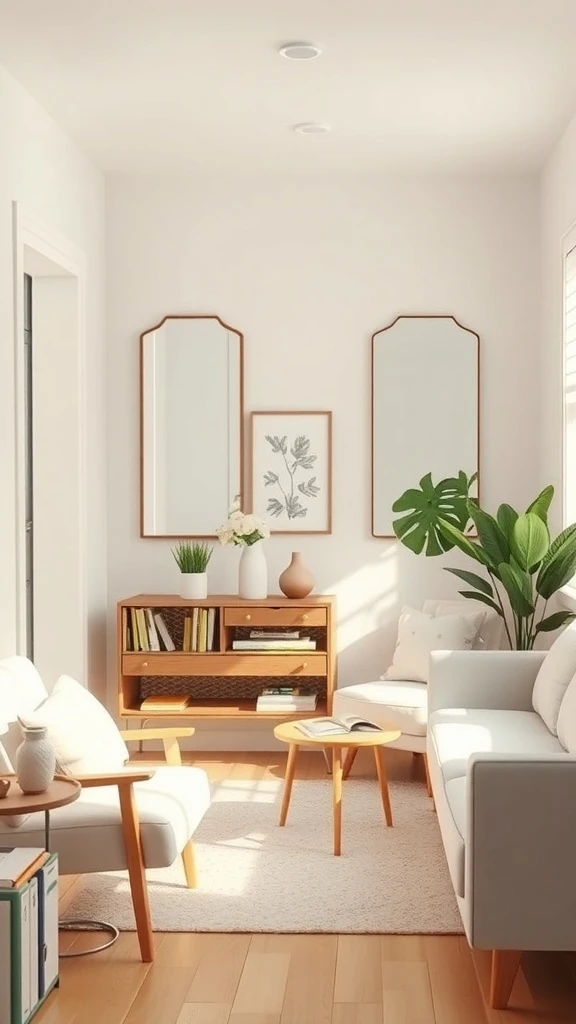
Mirrors That Open Up the Room
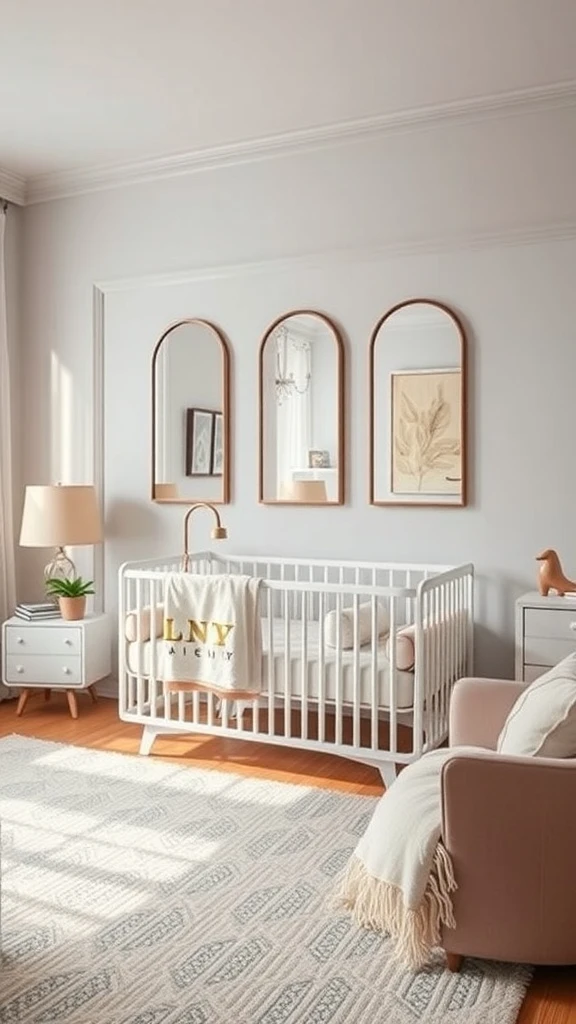
Three rounded mirrors on the wall reflecting light and making the small nursery feel so much more spacious. Soft shapes that match the gentle feel of the room. Light bouncing from the window to the mirrors and back again filling every corner with brightness.
Babies love looking at reflections too. So the mirrors are decorative, functional, and entertaining all at the same time.
Hang two or three small mirrors in soft round or organic shapes on a wall that catches natural light from a window. Position them at slightly different heights for visual interest. Use shatterproof or acrylic mirrors for safety in a nursery. Choose simple frames in natural wood, white, or gold to match your decor. Place them across from the window to maximize reflected light. These mirrors make the nursery feel brighter and bigger while giving your little one something delightful to discover as they grow.
A Name Sign That Makes It Personal
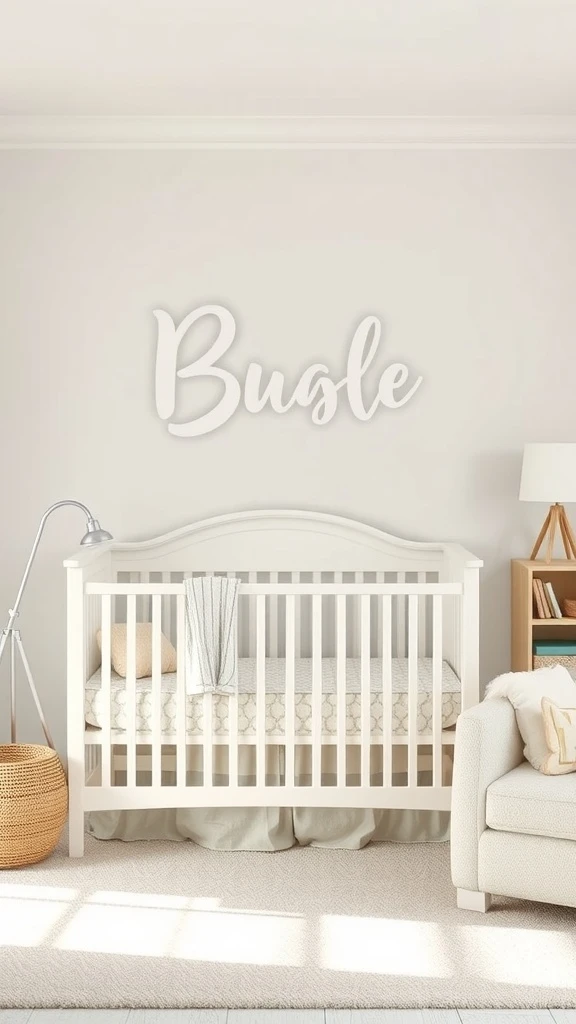
Your baby’s name spelled out in wooden letters above the crib. Soft colors and natural materials surrounding it. A cozy blanket draped over the railing. The nursery immediately feels like it was made just for them.
It is the simplest personalized touch but it makes the biggest emotional impact. This is their room and their name is right there to prove it.
Order or make a name sign in wooden letters, a cut-out script, or a framed print with your baby’s name. Mount it centered above the crib at a height that is visible when you walk into the room. Choose a material and color that matches the nursery palette whether that is natural wood, painted white, or soft gold. Pair it with a couple of small wall elements like a tiny shelf with a figurine or a single framed print beside it. This personal detail gives the nursery its identity and makes it feel truly complete.
A Bold Rug That Defines the Space
A colorful round rug with playful circles right in the center of the nursery floor. It anchors the crib area and gives the baby a soft warm place to play. Bright colors contrast with neutral walls and suddenly the room has energy and fun.
It is one piece that changes the whole feel of the nursery. Practical for tiny knees and beautiful for your eyes.
Choose a rug large enough to cover the main play area but leave a border of floor visible around the edges. Go with a bold pattern or bright colors that bring joy to the room. Make sure the material is soft, non-toxic, and machine washable because it will see a lot of use. Use a non-slip pad underneath to keep it secure on hard floors. Place the crib nearby so the rug creates a defined zone that feels like the heart of the nursery.
Baby Gear That Looks Like Real Furniture
A crib with clean modern lines. A rocking chair that would look just as good in the living room. A changing table that blends right into the decor. Light wood tones and soft fabrics throughout. Everything is baby-functional but none of it screams nursery.
It is a space that feels sophisticated and calm. Designed for a baby but styled for the whole home.
Choose a crib in a simple modern design with clean lines and a neutral finish like white or natural wood. Pick a rocking chair or glider in a fabric and shape that could fit any room in the house. Select a changing table that doubles as a dresser so it stays useful long after the diaper stage. Keep accessories like poufs, cushions, and baskets in coordinating tones. Add one or two decorative items on a shelf to make the room feel styled. Baby gear that looks like real furniture keeps the nursery feeling elevated and intentional.
Adjustable Lighting for Day and Night
Bright light for playtime during the day. A soft dim glow for bedtime routines at night. Recessed fixtures that let you control exactly how much light fills the room at any given moment.
The nursery shifts from energized to peaceful with just a turn of the dimmer. That flexibility makes every routine easier for both you and your baby.
Install a main ceiling fixture with a dimmer switch so you can go from full brightness to near darkness in seconds. Add a small nightlight or a warm-toned lamp near the nursing chair for middle-of-the-night feedings. Use warm white bulbs in every fixture to keep the mood soft and consistent. Avoid harsh cool-toned lighting that can overstimulate before bedtime. Consider a smart bulb in the main fixture that you can control from your phone without getting up from the chair. This layered lighting setup supports every moment of your nursery routine.
A Mobile That Catches Their Eyes
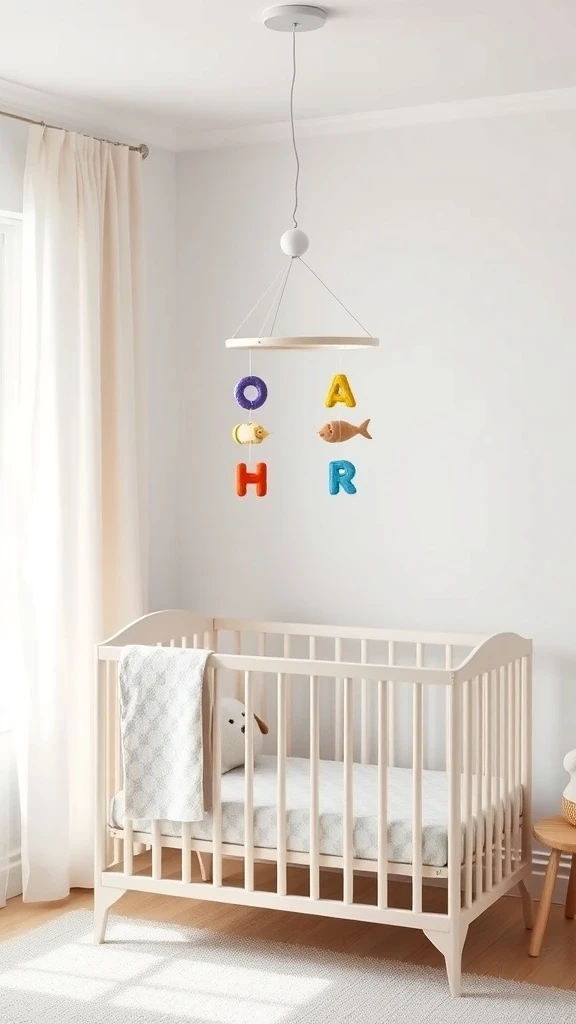
A simple mobile hanging above the crib with gentle shapes swaying in the air. Soft colors moving slowly catching the light. Your baby’s eyes following every movement with total fascination.
It is their first piece of art. Something beautiful to look at while they drift off to sleep or wake up smiling in the morning.
Choose a mobile with soft colors and simple shapes that match the nursery theme. Hang it centered above the crib at a height where the baby can see it clearly but cannot reach it. Look for one with gentle movement that sways with the air rather than a motorized version for a calmer effect. Make sure it is securely attached to the ceiling or a crib arm that can handle the weight. As the baby grows and starts reaching up, move the mobile higher or replace it with a ceiling decoration to maintain the visual interest safely.
A Play Area That Fits Right In
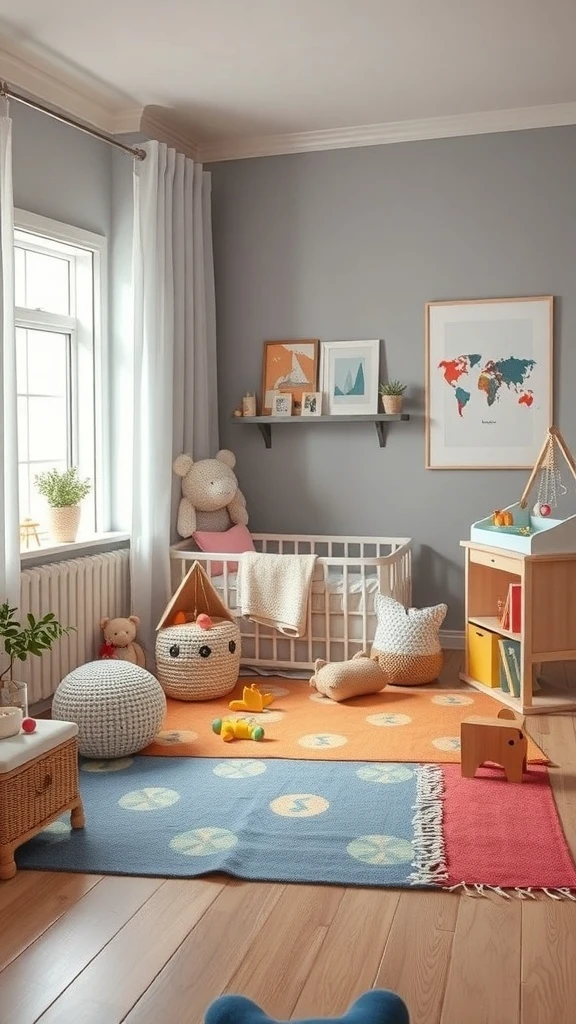
A soft rug on the floor with a couple of plush toys. A low shelf with books and blocks within reach. Bright colors and gentle textures everywhere the baby looks. The play area does not need its own room. It fits beautifully right inside the nursery.
It encourages exploration and creativity from the very beginning. And when playtime is over everything tucks neatly back into place.
Dedicate one section of the nursery floor as the play zone with a soft washable rug as the base. Place a low open shelf nearby with a few toys and books rotated weekly to keep things fresh. Use a fabric basket for quick toy cleanup at the end of the day. Keep the area near natural light if possible so the space feels bright and inviting. Add a couple of floor cushions for you to sit with the baby during play. This contained play area stays organized and keeps the rest of the nursery looking neat.
Family Photos That Fill the Room with Love
A small gallery of framed family photos on the nursery wall. Smiling faces. Happy moments. The baby surrounded by the people who love them most even when those people are not in the room.
It adds warmth that no amount of decorating can match. The nursery feels full of love before anyone even walks through the door.
Print four or five of your favorite family photos in small to medium sizes. Frame them in soft coordinating tones like white, natural wood, or light gray. Arrange them in a loose grouping on one wall near the crib or the nursing chair. Mix a couple of candid shots with one or two posed ones for a natural feel. Hang them at a height you can see from the chair so they bring comfort during late-night feedings. This personal gallery makes the nursery feel warm and connected in the most meaningful way.
A Layout That Makes Daily Life Easy
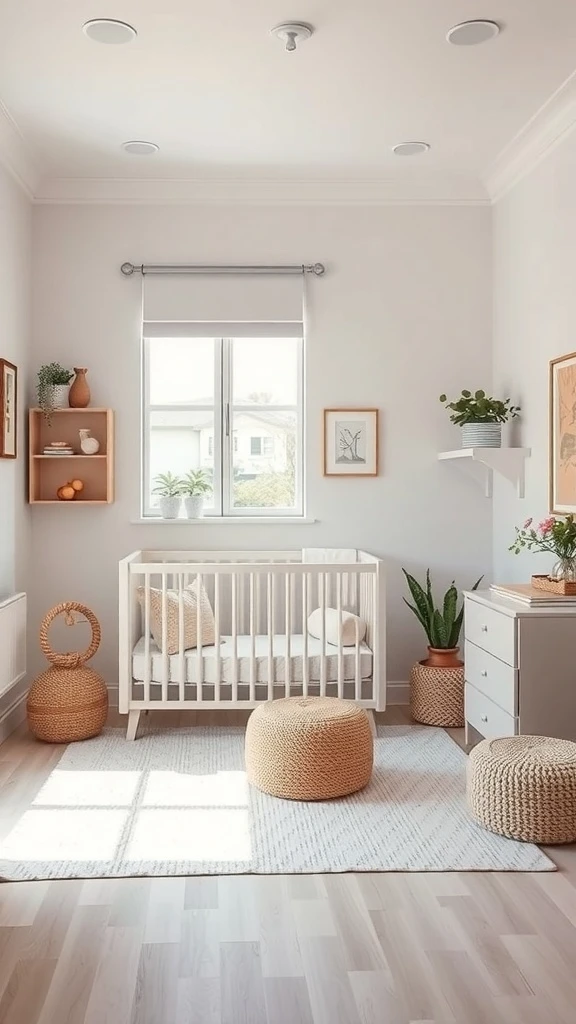
The crib near the window for natural light. The changing area right beside it for quick access. A nursing chair steps away. Shelves and baskets holding everything organized. Open floor space in the middle for movement and play.
Every zone connects to the next one naturally. You never have to cross the room with a fussy baby in your arms because everything is right where you need it.
Place the crib against the wall nearest the window for the best natural light during daytime naps. Position the changing table or dresser right beside it so you can move from crib to changing without any distance. Set the nursing chair in the corner closest to both for easy transitions during nighttime routines. Keep a small shelf or cart between the chair and the crib stocked with essentials like burp cloths, pacifiers, and a water bottle for yourself. Leave the center of the room open for a play rug. This flow-based layout saves steps and energy every single day.
A Compact Changing Station That Has It All
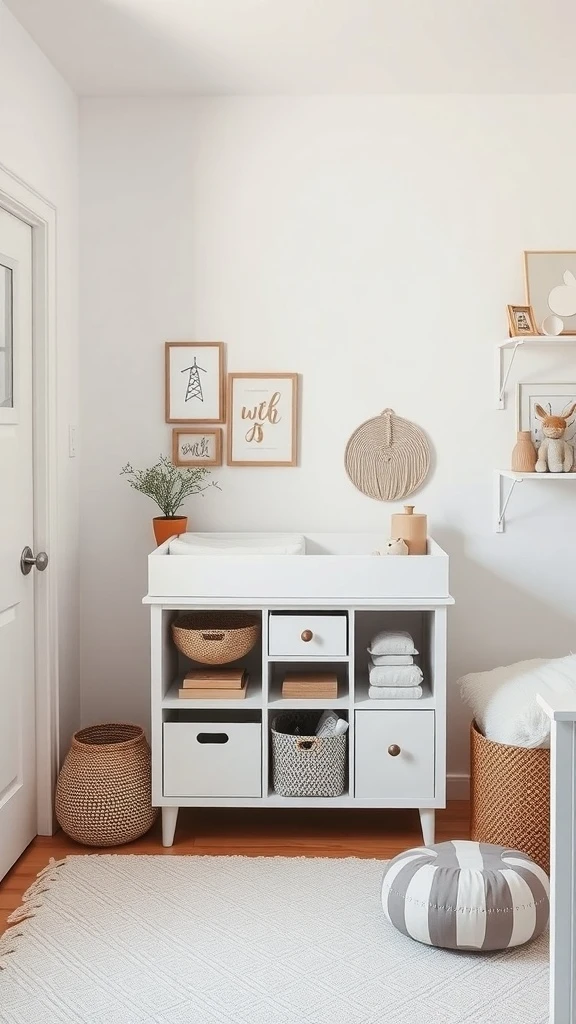
A clean white changing table with baskets and drawers holding diapers, wipes, and creams all within arm’s reach. Framed art on the wall above adding charm. A soft rug underneath. Everything you need for a quick change without ever leaving the station.
It is compact and organized and looks beautiful. No one would guess how much it holds just by looking at it.
Choose a changing table with built-in shelves and at least one or two drawers for maximum hidden storage. Assign each section a purpose like diapers on the left, wipes and creams in the middle, and spare clothes on the right. Use matching baskets for items you want accessible but visually neat. Hang one or two small framed prints above the station to make the area feel styled. Place a soft rug underneath for comfort and warmth. This all-in-one station keeps diaper changes quick and stress-free.
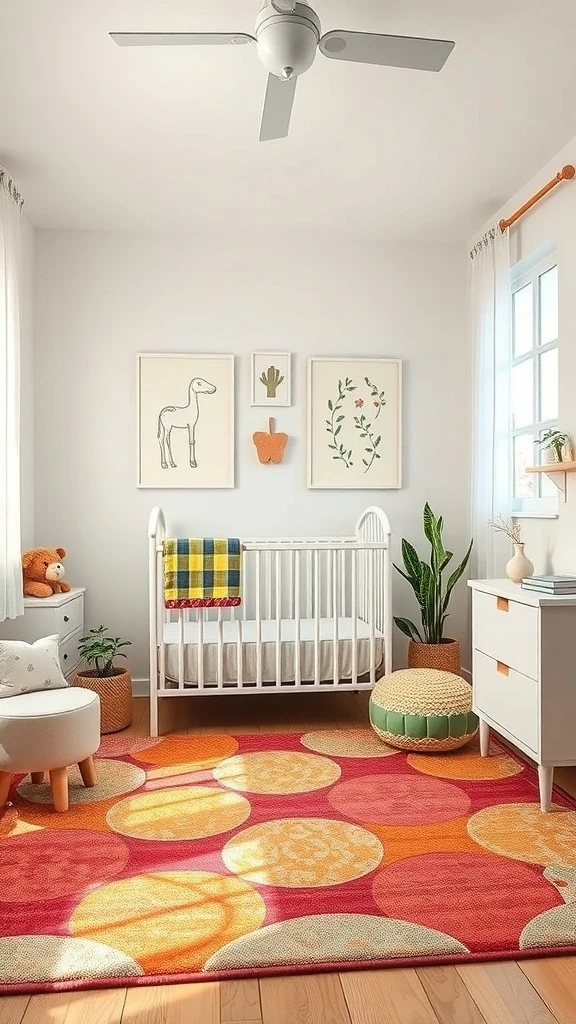
A Theme That Ties the Whole Room Together
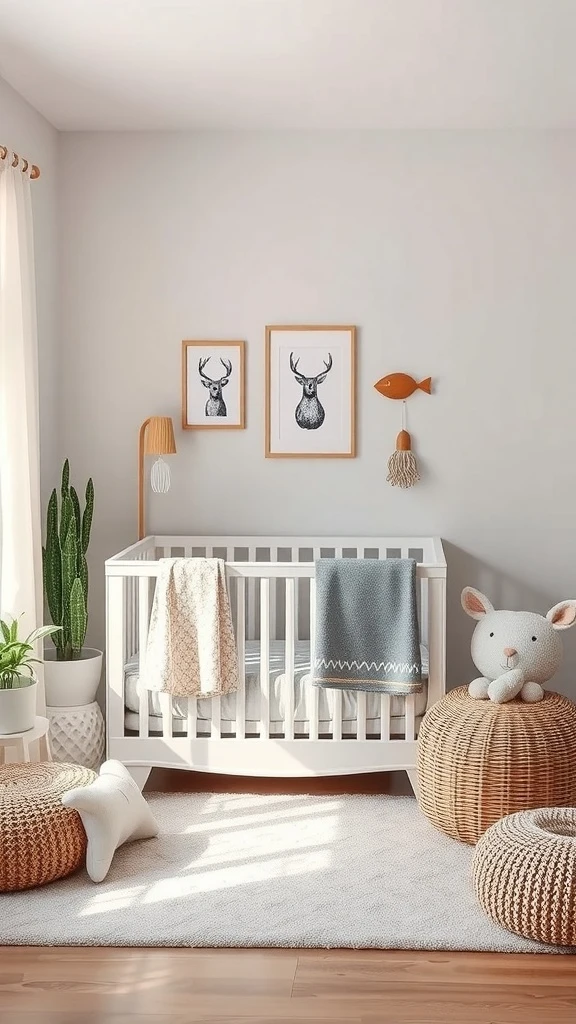
Animal-themed artwork on the wall. A potted plant adding a touch of nature. Woven poufs and soft rugs in earthy tones. A light airy color palette that makes the whole room feel like a gentle adventure. Every element connects to the theme without being over the top.
The nursery feels curated and thoughtful. Like a story that unfolds as you look around the room.
Pick a soft theme like nature, woodland animals, the sky, or botanicals and carry it through a few key pieces rather than covering every surface. Choose two or three themed prints for the wall and a coordinating mobile or stuffed animal. Keep furniture and paint colors neutral so the themed accents pop without overwhelming the space. Add natural textures through a woven basket, a jute rug, or a linen cushion to ground the theme in warmth. A themed nursery done with a light touch feels magical without ever feeling like too much.
by Clara Scott | Feb 21, 2026 | Uncategorized
A narrow staircase does not have to be boring or basic. It can actually become one of the most interesting design features in your home. With the right materials, lighting, and personal touches, even the tightest staircase becomes something people notice and remember. Here are some creative ideas to help you make your narrow staircase both beautiful and functional.
Drawers Built Right Into the Steps
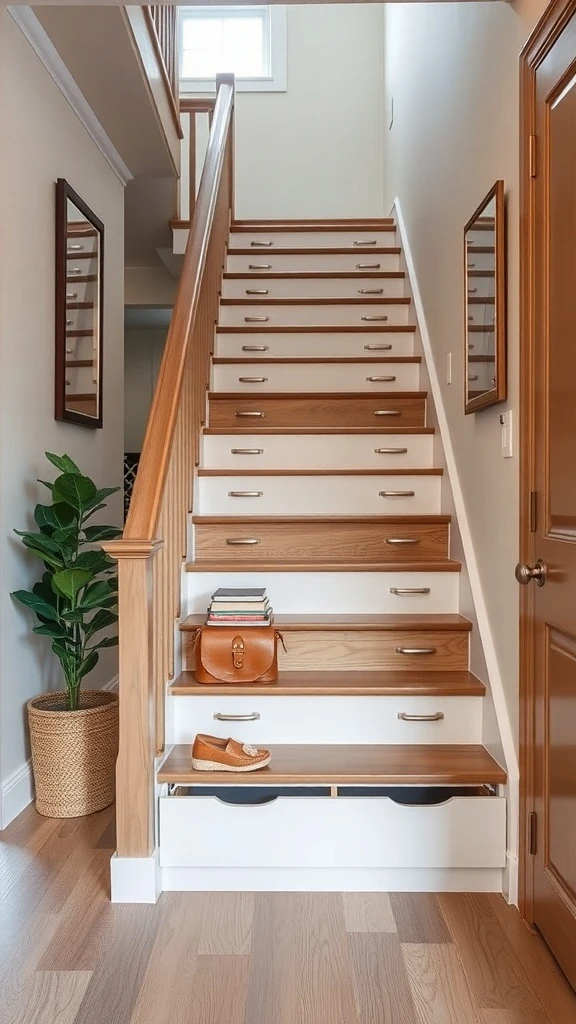
Imagine pulling open a drawer built directly into your stair step. Shoes, books, bags, all tucked away out of sight. The staircase looks clean and minimal from the outside but it is secretly hiding storage in every single step.
Light colors and sleek hardware keep the whole thing looking modern. It is one of the smartest uses of space in a small home.
Work with a carpenter or look for modular stair systems that include pull-out drawers built into the risers. Assign each drawer a category like shoes on the bottom steps and books or accessories higher up. Choose handles that sit flush with the surface so nothing catches your foot as you walk. Keep the exterior finish matching the rest of your staircase for a seamless look. This hidden storage eliminates the need for extra furniture and keeps your home clutter-free.
A Vintage Staircase with Timeless Charm
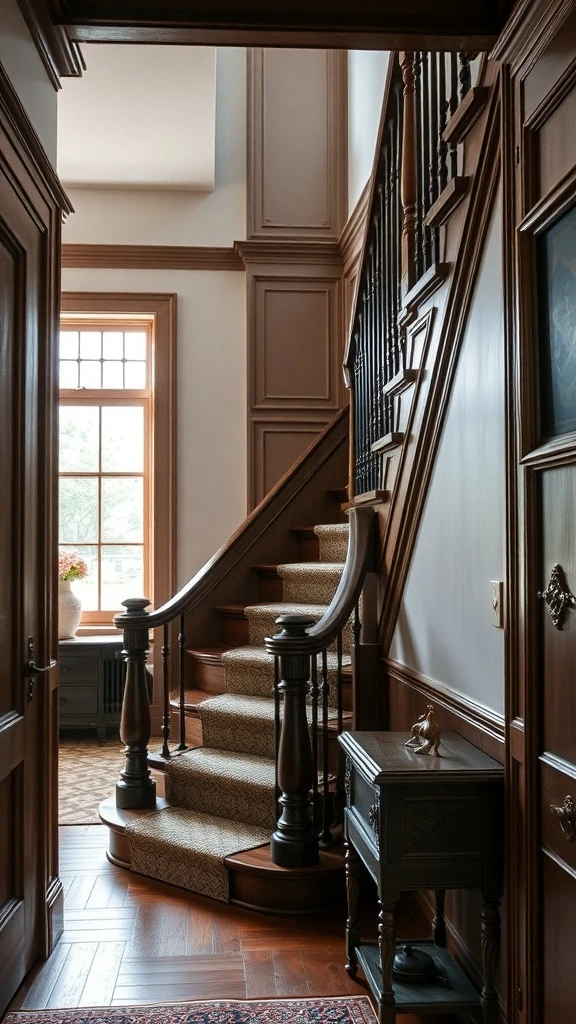
Rich warm wood spiraling upward. Elegant balusters with classic detailing. A plush runner going up the center adding comfort and luxury. Natural light pouring in through a tall window catching every beautiful grain in the wood.
This is a staircase that feels like it has been here for a hundred years. It tells a story every time you climb it.
If you have existing wooden stairs, restore the original wood finish by sanding and sealing with a warm-toned stain. Add a runner in a classic pattern like a stripe or a subtle geometric for comfort and style. Choose turned or carved balusters that reflect traditional craftsmanship. Let natural light from a nearby window highlight the wood tones. Wall paneling or wainscoting along the stairwell adds another layer of vintage character that makes the space feel rich and refined.
Floating Steps That Feel Like Air
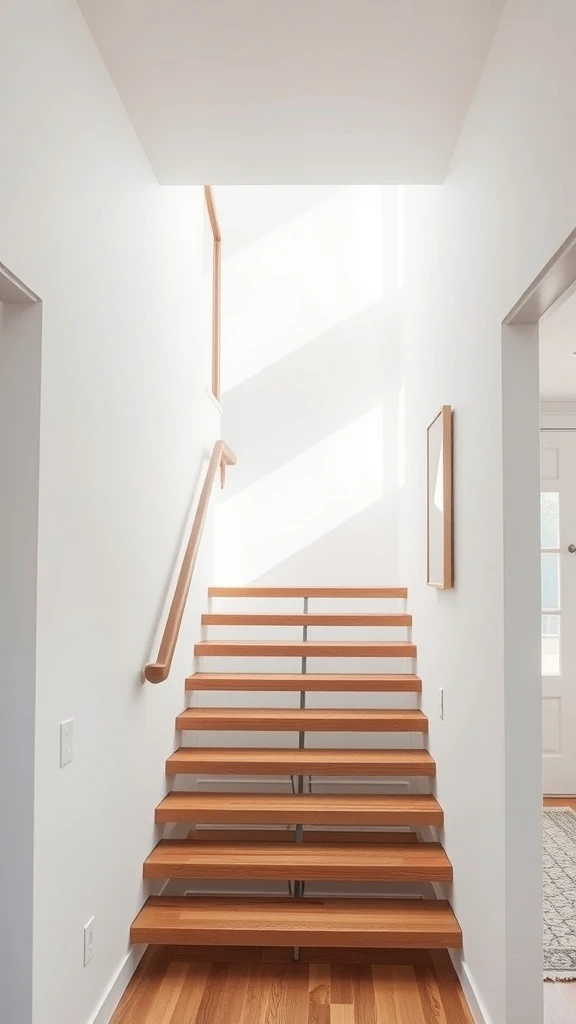
Wooden treads attached to the wall with no visible supports beneath them. Each step looks like it is hovering in midair. Light passes through the gaps between steps and fills the whole stairwell.
The effect is stunning. The staircase feels weightless and modern. A narrow space suddenly looks wide open because nothing is blocking the view.
Floating treads are mounted using hidden steel brackets embedded in the wall so the structure is completely concealed. Choose a warm hardwood like oak or walnut for a natural feel against a light-colored wall. Make sure the wall is structurally reinforced to handle the load. Add a slim glass railing or a thin cable system for safety without blocking the open look. This design maximizes both light and visual space making even the narrowest staircase feel airy and expansive.
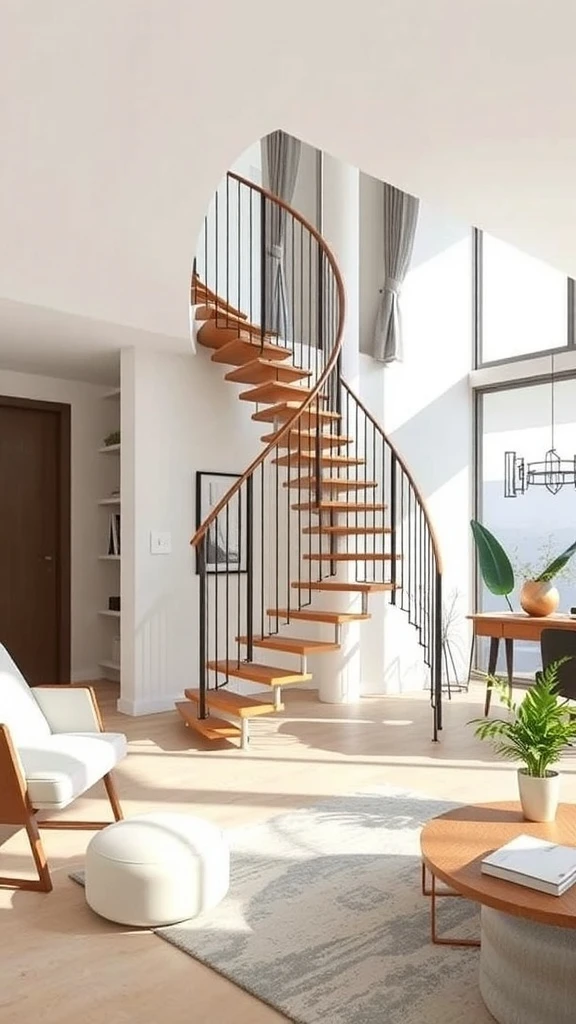
A Spiral Staircase That Saves Every Inch
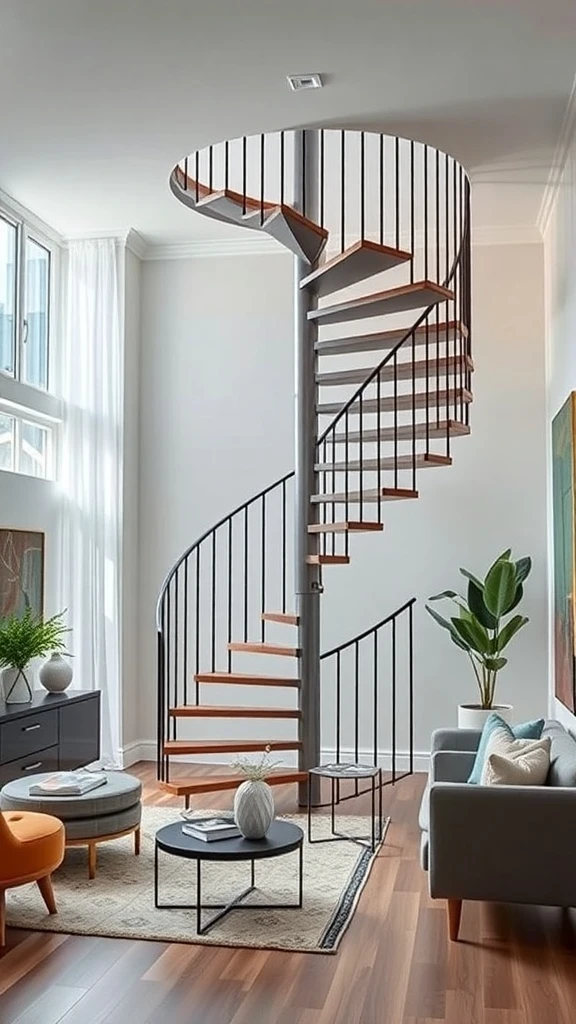
A metal and wood spiral staircase winding upward in a tight corner. It takes up almost no floor space but looks like a piece of sculpture. Light flows right through the open design making the whole room feel bigger.
It draws the eye upward and adds instant character to any room. Functional and gorgeous at the same time.
Choose a spiral staircase kit in metal with wooden treads for that perfect mix of modern and warm. Position it in a corner where it will not interrupt the main floor layout. Make sure the diameter fits your space while still meeting building codes for comfortable stepping width. Add a slim metal railing that follows the curve for safety without visual bulk. This compact vertical design connects your levels while barely touching your usable floor area.
LED Lights That Guide the Way
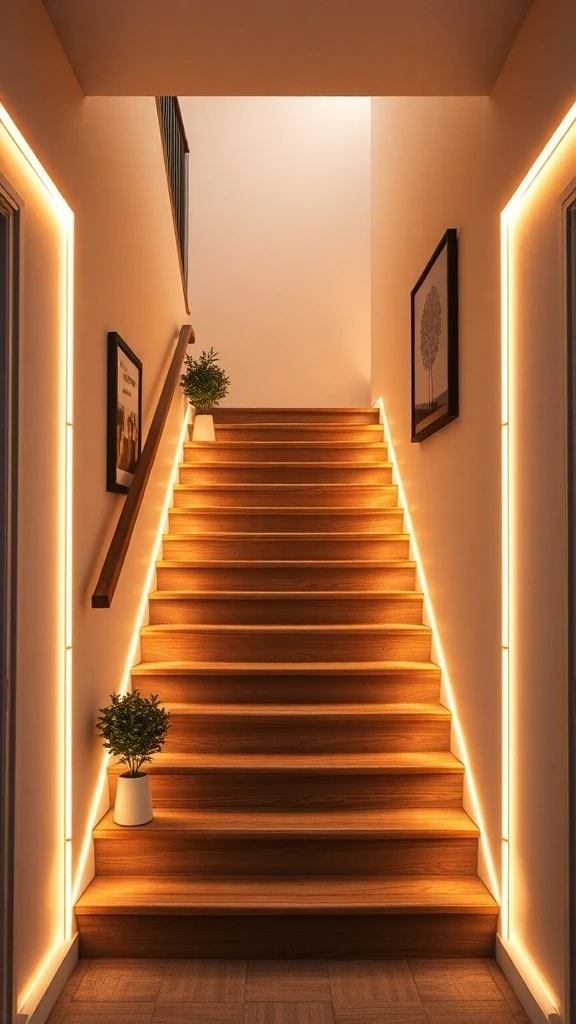
Warm LED strips running along the edges of each step. The staircase glows softly in the evening like a pathway in a boutique hotel. Every step is clearly visible and the whole space feels cozy and modern.
A few plants along the sides catching the light add freshness. It is a simple upgrade that completely transforms how the staircase looks and feels.
Install LED strip lights along the underside of each step’s nose or along the wall where the step meets it. Choose warm white for a cozy glow or go with a tunable smart strip you can adjust by mood. Use a motion sensor so the lights turn on when someone approaches the stairs at night. Add a small potted plant on one or two of the wider landings to pick up the warm light. This lighting upgrade makes the staircase safer, more inviting, and infinitely more stylish.
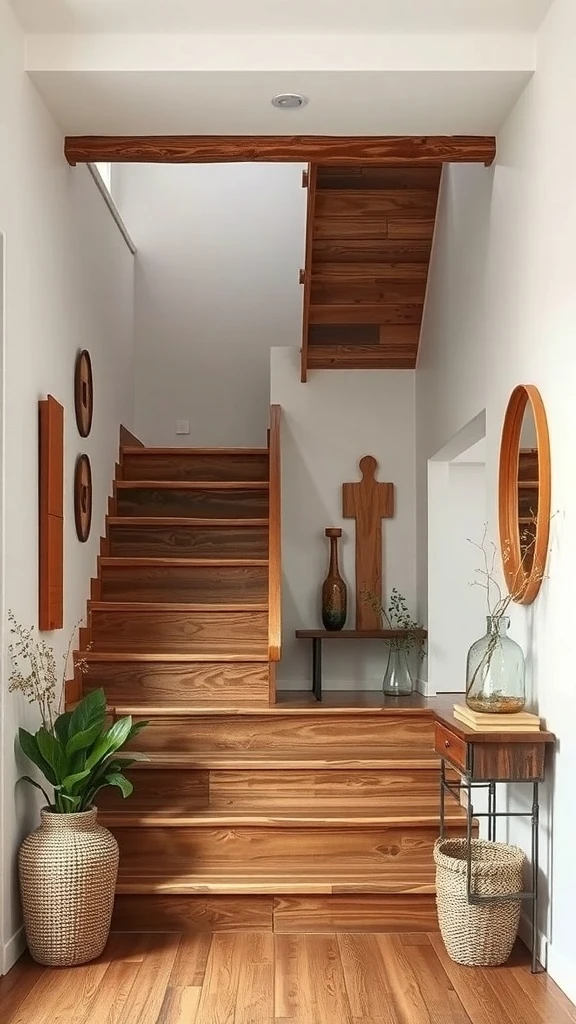
Warm Wood Steps with Sleek Metal Rails
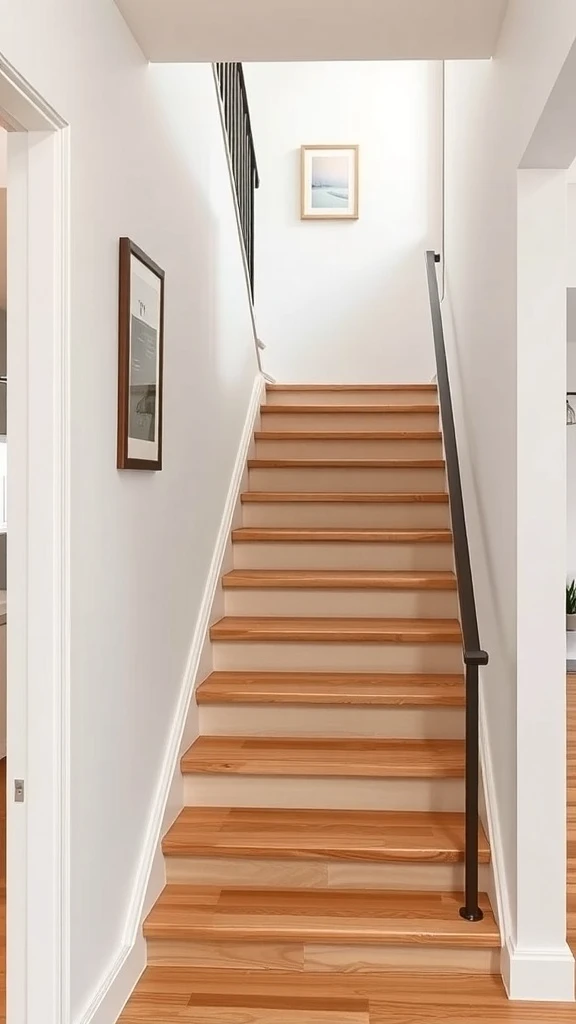
Smooth wooden steps in a rich natural tone paired with clean black metal railings. The contrast is striking. The warmth of the wood against the strength of the metal creates this beautiful balance between cozy and industrial.
The design is simple but it makes a statement. It works in modern homes and traditional ones equally well.
Choose a hardwood like oak or ash for the treads and have them sanded smooth with a matte or satin finish. Pair with a thin metal railing in matte black or brushed steel for a clean contemporary contrast. Keep the railing design simple with straight vertical bars or a minimalist horizontal cable system. Match the metal finish to other hardware in your home like door handles or light fixtures for a cohesive look. This pairing is durable, easy to maintain, and timelessly stylish.
Glass and Steel for a Modern Edge
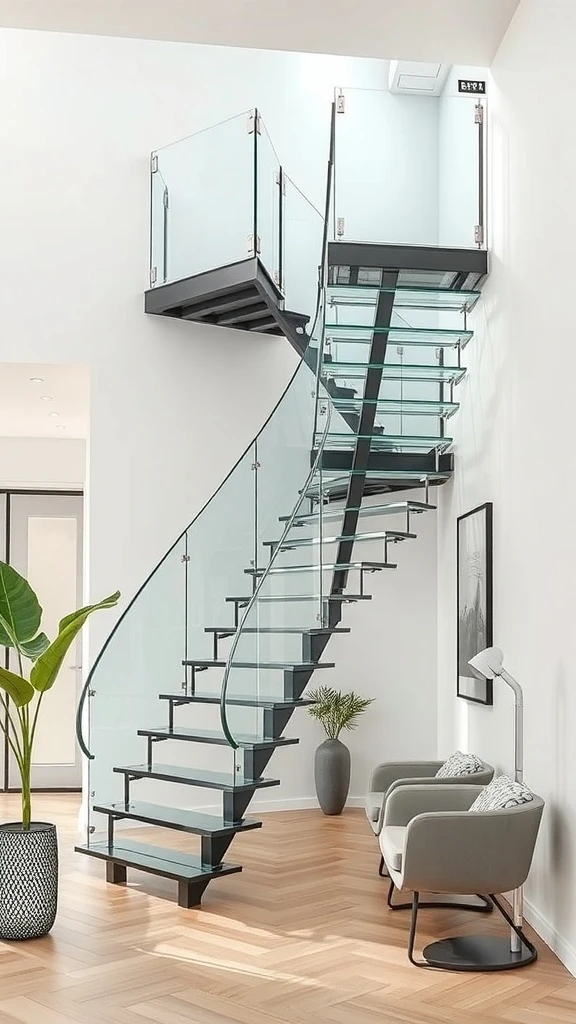
A spiral staircase with glass steps and a steel frame. Light passes through every surface. The staircase almost disappears into the room because nothing about it is heavy or opaque.
A glass railing provides safety without blocking any views. Plants nearby add softness to the hard modern materials. It is bold and elegant and completely open.
Work with a specialist fabricator who can build tempered glass treads rated for residential weight loads. Use a brushed or powder-coated steel frame for durability and a refined finish. Install a glass panel railing along the open side for unobstructed sightlines. Place a couple of green plants near the base to soften the industrial feel with natural texture. This combination is ideal for narrow spaces because the transparency makes the staircase visually weightless.
A Curved Staircase That Flows Beautifully
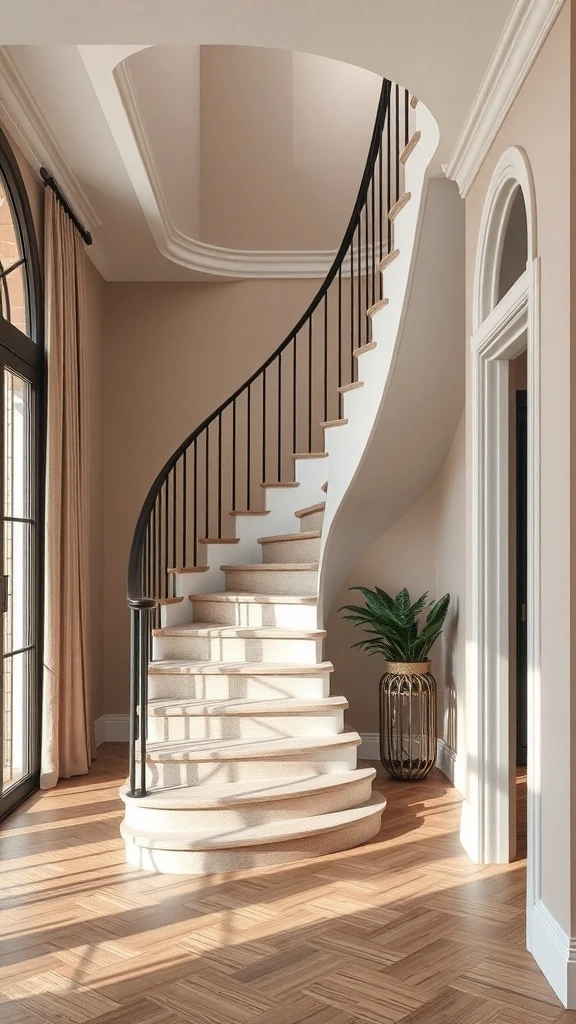
A gently curving staircase with smooth steps and a soft elegant railing. Sunlight pouring through tall windows and casting shadows that follow the curve. A potted plant on the landing adding a touch of life.
The whole design feels graceful. Like the staircase was not built but sculpted. It turns a narrow passage into the most beautiful part of the entryway.
If your space allows even a slight curve, work with a stair builder to design sweeping steps that follow the wall naturally. Choose a light-colored plaster or paint for the walls to reflect maximum light along the curve. Add a smooth wooden handrail that follows the shape without sharp angles. Place a tall window or a skylight at the top to flood the stairwell with natural light. One potted plant on the landing or at the base softens the architecture and adds warmth.
Bold Color on Every Step
Red, blue, orange, and yellow stripes painted across the stair risers. Each step is a different color. The whole staircase pops with energy and personality.
It is playful and unexpected. A narrow staircase that might have been forgettable suddenly becomes the most talked-about feature in the house.
Choose three to five bold colors that work together and paint the vertical riser of each step in alternating shades. Keep the treads themselves in a neutral tone like natural wood or white so the colors pop without being overwhelming. Use high-quality floor paint or porch and deck enamel for durability. Add a colorful piece of art on the stairwell wall to carry the energy upward. This is a weekend project that costs almost nothing but gives your narrow staircase a personality that guests never forget.
Shelves Along the Stairwell Wall
Floating shelves climbing the wall right alongside the stairs. Plants, books, small framed photos, and a candle at different heights. Soft lighting above highlighting each shelf. The staircase wall becomes a mini gallery that you enjoy every time you walk up or down.
It is functional and beautiful and turns wasted wall space into the most interesting part of the house.
Install slim floating shelves at staggered heights following the incline of the staircase. Place items that vary in height and texture on each shelf like a small plant, a framed photo, and a book standing upright. Use recessed spotlights or small puck lights above each shelf to highlight the display. Keep the shelf color matching the wall for a seamless built-in look. Limit each shelf to two or three items so the display stays curated and never feels crowded.
An L-Shaped Design That Fits Tight Corners
An L-shaped staircase turning neatly at a landing and tucking into the corner of a room. Wooden steps with a slim black railing. A small plant and a side table on the landing adding a touch of style.
It fits where a straight staircase would not. The turn creates a landing that doubles as a tiny display area. Compact and clever.
Measure your corner carefully and work with a builder to design an L-shape that uses a landing or winder steps at the turn. Choose warm-toned wood treads with a slim metal railing in matte black for contrast. Use the landing as a small styled moment with a plant or a decorative object. Keep the walls light to maintain an open feel around the turn. An L-shaped staircase fits naturally into corners and leaves the center of the room completely open.
A Decorative Railing That Steals the Show
A black metal railing with elegant curves and scroll details running alongside light wooden steps. A potted plant on the landing. Framed artwork on the walls. The railing is not just a safety feature. It is the design centerpiece of the entire staircase.
It adds character and charm to a narrow space without taking up any extra room.
Choose a metal railing with a design that reflects your home’s style whether that is classic scrollwork, geometric patterns, or simple clean curves. Finish it in matte black or dark bronze for a timeless look against light wood steps. Add a potted plant on the landing and one or two framed pieces on the stairwell wall to build on the railing’s personality. Keep the steps light and simple so the railing stays the star. A decorative railing transforms a basic staircase into a stunning architectural feature.
Soft Glow Beneath Every Step
Warm light glowing from underneath each step creating a soft halo effect on the wall and floor. The staircase looks like it is floating in light. Wood tones catch the glow and the whole stairwell feels warm and inviting even in the darkest hours.
It is practical for nighttime safety and absolutely gorgeous as a design feature.
Install recessed LED strips under the lip of each tread angled downward toward the wall or floor. Choose a warm white color temperature around 2700K for that cozy golden glow. Wire them to a dimmer switch so you can control the intensity from bright for evening use to barely-there for nighttime navigation. Pair with warm wood treads that reflect the light beautifully. This under-step lighting creates a dramatic effect that makes your narrow staircase feel like a luxury hotel feature.
Clean Concrete for a Minimalist Look
Smooth gray concrete steps with no fuss and no extra detail. Natural light from above hitting the surface and showing off the subtle texture. A couple of small plants and a storage container on the landing adding just enough warmth.
It is bold and industrial but somehow still feels calm. The simplicity is the whole point and it works beautifully in modern homes.
Opt for poured or precast concrete stairs with a smooth sealed finish for a clean contemporary look. Keep the walls white or very light to contrast with the gray and prevent the space from feeling heavy. Add one or two small plants in simple pots on the landing for softness. Use wooden accents like a timber handrail or a small wooden shelf to break up the concrete with warmth. This minimalist approach works best when everything is intentionally simple so let the material and the light do the talking.
An Art Gallery Going Up the Stairs
Framed artwork covering the stairwell wall from bottom to top. Black-and-white photos mixed with colorful prints. A plant at the base and a cozy chair for pausing to admire the display. Natural light washing over every frame.
Walking up these stairs feels like walking through a personal museum. Every step reveals something new to look at.
Collect a mix of art prints, personal photos, and one or two statement pieces in coordinating frame styles. Arrange them following the angle of the staircase so the display climbs with you as you go up. Hang the lowest piece at eye level from the bottom step and build upward. Mix sizes and orientations for a dynamic gallery feel. Add one green plant at the base of the staircase and use the natural light from a nearby window or skylight to illuminate the display. This gallery wall turns a plain narrow staircase into the most interesting walk in your home.
Rustic Wood That Feels Like Home
Rich reclaimed wood steps with visible grain and character. Open risers letting light pass through. A matching wooden railing that feels solid and handcrafted. A potted plant and a small lamp on a nearby table completing the scene.
The whole staircase feels warm and grounded. Like it was built by hand and has stories to tell. Rustic design at its most beautiful.
Source reclaimed or rough-sawn wood for treads with natural character marks and grain variation. Seal with a matte finish to protect the wood while keeping its raw beauty visible. Use open risers to let light through and keep the staircase feeling airy. Match the handrail to the tread wood for a cohesive rustic feel. Place a small table or a plant stand at the base with a lamp and a green plant to create a welcoming moment at the foot of the stairs.
A Textured Runner That Adds Softness
A striped carpet runner going right up the center of the stairs. The texture adds warmth underfoot and visually draws the eye upward. Bright walls and framed art alongside the runner keep the stairwell interesting.
It softens the hard surface of the steps and muffles sound. The staircase feels quieter, warmer, and more finished.
Choose a durable low-pile runner in a stripe or simple pattern that fits the width of your stairs with a few inches of wood visible on each side. Secure it with stair rods or a professional install so it stays firmly in place. Go with a neutral tone for timeless appeal or a bold pattern for personality. Add framed art on the stairwell wall to play off the runner’s color. Vacuum the runner weekly to keep it looking fresh. This one addition transforms hard wooden stairs into something soft, styled, and inviting.
A Modular Staircase You Can Customize
A modular spiral staircase with wooden steps and black railings that was assembled piece by piece. It fits the space perfectly because it was designed to be adjusted. The open design lets light flow through and the whole thing feels modern and intentional.
It can be taken apart and reconfigured if your space changes. That kind of flexibility is everything in a small home.
Look for modular staircase systems that come in kits with adjustable heights and angles. Choose a combination of warm wood treads and black metal framing for a modern industrial look. Assemble it yourself following the manufacturer’s guide or hire a professional for the final install. Add a plant near the base and keep the surrounding area minimal so the staircase stands out as a design piece. This modular approach gives you a custom-looking staircase at a fraction of the cost of a fully custom build.
Planters Built Right Into the Stairwell
Green plants climbing alongside the staircase in wall-mounted planters and floor pots. Different varieties at different heights creating layers of lush greenery. The wooden steps and the living plants together feel like walking through a garden path inside your own home.
It brings nature right into the heart of the house and makes a narrow staircase feel alive.
Mount small wall planters at staggered heights along the stairwell wall following the incline. Use a mix of trailing and upright plants for visual variety. Place one or two floor pots on wider landings or at the base of the stairs. Choose humidity-tolerant plants since stairwells can have different air conditions than main rooms. Water on a regular schedule and rotate plants toward light when needed. This integrated green approach turns a plain narrow staircase into a living breathing feature of your home.
An Outdoor Staircase Surrounded by Nature
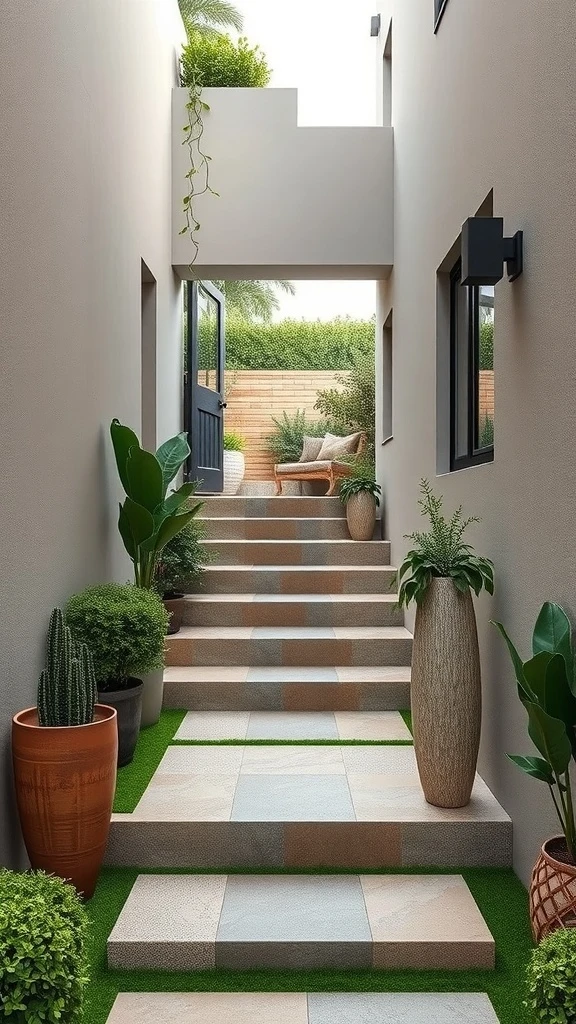
Stone steps leading upward with potted plants lining both sides. Grass or ground cover filling in around the edges softening every hard surface. The whole staircase blends into the landscape like it grew there naturally.
It feels like walking into a garden. Every step takes you deeper into green and calm. It is functional and absolutely beautiful.
Use natural stone or concrete pavers for outdoor steps that handle weather and foot traffic. Line both sides with potted plants in matching containers for a clean symmetrical look. Fill gaps between steps with low ground cover or ornamental grasses for a natural soft transition. Add outdoor solar lights along the edges for safe nighttime use. Choose plants that thrive in your local climate so the staircase stays lush year-round. This outdoor design makes arriving at your door feel like an experience not just a walk up the steps.
by Clara Scott | Feb 21, 2026 | Uncategorized
Tiny house living is all about making every square foot count without giving up the things that make a home feel like yours. Smart storage, cozy textures, and personal touches turn even the smallest space into something truly special. You do not need a big house to have big style. Here are some beautiful ideas to help you decorate your tiny home with confidence and creativity.
Hidden Storage Under the Stairs

The space under your staircase is one of the most underused areas in a tiny home. Built-in shelves and drawers tucked right into the steps turn dead space into functional storage. Books on the shelves. Personal items in the drawers. A plant or a vase on display adding charm.
Everything stays organized and out of the way. The staircase becomes a design feature instead of just a way to get upstairs.
Work with the angles of your staircase to install custom shelves that follow the slope. Use the taller sections for books and display pieces and the shorter sections for pull-out drawers that hold smaller items. Keep the finishes matching the rest of your home so the storage feels built-in and seamless. Add one plant or a small decorative object on a middle shelf for personality. This hidden storage solution keeps clutter invisible while making the most of every inch.
Mirrors That Make the Whole Room Feel Bigger
Two elegant mirrors on the wall catching every bit of light in the room. The space instantly feels deeper and brighter. Wooden frames that match the warm tones of the floor and furniture tie everything together.
Natural light bounces across the room and even the darkest corners glow. One of the simplest tricks for tiny homes and one of the most powerful.
Hang one or two mirrors on the wall opposite your biggest light source whether that is a window or a glass door. Choose frames that complement your existing wood tones for a cohesive look. Position them at eye level or slightly higher so they reflect the brightest part of the room. Use them near a seating area or an entryway where the added depth makes the most impact. This one change transforms how your tiny home feels without moving any furniture.
A Light Color Palette That Opens Everything Up
Soft whites on the walls and ceiling. Light wood flooring warming up the base. A neutral sofa with teal and coral cushions adding just enough personality. Natural light pouring through glass doors making the whole room glow.
The space feels twice its size because nothing heavy is weighing it down visually. It is airy and calm and inviting all at once.
Paint your walls and ceiling in the same soft white or cream to erase visual boundaries. Choose light-toned flooring that flows continuously through the space without breaks. Keep your largest furniture pieces neutral and add color through cushions, throws, and small accessories that can be swapped anytime. Let natural light in as much as possible with minimal window coverings. This simple palette gives your tiny home the most spacious feeling possible.
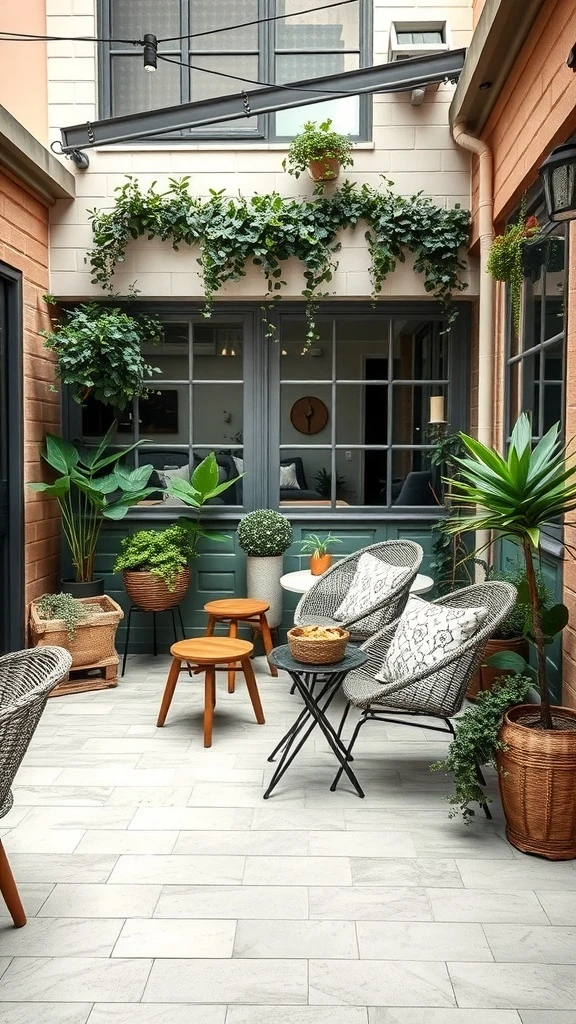
An Outdoor Space That Extends Your Home
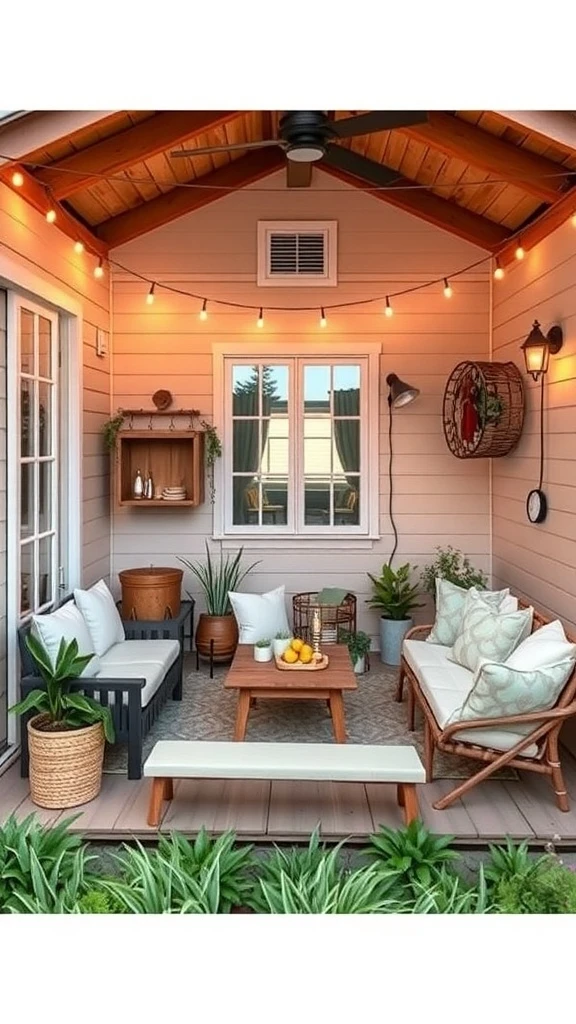
String lights overhead. A mix of comfortable chairs and a bench arranged around a small table. Plants everywhere. The outdoor area feels like another room of the house just without the roof.
Morning coffee out here. Evening hangouts with friends. It doubles your living space without adding a single square foot indoors.
Set up a small seating area right outside your door with a mix of chairs and a compact table. Hang warm white string lights above for evening ambiance. Add potted plants in different sizes to frame the space naturally. Use outdoor cushions and a small rug to make it feel soft and inviting. Keep a basket or a tray on the table for drinks and snacks. This outdoor area becomes your favorite room when the weather is right.
Big Windows That Fill the Room with Sun
Large windows stretching across the wall letting sunlight flood every corner. High ceilings with exposed wooden beams adding character. Light-colored walls catching the glow and spreading it everywhere. A few plants soaking up the rays on the windowsill.
The tiny house feels open and alive. The boundary between inside and outside almost disappears.
If you are designing or renovating go with the largest windows your walls can support. Position your main seating area near the windows to take full advantage of natural light. Keep window coverings minimal or use sheer panels that let light through while adding softness. Place a couple of plants on the sill or beside the windows where they will thrive. The more natural light you bring in the bigger and more welcoming your tiny home will feel.
Furniture That Serves More Than One Purpose

A sofa that converts for sleeping. A coffee table with hidden storage inside. Bright throw pillows making the whole area feel cheerful. A lamp beside the couch ready for evening reading.
Every piece does double duty. Nothing just sits there looking pretty without also being useful. That is the secret to making tiny living feel effortless.
Choose a sofa that has a pull-out bed or storage underneath the cushions. Pick a coffee table with a lift-top or built-in compartments for books and remotes. Use an ottoman that opens for blanket storage and doubles as extra seating. Add a slim floor lamp that takes up no surface space but gives you flexible light. Keep your furniture in light tones and clean lines so nothing feels bulky. This multi-purpose approach means fewer pieces doing more work.
Green Plants That Bring the Room to Life
Plants everywhere you look. Hanging from the ceiling. Sitting on shelves. Standing tall in the corner. A tiny home filled with green feels fresh and alive in a way that no amount of furniture or decor can match.
The air feels cleaner. The room feels calmer. Every corner has something growing and it makes the whole space glow.
Start with one tall floor plant to anchor a corner and add height. Place smaller pots on shelves and windowsills at different levels for a layered look. Hang a trailing plant from a ceiling hook where it can drape down dramatically. Choose low-maintenance varieties like pothos, snake plants, and ZZ plants so they thrive without daily attention. Use pots that match your decor style whether that is ceramic, terracotta, or woven baskets. Three to five plants is the sweet spot for a tiny home that feels lush but not overcrowded.
Wall Shelves That Add Storage and Style
Floating shelves above a cozy seating area lined with books, plants, and a few meaningful objects. The wall becomes a display and a storage system at the same time. The eye travels upward and the room feels taller.
Nothing is sitting on the floor taking up space. Everything lives on the wall where it looks styled and intentional.
Mount two or three shelves at staggered heights above your sofa or seating area. Mix practical items like books with decorative pieces like small frames and plants. Keep the shelf color matching the wall for a seamless built-in feel. Leave breathing room between objects so nothing looks crammed. Use one trailing plant on the highest shelf to connect the display and add movement. This vertical approach gives your tiny home serious storage without using a single inch of floor space.
A Styled Entryway That Welcomes You Home
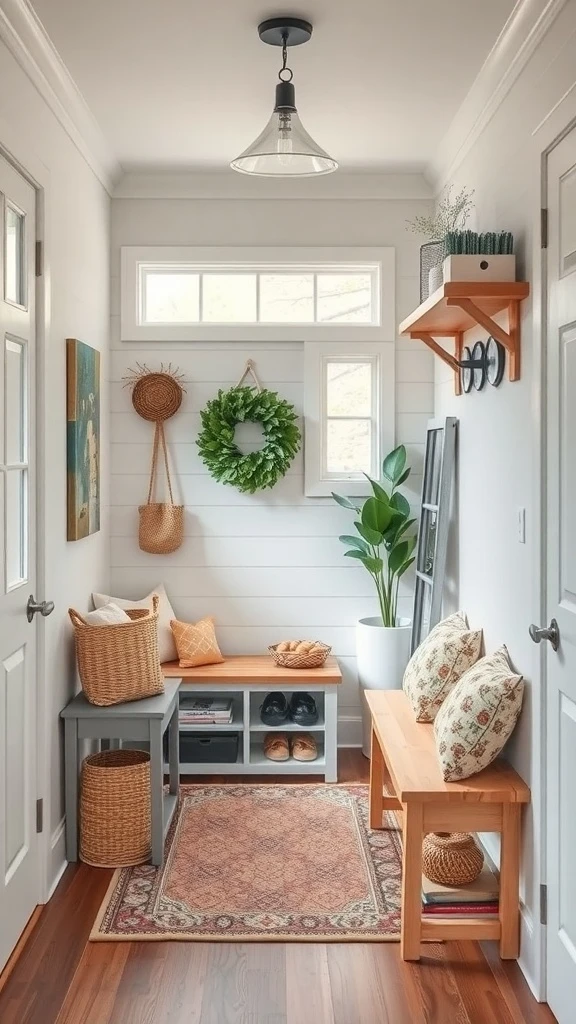
A small bench with baskets underneath for shoes. Open shelves holding keys and daily essentials. A wreath on the wall and a plant adding freshness. A rug on the floor defining the spot.
It is compact but complete. You walk through the door and everything has a place. The first thing you see when you come home feels intentional and warm.
Place a slim bench near the door with a couple of baskets underneath for shoe storage. Mount hooks above for bags and jackets. Add a small open shelf or a narrow console for keys, sunglasses, and mail. Hang one piece of art or a simple wreath to give the area personality. Lay a small rug in front of the bench to define the zone. This tiny entryway setup keeps clutter from ever making it past the front door.
Vintage Pieces That Add Character
A worn wooden coffee table. Woven poufs with natural texture. Framed photos and landscape prints on the wall telling stories. Soft cushions mixing with rough fibers creating layers of warmth.
Vintage finds give a tiny home a soul that new furniture cannot replicate. Every piece feels like it has a history and the room feels collected and real.
Visit thrift stores and flea markets for a wooden coffee table, an old picture frame, or a unique basket with character. Mix vintage items with a few modern pieces so the space feels balanced and not dated. Display old photos or prints in mismatched frames for an eclectic gallery wall. Add woven textures through poufs, baskets, or a jute rug. Keep the overall palette warm and neutral so the vintage pieces are the stars. These collected items make your tiny home feel lived-in and loved.
Lighting That Sets the Perfect Mood
Two pendant lights hanging from exposed wooden beams casting a warm glow over the room. Natural light pouring through big windows during the day. A task lamp on the desk for focused work at night.
The combination of overhead, natural, and task lighting gives the tiny home depth and warmth at every hour. It never feels flat or dim.
Hang one or two statement pendant lights from the ceiling in your main living area for ambient warmth. Position your desk or work area near a window to take advantage of daylight. Add an adjustable desk lamp for evening focus work. Use warm white bulbs in every fixture to keep the whole space feeling cozy and unified. If you have the option install a dimmer so you can shift from bright and productive to soft and relaxing. Good lighting makes a tiny home feel three times its size.
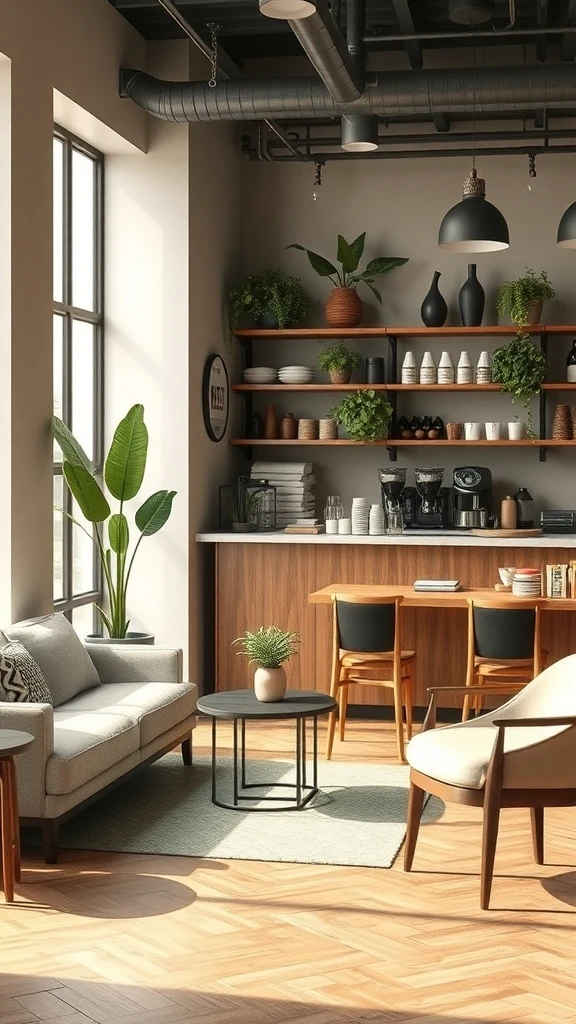
A Kitchen That Is Stylish and Smart
Open shelving showing off your prettiest dishes and bowls. Wooden countertops adding warmth. White cabinets keeping things bright. A pendant light above the workspace. A cozy rug on the floor making the kitchen feel like a real room not just a cooking zone.
Everything is visible and reachable. The kitchen is compact but it works beautifully.
Replace upper cabinets with open shelves to make the kitchen feel larger and more accessible. Display your most-used items and prettiest pieces on the shelves. Keep counters clear by storing appliances inside lower cabinets when not in use. Choose a warm wood countertop or butcher block for natural texture. Add a pendant light above the main work area for both function and style. Lay a washable rug on the floor for comfort and color. This approach keeps a tiny kitchen feeling open and inviting every day.
Walls That Do More Than Just Stand There

Shelves holding clocks, art, baskets, and plants. Every wall in the room working as both structure and storage. A ceiling fan keeping the air moving. Natural light filling in the rest.
In a tiny home your walls are your most valuable real estate. Using them well means the rest of the room stays open and free.
Mount shelves, hooks, and wall-mounted organizers on every available wall surface. Mix functional items with decorative pieces so the display looks curated not cluttered. Use woven baskets on shelves for hidden storage that still looks great. Hang a clock or a small piece of art between the shelves for variety. Add a plant on at least one shelf to bring life to the wall. This approach turns blank walls into the most hardworking design feature in your entire tiny home.
Soft Textiles That Make Everything Cozy
A chunky throw blanket draped over the couch. Patterned pillows in warm tones. A textured rug underfoot. A woven basket beside the sofa. Everything soft and touchable and warm.
Textiles are what turn a tiny house from a small space into a real home. They add layers and warmth that hard surfaces alone cannot achieve.
Start with a cozy throw blanket in a natural fiber like cotton or wool draped over your sofa. Add three or four cushions in a mix of patterns and textures but keep them in the same color family. Layer a soft area rug under your seating area for warmth and definition. Use a woven basket beside the couch for extra blankets or magazines. Choose breathable natural materials that feel good against your skin and hold up to daily use. These textile layers make your tiny home feel incredibly inviting.
A Gallery Wall That Shows Who You Are
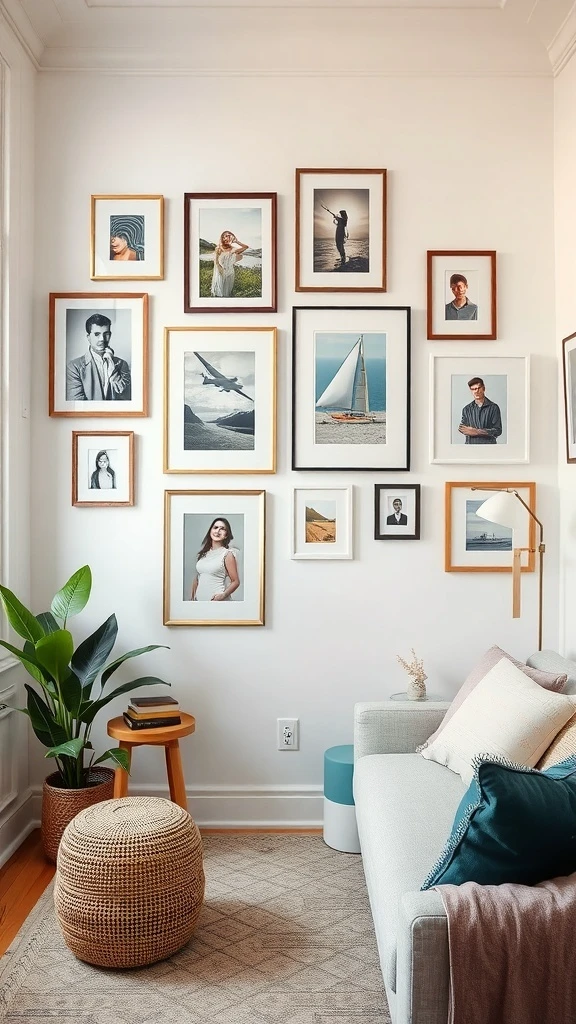
Framed family photos mixed with art prints in gold and wooden frames. A plant in the corner tying the display to the rest of the room. A small pouf and side table below completing the vignette.
This wall tells a story. It is personal and warm and makes the tiny home feel full of life and memory. Every time you pass by you see something that makes you smile.
Gather a mix of personal photos, art prints, and maybe one small mirror in frames that coordinate in tone but vary in size and style. Lay them out on the floor first to find an arrangement that feels balanced. Hang the center of the grouping at eye level and build outward. Add a small plant on a nearby surface to connect the wall display to the rest of the room. Keep the arrangement loose and organic rather than rigid and gridded. This gallery wall becomes the heart of your tiny home and the most talked-about feature when guests visit.
Handmade Items That Add Real Soul
A hand-woven basket on the shelf. A personal photo in a frame you found at a market. Cushions with textures you can feel. A pendant light that looks like someone actually chose it with care.
Handmade and personally chosen items give a tiny home the kind of warmth that mass-produced decor never can. The room feels loved and lived in.
Start with one or two handmade pieces like a woven basket, a ceramic vase, or a hand-stitched cushion cover. Display personal photos in frames that have character rather than matching perfectly. Look for unique lighting fixtures at local markets or small shops. Add a plant in a handmade pot or a simple clay vessel. These one-of-a-kind items create a home that looks and feels like it belongs to you and no one else.
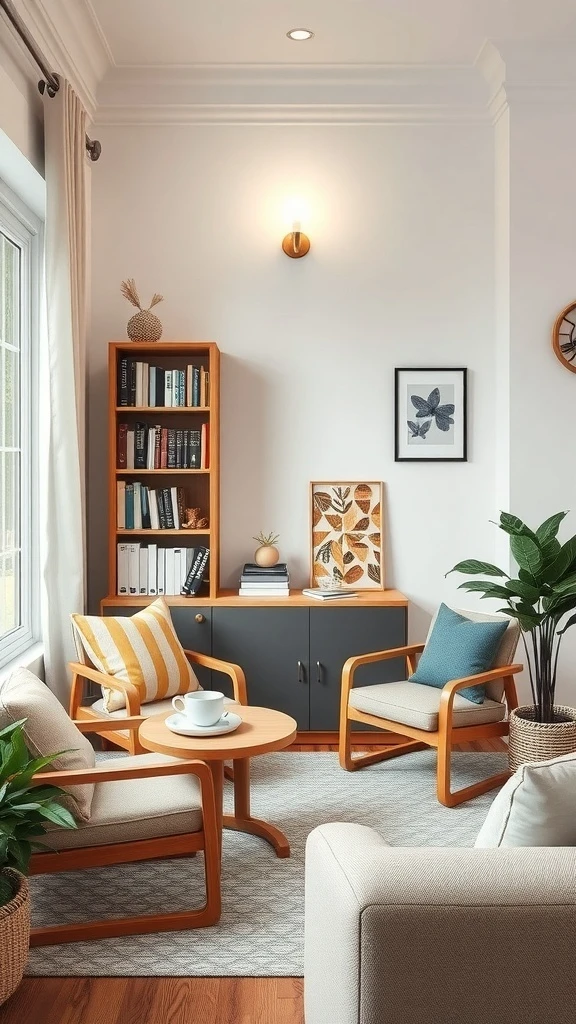
A Reading Nook You Will Never Leave
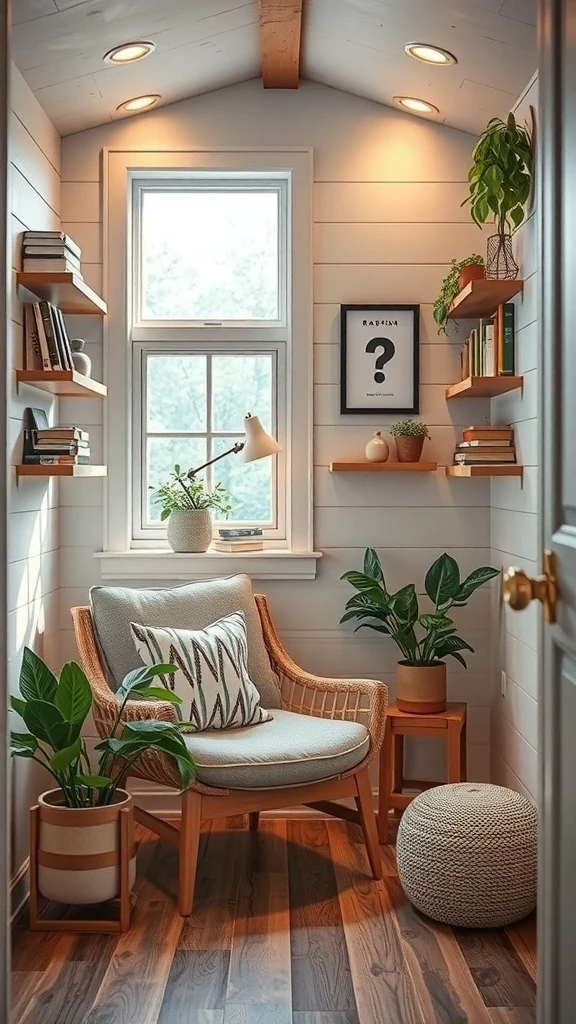
A deep comfortable chair in a quiet corner. Shelves filled with books within arm’s reach. A small lamp for late-night reads. A plant adding calm to the space.
You sit down with a book and everything else fades away. This tiny corner becomes the most peaceful spot in the house. It does not take much room to create something this special.
Pick a chair with a deep seat and soft cushions that invites curling up. Place it in the quietest corner of your home near a window for natural light. Add a small bookshelf or a couple of floating shelves within reach stocked with your current reads. Set a small lamp on a side table for evening reading. Drape a soft throw over the arm of the chair and add one plant on a nearby surface. This dedicated nook gives you a daily escape right inside your own tiny home.
Eco-Friendly Choices That Look Great
A wooden coffee table. Woven baskets for storage. Plants purifying the air. Natural fabrics on the cushions and rug. Everything chosen with the planet in mind and it all comes together beautifully.
Sustainable decor in a tiny home feels intentional and thoughtful. It is good for your space and good for the world.
Choose furniture made from reclaimed wood, bamboo, or FSC-certified materials. Use woven baskets in natural fibers for storage that doubles as decor. Select cushion covers and throws in organic cotton or linen. Add plants that purify the air like snake plants, pothos, or peace lilies. Look for secondhand or locally made pieces whenever possible. This eco-friendly approach creates a tiny home that is stylish and sustainable without compromising on comfort or beauty.
Pops of Color That Bring Energy
A neutral gray sofa with bright orange and red cushions. A wooden coffee table grounding the space. A green plant adding freshness. Shelves with books and personal items giving the room depth.
The base is calm and the accents are bold. That balance keeps the tiny home feeling open while still being full of personality and life.
Keep your walls, floors, and largest furniture pieces in soft neutral tones. Add energy through colorful cushions, a bold throw, or a vibrant piece of art. Stick to two or three accent colors so the room stays harmonious. Place your brightest items where the eye naturally lands like the sofa or a shelf at eye level. Swap these accents seasonally for a fresh look without buying new furniture. This approach gives your tiny home big personality while keeping the foundation calm and spacious.
Seasonal Touches That Keep Things Fresh
A garland draped along the wall. A warm-toned area rug. Candles on the coffee table. A few seasonal flowers mixed in with the usual greenery. The room shifts with the season and it feels like a whole new space.
Tiny homes especially benefit from seasonal swaps because even small changes make a big visual difference.
Keep your base furniture and main decor the same year-round and only swap the accessories. Drape a seasonal garland along a shelf or doorway. Change your throw pillows to match the season’s colors. Add a few candles for fall and winter warmth or fresh flowers for spring and summer brightness. Lay down a rug in a seasonal tone to shift the mood of the whole room. Store off-season items in a small bin and rotate every few months. These little swaps keep your tiny home feeling exciting and new without spending much at all.
by Clara Scott | Feb 21, 2026 | Uncategorized
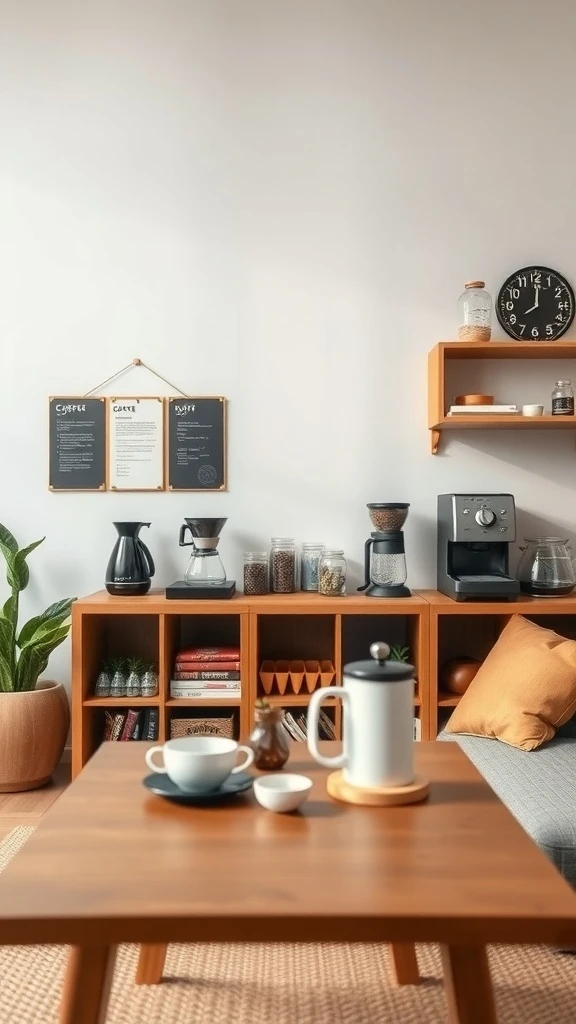
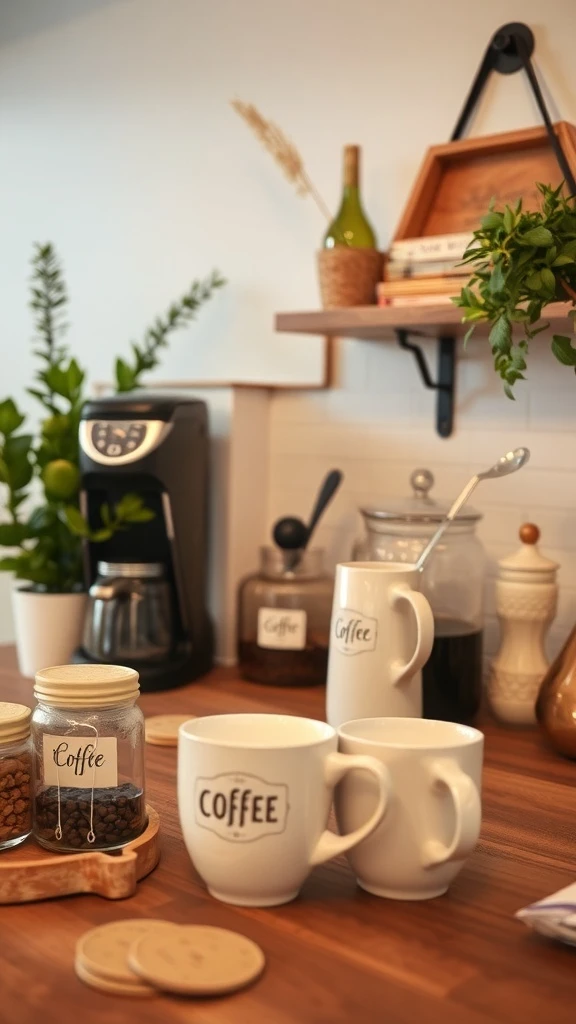
A small coffee bar at home is one of those things that just makes daily life feel a little more special. You do not need a lot of space to create something cozy and beautiful. A corner of your kitchen, a cart by the window, or even a single shelf can become your own personal coffee spot. Here are some fun ideas to help you set up a coffee bar you will love using every single day.
An Outdoor Patio Perfect for Coffee
Wicker chairs tucked between green plants. A couple of wooden stools pulled up to a small table. String lights draped overhead casting a warm glow as the sun goes down. This is the kind of outdoor coffee spot that makes you forget you are at home.
Your morning cup tastes better out here. The fresh air and the greenery around you turn a simple coffee moment into something truly relaxing.
Pick a small corner of your patio or balcony and set up two comfortable outdoor chairs with a tiny round table between them. Add potted plants on either side for a natural frame. Hang warm white string lights above for cozy evening vibes. Keep a small tray on the table for your mugs and a sugar bowl. This simple setup gives you an outdoor coffee retreat that costs very little but feels like a vacation every morning.
A Clean Minimalist Coffee Corner
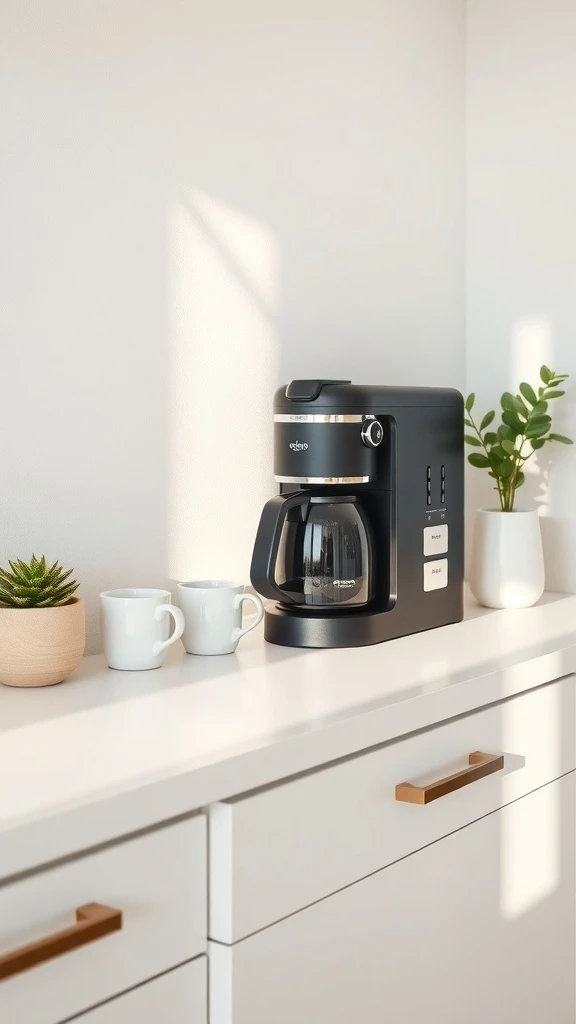
A sleek coffee maker on a white countertop. Two simple mugs waiting beside it. One small plant adding a touch of green. Nothing else. The whole setup breathes calm.
This is coffee made simple. No clutter. No extra gadgets fighting for space. Just the essentials styled beautifully so your morning routine feels effortless and peaceful.
Choose a compact coffee maker that matches your kitchen style and place it on a clear section of counter. Keep only two or three mugs nearby in a matching set. Add one small potted plant like a succulent or a tiny herb for freshness. Store everything else like filters, extra beans, and spoons in a drawer or cabinet below. This minimalist approach makes your coffee corner feel like a design feature instead of just a spot with appliances.
A Rustic Cart That Goes Anywhere
A wooden rolling cart with warm rustic tones holding your coffee maker, your favorite mugs, and a canister of fresh beans. A little plant tucked in the corner. Wheels that let you roll the whole thing from the kitchen to the living room whenever you want.
It is charming and practical and looks like something out of a cafe. Guests always notice it.
Find a two or three tier rolling cart in natural wood or a distressed finish for that rustic feel. Place your coffee maker on the top shelf and your mugs and canisters on the lower levels. Add a small plant and one decorative piece like a framed coffee quote or a small sign. Roll it to wherever you are hanging out that day. This portable setup means your coffee bar is never stuck in one spot and always looks adorable.
Wall-Mounted Shelves for a Floating Coffee Bar
Shelves mounted right on the wall holding your coffee maker, mugs, a grinder, and a couple of plants. No counter space needed. No furniture touching the floor. The whole bar floats and the area below stays completely open.
It looks intentional and styled and takes up almost zero room in your kitchen. A framed photo or a small print on the shelf makes it feel personal.
Install two or three sturdy floating shelves at different heights on a blank kitchen wall. Place your coffee maker on the lowest shelf at a comfortable working height. Use the upper shelves for mugs hung on hooks or stacked neatly alongside a small plant and a decorative item. Mount a small hook strip underneath one shelf for hanging extra mugs or a towel. This wall-mounted approach gives you a full coffee bar without sacrificing any counter or floor space.
A Compact Espresso Setup That Feels Pro
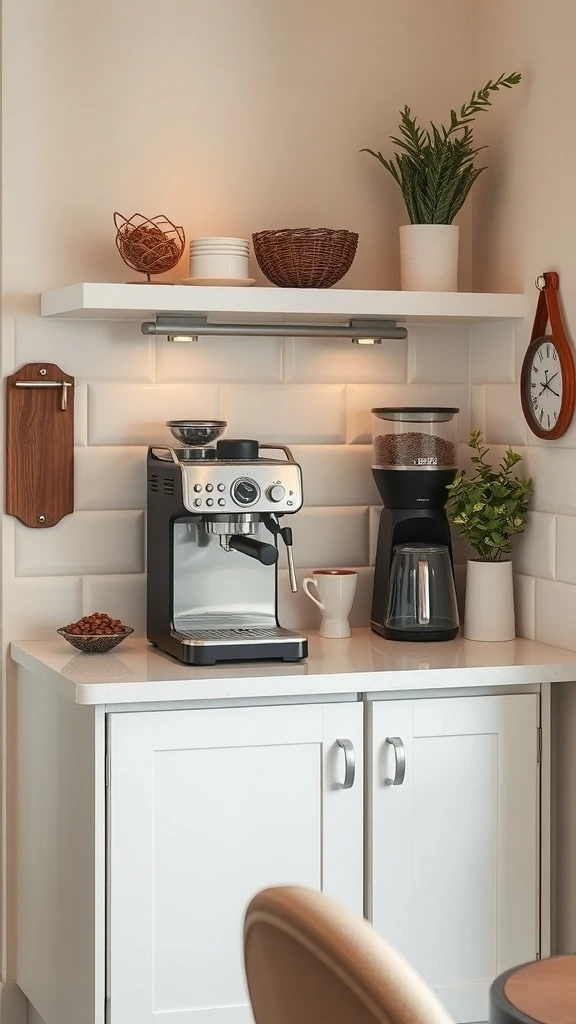
An espresso machine and a grinder side by side on a small counter. Shelves above with cups and baskets keeping everything organized. A tiny plant adding just enough softness. The whole corner feels like a real coffee shop squeezed into your kitchen.
Every morning you pull a perfect shot and it feels like a luxury. It does not take much space to have a setup this good.
Choose a compact espresso machine that fits your counter depth and pair it with a burr grinder for fresh beans every time. Mount a small shelf above for espresso cups and a decorative basket for supplies. Keep a knock box and a small towel nearby for easy cleanup. Add one small plant and maybe a tiny wall clock to finish the look. This focused setup turns a single corner into a legitimate home espresso bar you will use every day.
A Colorful Mug Display That Pops
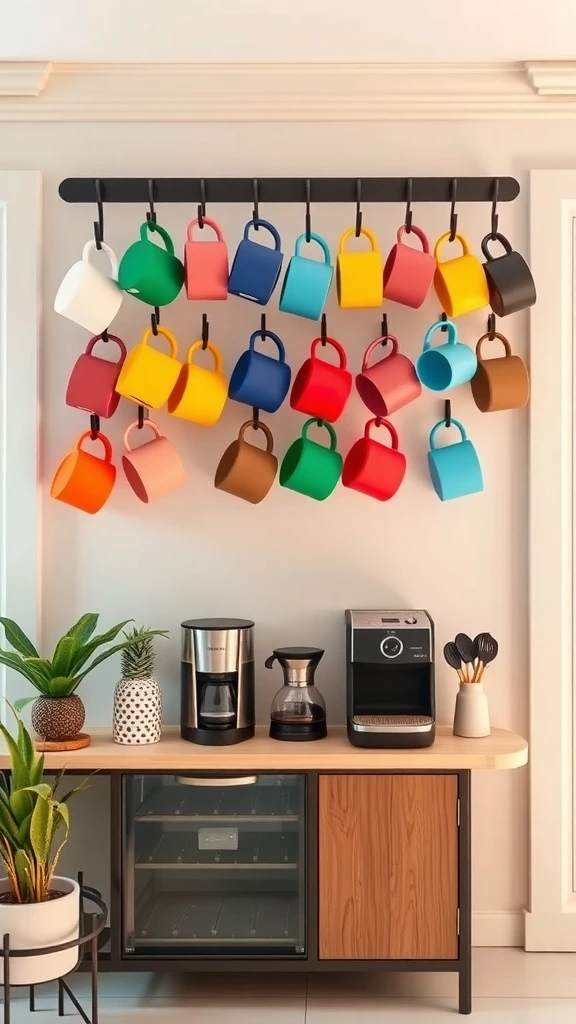
A row of mugs hanging from a sleek rack in every color you love. Each one different. Each one with its own personality. They are not just mugs anymore. They are part of the decor.
Paired with a simple coffee maker and a plant or two, the whole area feels cheerful and inviting. Reaching for your favorite mug each morning becomes a tiny moment of joy.
Mount a slim mug rack or a set of hooks on the wall near your coffee station. Collect mugs in a mix of colors and patterns that make you happy. Arrange them in a loose order that feels natural rather than perfectly matched. Keep your coffee maker directly below for a functional flow. Add a small potted plant beside the machine to soften the look. This display turns your everyday mugs into wall art that also happens to be totally practical.
A Cozy Chair and a Cup of Coffee

A comfortable armchair in a quiet corner. A small side table just big enough for your cup. Shelves above with plants and a few pretty things. Soft light coming in through a nearby window.
This is not just a coffee bar. It is a coffee moment. A spot designed specifically for sitting down, slowing down, and actually enjoying every sip.
Pick a cozy armchair and place it in the quietest corner of your home near a window if possible. Set a small round side table beside it for your mug and maybe a little book. Mount a shelf above with a plant and one or two decorative pieces. Keep a small throw blanket on the arm of the chair for chilly mornings. This dedicated coffee nook gives you a reason to pause and enjoy instead of rushing through your morning routine.
Coffee and Dessert Together on One Table
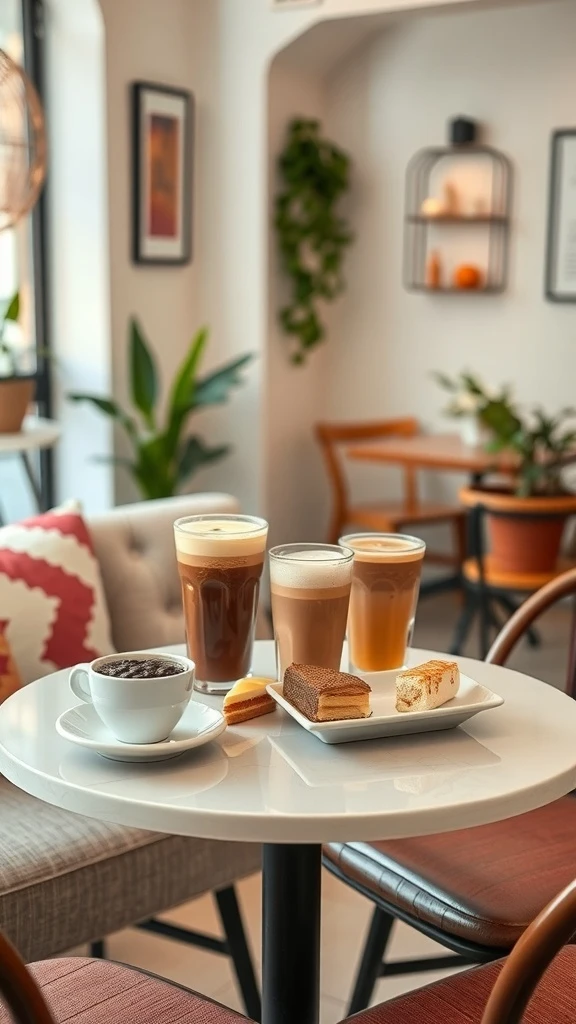
A small table set with a rich cup of black coffee, a couple of creamy drinks, and a plate of sweet treats. Cake beside pastries beside something chocolatey. Every bite paired perfectly with every sip.
This is the kind of spread that turns an ordinary afternoon into a little celebration. It does not take much. Just good coffee and something sweet to go with it.
Dedicate a small tray or a section of your coffee bar counter to a dessert pairing. Set out two or three small pastries or cookies beside your freshly brewed cups. Use simple white plates and clear glasses so the food and drinks are the stars. Change the treats weekly to keep things exciting. This pairing approach makes your coffee bar feel like a real cafe experience and gives you a reason to invite a friend over.
A Tasting Station for Coffee Lovers
A wooden table with different beans on display. A chalkboard menu on the wall listing your options. A French press and a pour-over sitting side by side. Small cups lined up for tasting each one.
This is for the person who treats coffee like an experience not just a drink. It is interactive and fun and makes every cup feel special.
Set up a small table or a section of your counter with two or three different brewing methods like a French press and a pour-over dripper. Display your bean options in small jars with labels. Write a simple menu on a small chalkboard listing what is available that day. Use small tasting cups so you can try each one without committing to a full mug. Add a few biscotti or crackers on a plate for palate cleansing between tastings. This setup is perfect for a coffee date at home or a weekend morning ritual.
A Handcrafted Brewing Corner
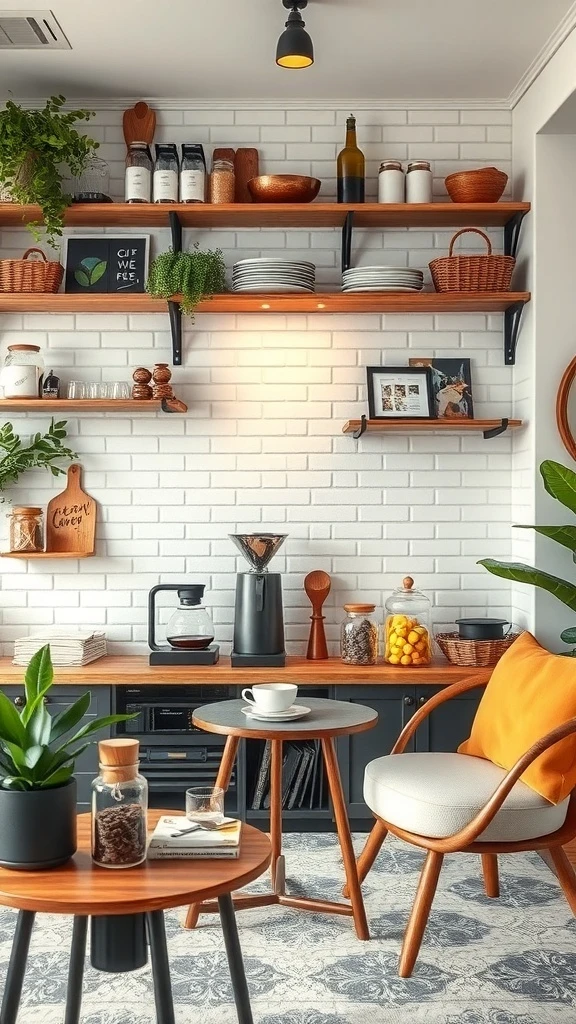
Wooden shelves lined with jars of beans and supplies. A sleek coffee maker ready to go. A small table with a steaming cup waiting. Plants tucked in between everything adding freshness and charm.
The whole corner feels like a tiny artisan shop hidden inside your home. Every detail is chosen with care and it shows.
Install open wooden shelves on the wall above your coffee setup for jars, mugs, and a small plant or two. Keep your coffee maker and grinder on the counter below with a small cutting board as a base for a clean look. Place a tiny table or a stool nearby where you can sit and enjoy your cup. Add a decorative item like a small framed coffee illustration or a vintage tin. This artisan-inspired corner makes brewing feel like a craft and every cup feel handmade.
Framed Art and Warm Lights for Character

Coffee-themed prints in simple frames on the wall above your station. Warm Edison bulb lighting casting a golden glow over the counter. Plants on the shelves adding life. Comfortable seating nearby inviting you to sit and stay awhile.
This is a coffee bar that feels like a real cafe. Styled with love and ready for mornings, afternoons, and late-night cups.
Hang two or three coffee-themed prints or vintage signs on the wall behind your coffee setup. Install a small pendant light or a clip-on Edison bulb above the counter for that cafe glow. Arrange your coffee maker, mugs, and canisters neatly on the counter below. Add a small stool or a chair nearby for lingering. Place a plant on the counter and one on the shelf above for greenery at two different levels. This combination of art and lighting gives your coffee bar personality that goes way beyond the basics.
A Vintage Setup with Old-World Charm
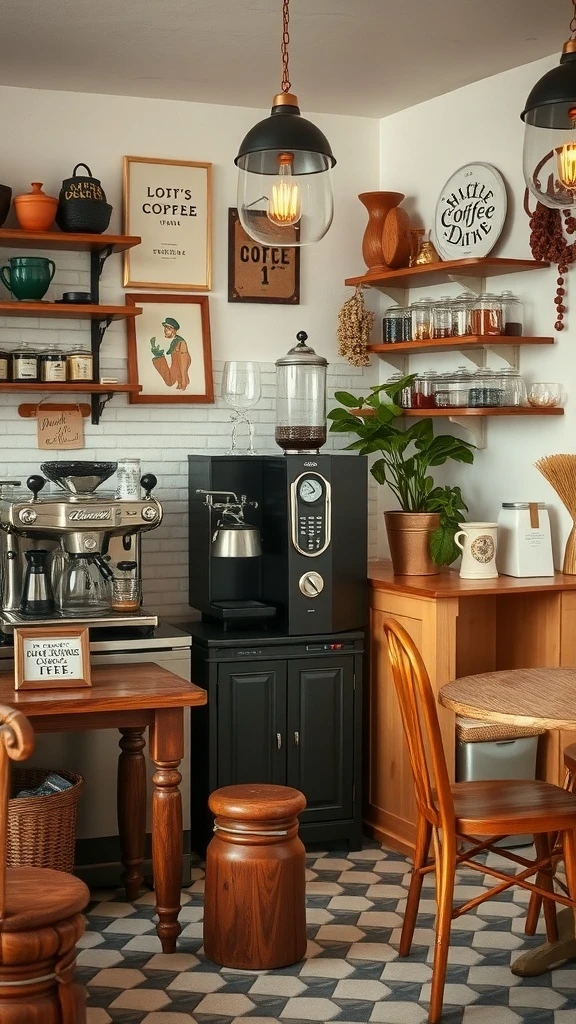
Reclaimed wood shelves. Retro coffee accessories. Patterned floor tiles. Framed art with a nostalgic feel. The whole bar looks like it has been there for decades telling stories over countless cups of coffee.
It is warm and full of character. The kind of space that makes you slow down and savor every moment with your mug in hand.
Use reclaimed or distressed wood for your shelves and countertop to get that aged vintage look. Search thrift stores for old coffee tins, vintage mugs, and retro signs to display. Add a patterned tile backsplash or a patterned rug beneath the station for old-world texture. Frame a couple of coffee-related prints in mismatched vintage frames. Keep a few plants in simple terracotta pots to balance the warm tones. This collected-over-time aesthetic makes your coffee bar feel like a story not just a station.
Seasonal Decor That Changes with the Calendar
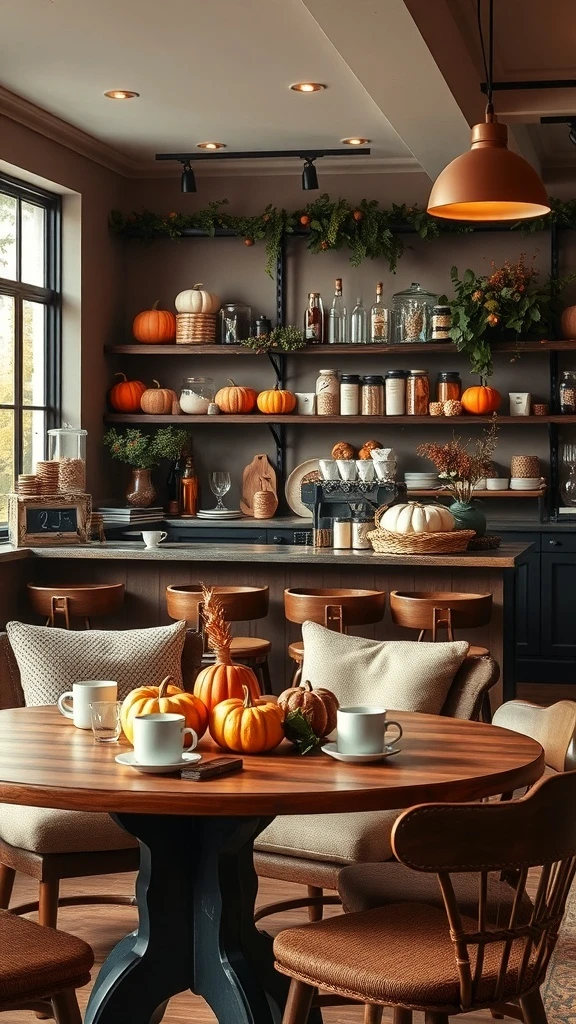
Mini pumpkins and autumn leaves surrounding your coffee station in the fall. Fresh flowers and pastel mugs in the spring. A little evergreen sprig and a candle in the winter. Each season your coffee bar gets a new look without changing a single piece of furniture.
It keeps the space feeling fresh and festive all year long. You look forward to each seasonal swap as much as the coffee itself.
Keep your base setup the same with your coffee maker, main mugs, and a plant that stays year-round. Swap out small accessories like a decorative tray, a seasonal candle, or themed napkins every few months. Add mini pumpkins in fall, fresh flowers in spring, citrus in summer, and pine sprigs in winter. Store off-season items in a small box so switching takes just minutes. This rotation keeps your coffee bar feeling alive and gives you a creative little project every season.
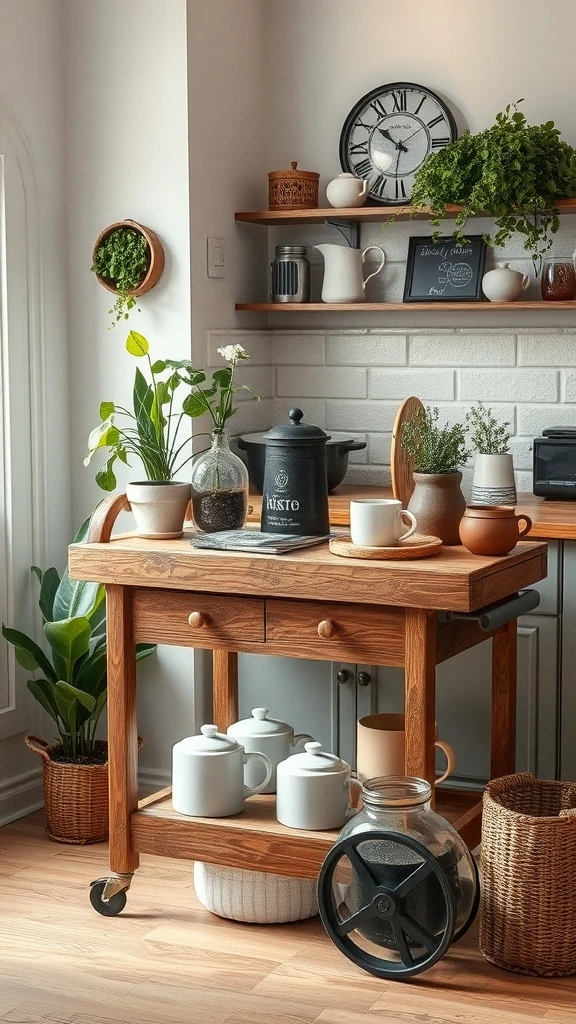
A Utility Table That Does Everything

A beautiful wooden table with a spacious top holding your coffee maker and kettle. Open shelving above for mugs and beans. Woven baskets on the lower shelf hiding extra supplies. A plant beside it keeping things fresh.
This table is not just furniture. It is your entire coffee bar in one compact piece. Everything you need is right here in one stylish spot.
Choose a sturdy utility table with at least two levels for maximum storage in a small footprint. Place your coffee maker and kettle on the top surface with a small tray to keep things tidy. Use the lower shelf for woven baskets holding filters, extra beans, and sweeteners. Mount a small shelf above the table for mugs and one or two decorative items. Add a plant on the countertop or on the lower shelf to bring the whole setup to life. This all-in-one station keeps your coffee bar self-contained and looking gorgeous.
A Personalized Station Just for You
Labeled jars filled with your favorite beans. Mugs you picked out yourself. A small sign or a framed quote that makes you smile. A coffee maker that brews exactly the way you like it. Every detail chosen by you for you.
This is not just a coffee bar. It is your coffee bar. And that is what makes it special.
Dedicate a small table or a section of counter to your personal coffee setup. Transfer your beans into clear labeled jars so they look beautiful and stay fresh. Display your two or three favorite mugs on a small rack or hook strip. Add one personal touch like a framed photo, a handwritten quote, or a tiny souvenir from a trip. Keep sweeteners and creamers in small matching containers nearby. This personal station turns your daily coffee into a ritual that feels uniquely yours.
Coffee and Books in One Perfect Nook
A small round table with a steaming cup. Two comfy chairs pulled close. A bookshelf right behind filled with novels and favorites. Plants adding softness and light streaming in from a nearby window.
This is where coffee and reading become the same beautiful ritual. You sit down with both and time just disappears.
Place a small round table between two comfortable chairs near a bookshelf or a wall of floating shelves filled with books. Keep a cozy throw on one chair for longer reading sessions. Set a small tray on the table for your coffee cup and a candle. Add a plant on the bookshelf or on the table for freshness. Position the nook near a window for natural light during the day. This combined coffee and reading spot becomes the most used corner in your entire home.
An Eco-Friendly Coffee Bar
Reclaimed wood shelves. Ceramic mugs instead of disposable cups. Plants purifying the air all around you. Natural light filling the space so you barely need a lamp. Everything chosen with the planet in mind and it all looks beautiful.
This coffee bar feels good to use because you know every piece of it was thoughtfully chosen. Sustainability and style working perfectly together.
Use reclaimed wood or bamboo for your shelves and countertop. Choose reusable ceramic or glass mugs over anything disposable. Buy organic and locally roasted beans when possible. Offer plant-based milk options in your home bar for variety. Add several small plants throughout the space to naturally purify the air. Use an LED light or position the bar near a window to minimize energy use. This eco-friendly approach creates a coffee bar that feels as good as it looks.
A Coffee Spot with a Beautiful View
A simple wooden table placed right by a big window. A comfortable chair facing the view. A cup of coffee in your hands and the world outside filling your eyes. Plants on the sill connecting the indoor and outdoor energy.
It is the simplest setup but it feels like the best seat in the house. Morning coffee here becomes the highlight of every day.
Position a small table or a narrow counter directly in front of your best window. Choose a chair that faces outward so the view is the main event. Keep the surface minimal with just your mug and maybe a small vase or plant. Add a couple of plants on the windowsill to blur the line between inside and outside. Let natural light be the only decoration you need. This view-focused coffee spot proves that sometimes the best design is just placing a chair in the right place.
A Chic Bar with Modern Touches
A sleek countertop with carefully arranged coffee tools. Light-colored walls and elegant furniture around it. Plants placed just right. A couple of bold chairs adding a pop of color. The whole setup looks like it belongs in an interior design magazine.
It is modern and polished but still warm enough to feel like home. The kind of coffee bar that makes you proud to show off to guests.
Choose a countertop in white, marble-look, or light stone for a clean modern base. Display your coffee tools and mugs in a curated arrangement rather than cramming everything together. Add one or two statement chairs in a bold color nearby for seating. Mount slim shelves on the wall for plants and decorative pieces. Keep the lighting warm and the accessories minimal. This chic approach gives your coffee bar a high-end feel that elevates your whole kitchen or dining area.
A Social Coffee Corner for Hanging Out
Two stylish chairs facing each other. A small round coffee table between them. Shelves nearby with books and a couple of games. Plants adding life to every surface. The whole area says sit down, grab a cup, and stay awhile.
This coffee corner is designed for conversation and connection. It is where friendships get deeper one cup at a time.
Set up two comfortable chairs facing each other with a round table in between for mugs and snacks. Place a small bookshelf or floating shelves nearby stocked with books, a card game, or a small puzzle for rainy day hangouts. Add plants at different heights for a lush relaxed atmosphere. Keep a tray on the table with a sugar bowl, a creamer, and a small vase for fresh flowers. This social setup transforms your coffee bar from a solo station into a welcoming gathering spot for two.
by Clara Scott | Feb 21, 2026 | Uncategorized
A tiny home office can be just as productive and beautiful as a big one. You do not need a spare room to create a workspace that inspires you. A corner, a closet, even a sliver of wall space is enough when you design it right. Smart choices and a little creativity go a long way. Here are some ideas to help you build a small office that works as hard as you do.
Shelves That Take Your Office Vertical
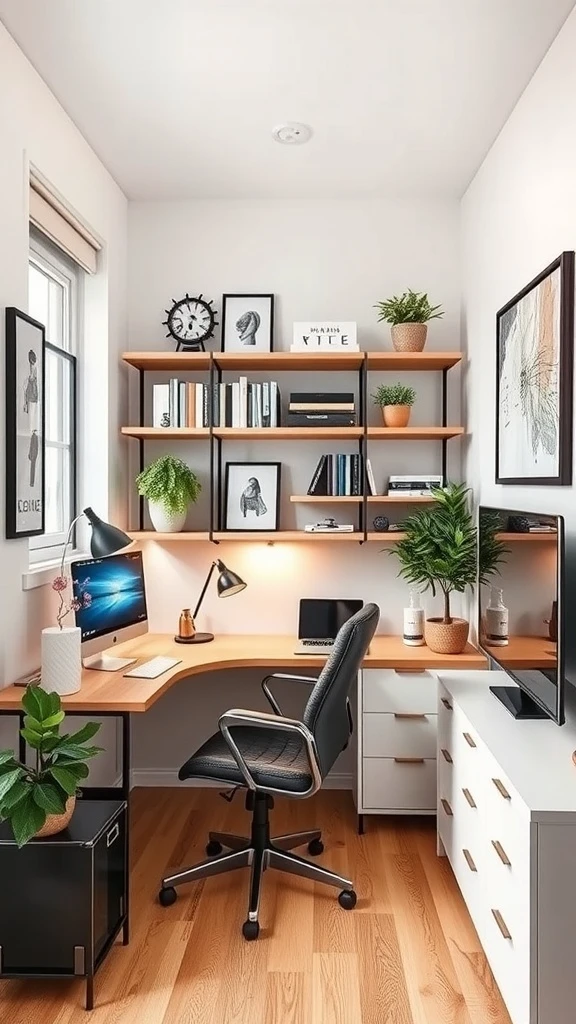
When your desk space is limited your walls become the answer. Shelves mounted above the desk holding books, plants, and a few decorative touches. The desktop stays clear for actual work. A corner desk tucked into the angle of the room uses every inch without wasting anything.
Light wood tones keep it feeling warm and open. The whole setup looks like it was custom built even though it is just smart choices stacked together.
Install two or three floating shelves above your desk starting about 18 inches from the surface. Use them for books, small baskets, and one or two plants to mix function with style. Choose a corner desk if you have an L-shaped wall to work with so you get maximum surface area in minimum space. Keep the shelves in the same wood tone as the desk for a seamless built-in look. Only display items you use or love so the shelves stay curated and never cluttered.
Layered Lighting That Keeps You Going
Natural light from a big window flooding the desk during the day. A pendant light overhead for general brightness. An adjustable desk lamp for focused tasks at night. Three layers of light working together so you never feel like you are straining your eyes.
Plants on the windowsill soak up the sun alongside you. The whole workspace feels bright and energizing no matter what time it is.
Position your desk near a window for the best natural light during work hours. Hang a pendant or ceiling fixture above the desk area for even overhead brightness. Add an adjustable arm desk lamp that lets you direct light exactly where you need it for reading or writing. Use warm white bulbs in every fixture to keep the mood consistent and easy on the eyes. This three-layer approach gives you full control over your workspace lighting from morning to midnight.
Clean Cables and Tidy Tech
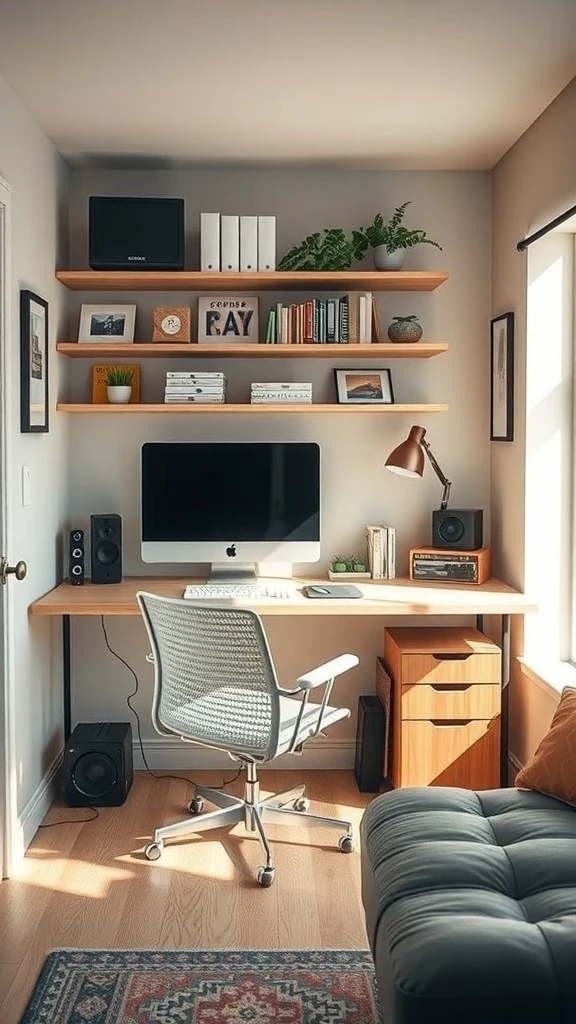
A desk with wires running everywhere feels chaotic before you even sit down. But tuck those cables behind the desk with a few clips and suddenly the whole space feels calm and professional. Your monitor, speakers, and lamp all sitting neatly on the surface with nothing tangled below.
Shelves above hold the rest of your gear and a good desk lamp lights up the workspace beautifully. It is clean and focused and ready for real work.
Use adhesive cable clips or a cable management tray attached under the desk to route all your cords out of sight. Switch to wireless peripherals like a keyboard and mouse to eliminate extra cords on the surface. Keep only your essential tech on the desktop and store accessories on a nearby shelf or in a drawer. A single well-placed desk lamp adds both light and style without adding visual noise. This clean setup helps your brain focus because nothing on the desk is distracting you.
Furniture That Does Double Duty
A sleek desk with enough room for a laptop and a coffee cup. A small cabinet beside it hiding supplies behind a closed door. Compact chairs that are comfortable enough for hours but slim enough to slide under the desk when you stand up.
A couple of plants keeping the air fresh. Every piece in this tiny office earns its place by doing more than one job. Nothing is wasted.
Look for a desk with built-in drawers or a pull-out shelf so you skip the need for a separate storage unit. Choose a chair with a slim profile that tucks fully under the desk when not in use. Add a small rolling cabinet that doubles as a side table and a supply closet. Keep one or two plants in simple pots to soften the space without adding bulk. The key is choosing pieces that are compact in size but generous in function.
A Reading Corner Inside Your Office
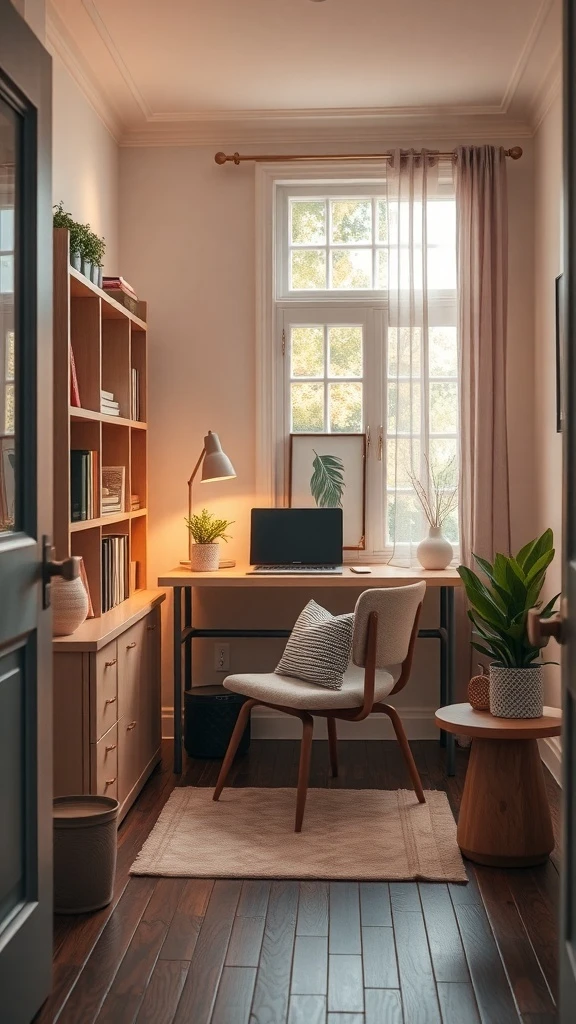
A comfortable chair beside the window with a soft throw pillow. A small side table for your tea. A bookshelf within arm’s reach filled with your favorite titles. Natural light pouring in and a warm desk lamp waiting for the evening.
This tiny office gives you a place to work and a place to recharge without ever leaving the room. It is productive and peaceful at the same time.
Place a cozy armchair in the corner nearest to your window for the best natural light. Set a small round side table beside it for your drink and reading glasses. Keep a slim bookshelf close by organized with books you actually want to read. Add a soft cushion and a small throw for comfort during longer reading breaks. This little nook inside your office gives you mental breathing room without needing a separate space.
Bold Colors That Spark Creativity
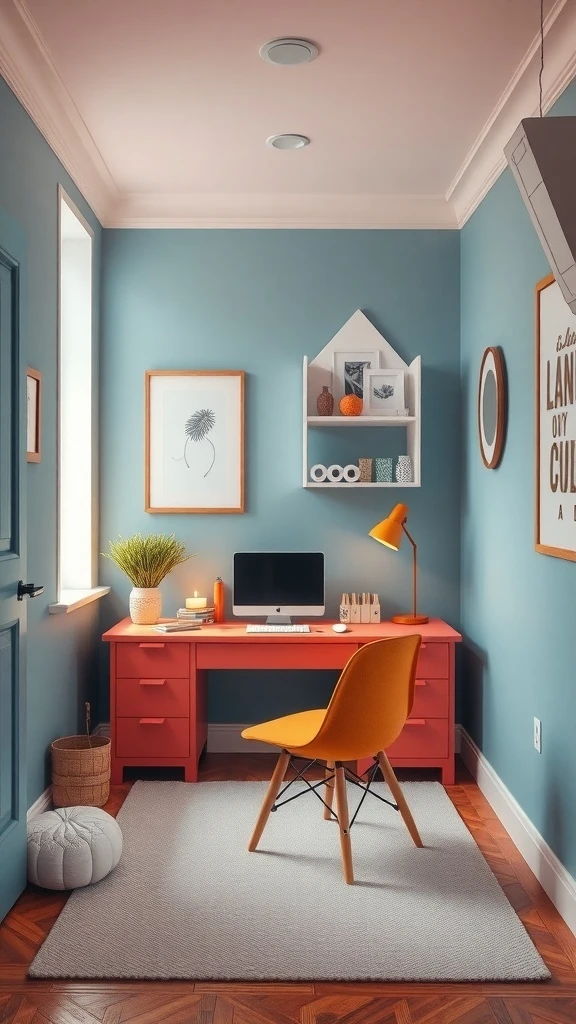
Soft blue walls with a peach ceiling. A bright coral desk popping against it all. An orange chair tying everything together. This is not your typical home office and that is exactly what makes it so inspiring.
Framed art and a couple of plants add personality. The space feels energetic and fun and totally unique. You sit down and ideas just start flowing.
Pick a calming base color like soft blue or sage for your walls and go bold with one piece of furniture like a bright desk or a colorful chair. Add a contrasting ceiling color or an accent wall for unexpected depth. Hang two or three pieces of art that match the playful palette. Bring in a plant for natural balance against all the color. This approach turns a tiny office from basic to inspiring with just a few brave choices.
Plants That Make Your Office Feel Alive
Green everywhere you look. Hanging from shelves. Sitting on the desk. Trailing from a high spot near the ceiling. A tiny office filled with plants feels less like a workspace and more like a calm creative retreat.
The air feels cleaner. Your mood lifts. Your focus sharpens. It is amazing what a few well-placed pots of green can do for how you feel at your desk.
Start with one tall floor plant like a fiddle leaf fig in the corner to anchor the greenery. Add a small pot on the desk near your monitor for a close-up touch of nature. Hang a trailing pothos from a high shelf or a ceiling hook to bring green into the upper part of the room. Choose low-maintenance varieties that handle indoor light without fussing. Three to five plants is the sweet spot for a tiny office. Enough to feel lush but not so many that it feels crowded.
Natural Materials That Add Warmth
A light wood desk. A woven ottoman. A soft textured rug underfoot. Natural materials in a tiny office make the space feel grounded and cozy in a way that metal and plastic never can.
Plants scattered throughout tie the natural theme together. The whole room feels like a breath of fresh air. You want to sit down and stay awhile.
Choose a desk and chair in light natural wood tones like oak or birch. Add a woven or rattan element like a basket, an ottoman, or a small shelf for texture. Layer a soft rug underneath the desk area for warmth and comfort. Use ceramic or terracotta plant pots instead of plastic to carry the natural feel through the details. Linen or cotton cushions on the chair complete the look and make long working hours more comfortable.
A Tech Setup That Stays Sleek

A clean monitor on a slim desk. Stylish lamps on each side. Drawers underneath hiding everything from cables to notebooks. A plant on the corner bringing life to the tech.
The space looks like something from a design magazine but it actually functions perfectly for real daily work. Modern and efficient and easy to sit at for hours.
Mount your monitor on an arm or a slim stand to lift it to eye level and free up desk space below. Use the freed surface for just a keyboard, a mouse, and one small decorative item. Store all other tech accessories inside desk drawers or a compact cabinet nearby. Place matching lamps on either side of the monitor for balanced lighting that looks intentional. One plant in a simple pot on the desk rounds out the setup and keeps the tech from feeling cold.
Mirrors That Make a Tiny Office Feel Huge
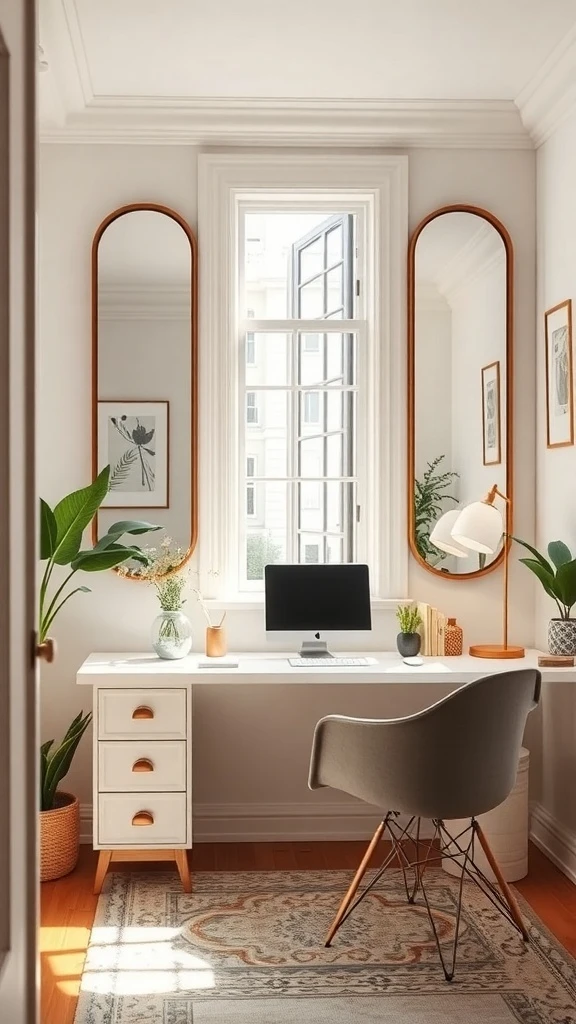
Two tall mirrors flanking a window instantly double the light and depth in a small room. The office feels twice as big the moment you walk in. Light bounces everywhere and the walls seem to disappear.
Round frames add softness and style. The whole space opens up without moving a single piece of furniture. It is the simplest trick with the biggest impact.
Place one or two tall mirrors on either side of your window or on the wall across from your main light source. Choose frames that complement your office decor whether that is natural wood, gold, or simple black. Position them so they reflect the brightest part of the room for maximum effect. Make sure they do not reflect clutter or a messy corner. This one addition transforms a cramped office into a bright open workspace instantly.
A Zen Space for Deep Focus
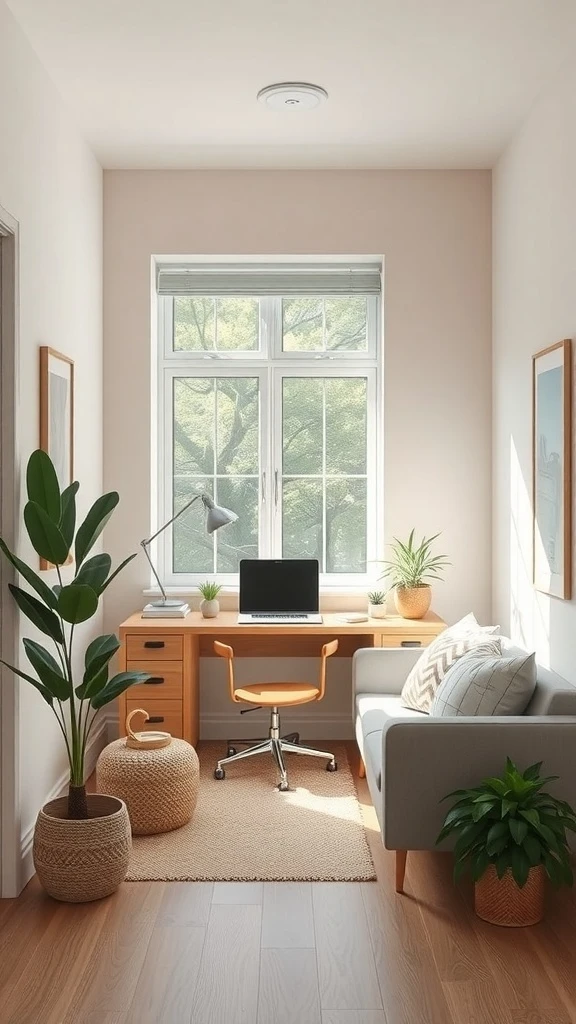
A bright room with a big window. A simple desk with clean lines. An orange chair adding just enough energy. Plants all around creating calm. A cozy rug and a sofa for quick breaks.
This is a workspace designed for deep focused work with built-in moments of rest. It feels balanced and peaceful and exactly right.
Position your desk facing the window or beside it for the best natural light. Keep the desk surface almost empty with just your computer and one personal item. Add plants at three different heights around the room for a layered calming effect. Place a small sofa or a comfortable chair nearby for thinking breaks. Use a soft rug under the desk to define the work zone and add warmth. This zen approach removes distractions and lets your best work happen naturally.
Soft Touches That Block the Noise
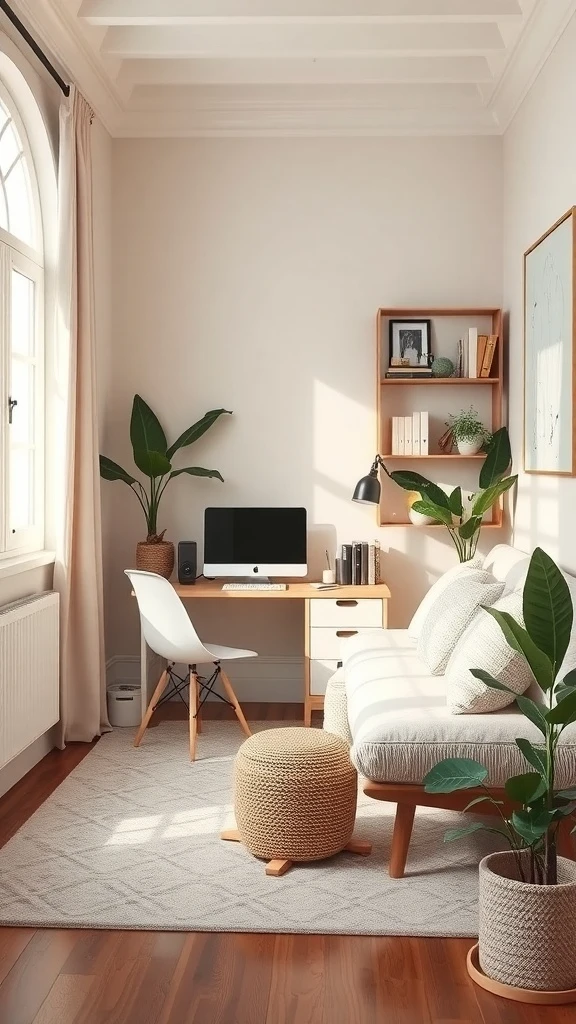
A cozy rug absorbing footstep sounds. Thick curtains muffling outside traffic. A sofa with soft cushions breaking up the echo in the room. Plants in every corner adding another layer of natural sound absorption.
These soft elements do not just make your office look better. They make it quieter and calmer. You focus more easily because the noise around you fades.
Lay a thick rug under your desk and chair area for both comfort and sound absorption. Swap thin curtains for heavier lined ones that dampen outside noise when closed. Add a few cushions to any seating in the room to soften hard surfaces that bounce sound. Place larger leafy plants in corners where sound tends to echo most. If you want to go further add a small decorative acoustic panel behind your monitor that blends into the wall while seriously reducing noise.
An Ergonomic Chair That Changes Everything
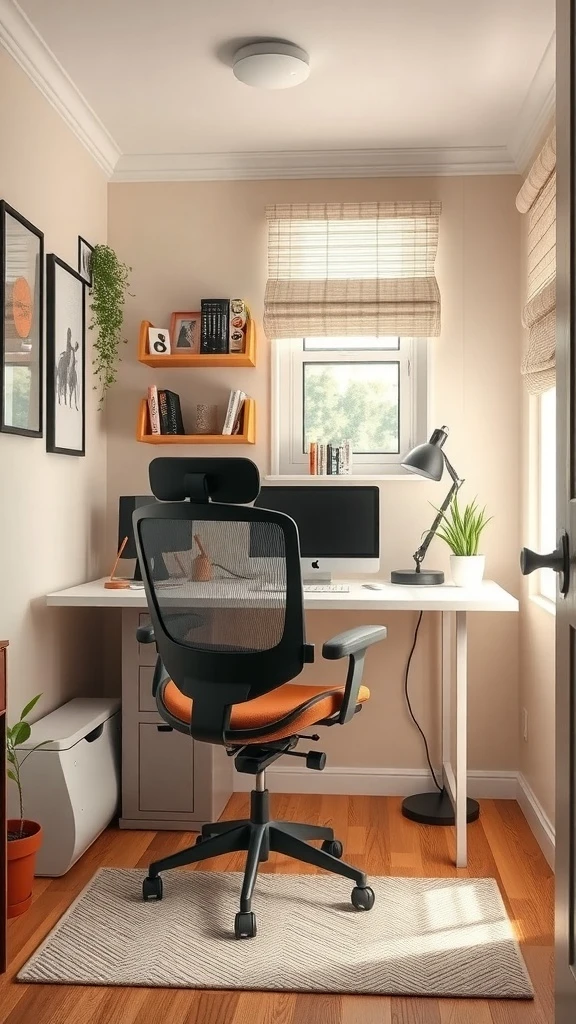
A mesh-back chair with proper lumbar support sitting at a clean minimalist desk. Your back feels good. Your posture stays aligned. Hours go by and you still feel comfortable.
Natural light from the window keeps your energy up. A plant and a few books add personality. The whole setup is built around how your body actually needs to work.
Invest in an ergonomic chair with adjustable height, lumbar support, and breathable mesh. Set the seat height so your feet rest flat on the floor and your elbows bend at ninety degrees. Position the desk near a window so natural light reaches your face without causing screen glare. Keep the desktop minimal with just your essentials and one personal item. A small plant and a stack of books on a nearby shelf add life without disrupting the clean productive feel.
A Closet Turned Into a Full Office
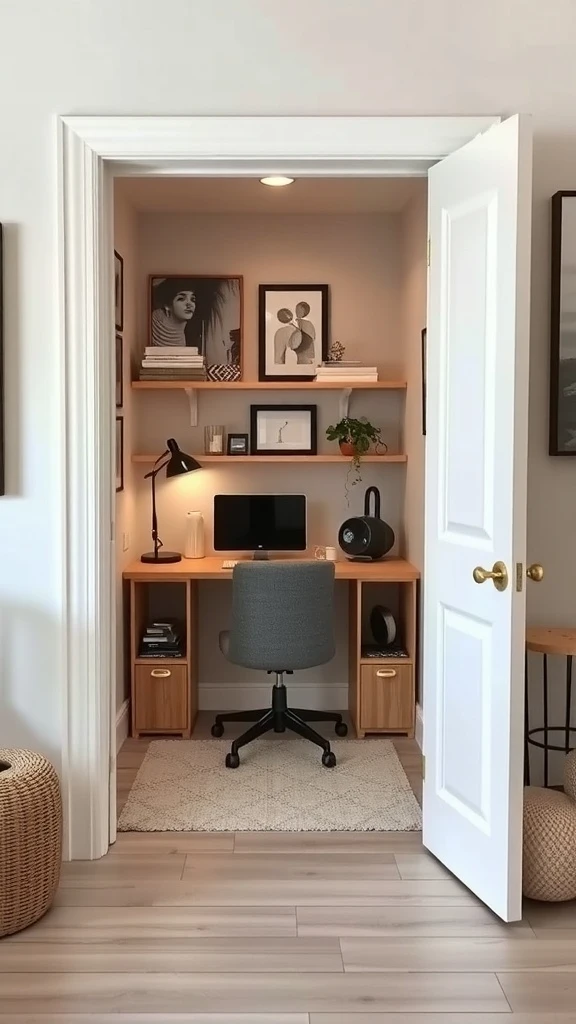
A closet with the doors removed and a desk slid inside. Shelves above holding books and framed art. A compact chair that fits perfectly in the opening. A small plant adding freshness. Soft lighting making the whole nook glow.
The closet becomes a complete workspace you can close off at the end of the day if you add doors back. It is the ultimate hidden office.
Remove or fold back the closet doors and measure the inside for a desk that fits the width snugly. Install floating shelves above for books and decorative pieces. Add a compact ergonomic chair that slides under the desk when not in use. Mount a small wall light or use a slim desk lamp since closets usually lack overhead lighting. Paint the inside walls a light bright color to make the space feel open. This closet office gives you a dedicated workspace that takes zero room from the rest of your home.
Personal Touches That Make It Yours
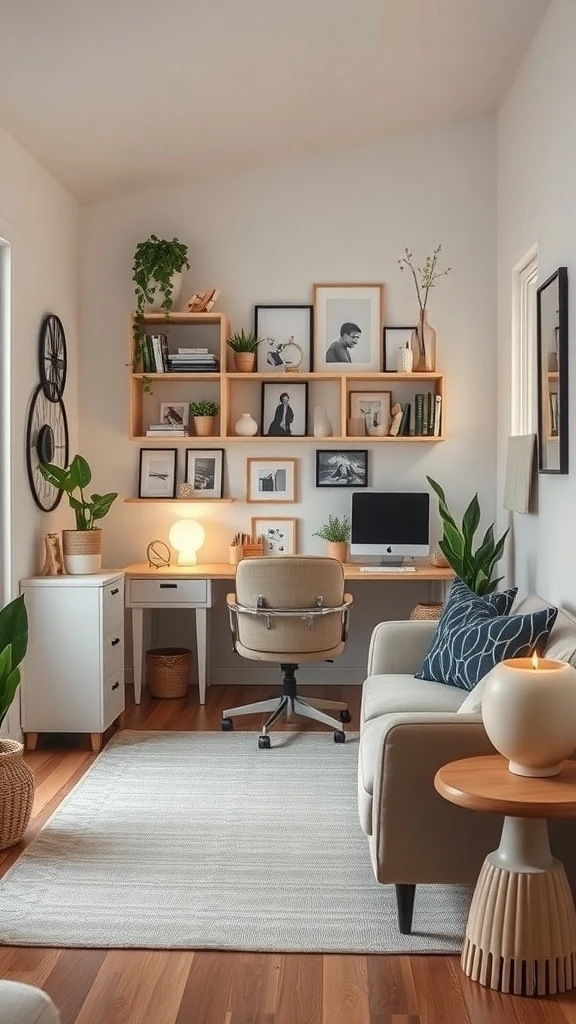
Your favorite plants on the shelf. A photo that makes you smile on the wall. Cushions on the sofa in colors you chose. A warm lamp casting a glow that feels like home.
These are the things that make a tiny office feel like yours. Not just a place to work but a space you actually enjoy being in every single day.
Choose three or four items that genuinely mean something to you and give them visible spots in the room. A framed photo on the shelf. A candle you love the smell of. A plant you enjoy tending. Add a couple of cushions to your chair or a nearby sofa in your favorite colors. Keep the total number of personal items low so each one gets noticed. The goal is a space that reflects you without feeling cluttered or distracting from actual work.
Wall Art That Inspires You Daily
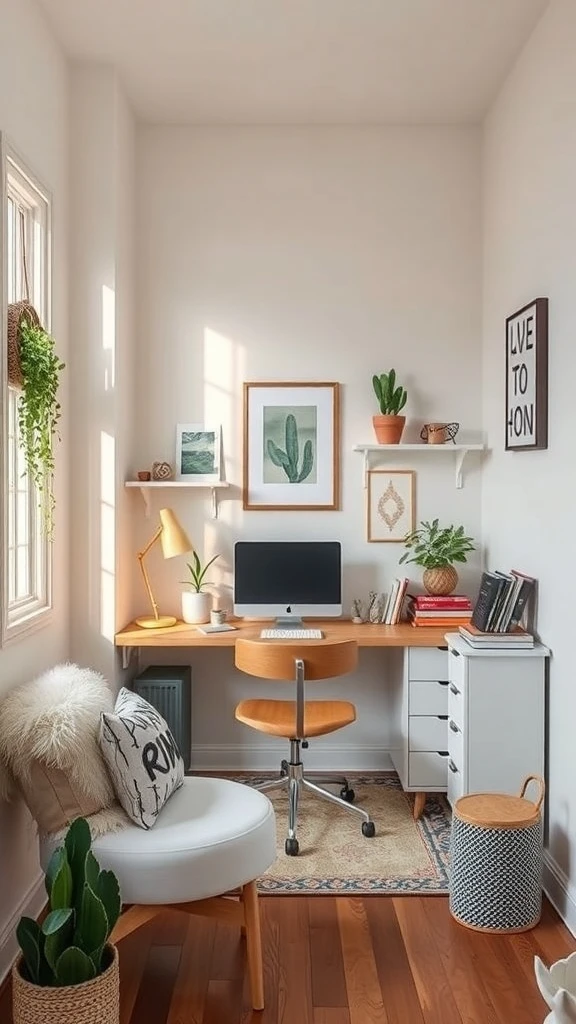
A bold cactus print on the wall. A motivational quote beside it. A small shelf with trailing plants connecting the art to the rest of the room. Every time you glance up from your screen you see something that sparks a thought or makes you smile.
Wall art in a tiny office is not just decoration. It is fuel for your creativity and a reminder of why you show up every day.
Pick two or three pieces that mix styles like a colorful print, a simple quote, and a nature-inspired illustration. Hang them above or beside your desk at eye level so they are easy to see during the workday. Use matching or coordinating frames for a pulled-together look. Add a small shelf nearby with a trailing plant to bring the wall display to life. Choose pieces that genuinely motivate you because you will be looking at them every single day.
Smart Storage That Hides the Mess
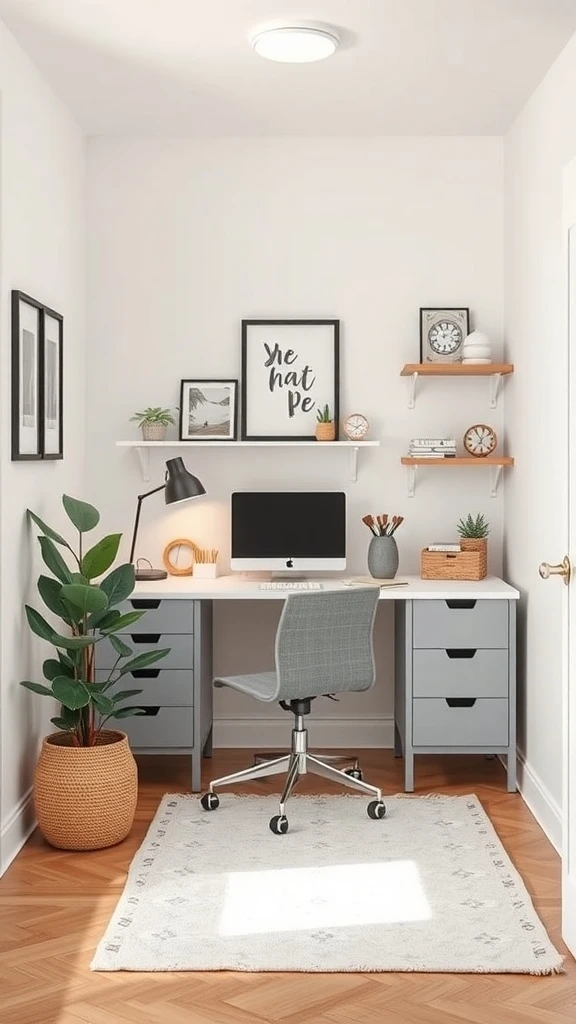
A desk with drawers that swallow up all the clutter. Floating shelves above holding just the pretty stuff. A plant adding life to the organized calm. Nothing is piling up on the surface because everything has a hidden spot.
The office looks effortlessly clean. Your mind feels the same way. Good storage is the backbone of every tiny office that actually works.
Choose a desk with at least two drawers for pens, notebooks, chargers, and all the small items that create visual clutter. Add floating shelves above for items you want on display like a plant, a framed photo, or a decorative box. Use one small basket or bin on the shelf for odds and ends you want accessible but hidden. Keep your desktop to your computer, a lamp, and one personal item maximum. This discipline keeps the space looking magazine-worthy every day without constant tidying.
A Minimalist Desk That Feels Spacious
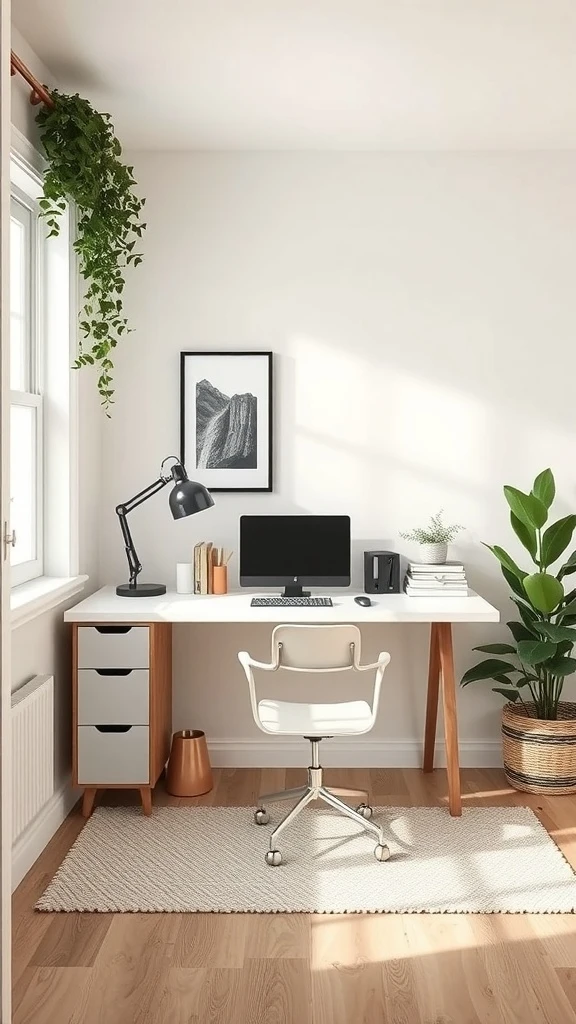
A white desk with slim wooden legs. One comfortable chair. A single lamp. A plant in a simple pot. That is the entire setup and it feels completely enough.
The room breathes because nothing is crowding the surface. The desk feels twice as big because there is almost nothing on it. Minimalism in a tiny office is not about having less. It is about having room to think.
Pick a desk with a light or white surface and simple legs for maximum visual lightness. Keep only your laptop, one lamp, and one small plant on top. Store everything else inside drawers or in a nearby cabinet. Choose a chair that matches the desk tone so nothing feels visually heavy. Leave the wall above the desk mostly empty or hang one single piece of art. This stripped-back approach gives your tiny office the most spacious feel possible.
A Flexible Layout You Can Change Anytime
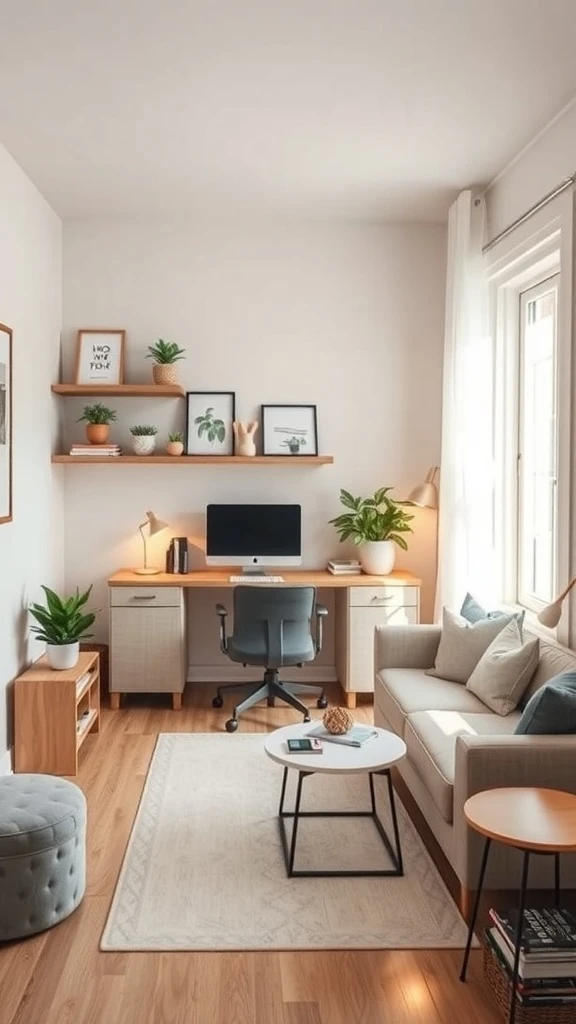
A desk that can move to a different wall. A sofa that shifts for video calls. Shelves that hold different things depending on the week. A tiny office that adapts to how you work instead of locking you into one setup forever.
Plants and personal items keep it feeling warm no matter how you rearrange. Flexibility is the secret to a small office that never feels boring.
Choose lightweight furniture you can reposition without help. Use a desk on wheels or a simple table that slides easily across the floor. Keep shelves styled with a mix of practical and decorative items you can swap out whenever you want a fresh look. Rearrange the layout every few months to keep the space feeling new and to discover which setup works best for your current routine. A flexible office keeps you energized and prevents that stuck-in-a-rut feeling.
The Right Floor That Ties It All Together
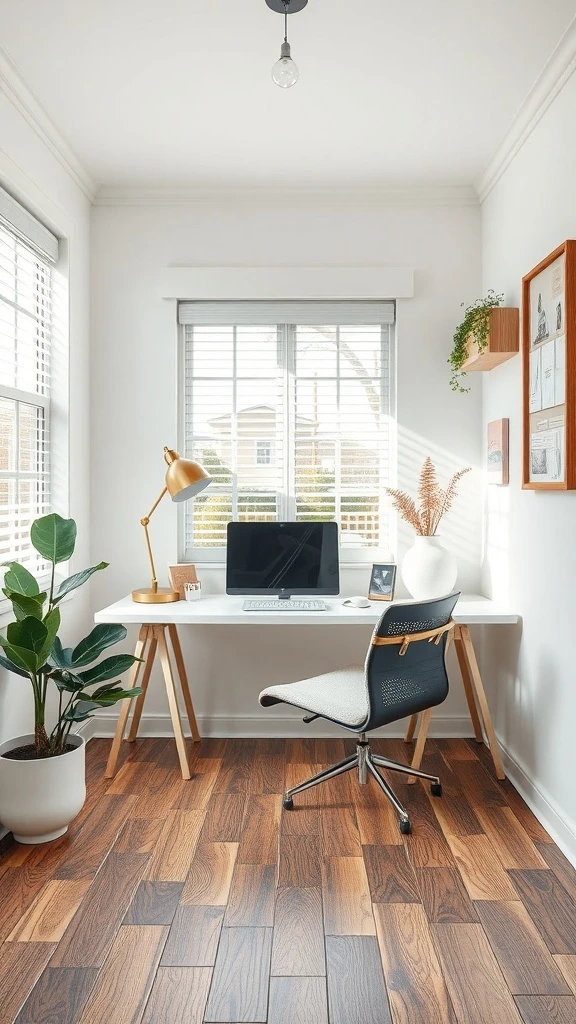
Warm wood flooring under a tiny office makes the whole room feel grounded and inviting. The rich tones connect the desk, the chair, and the walls into one unified look. Natural light from the window catches the grain and the floor almost glows.
A small rug under the desk adds softness. It defines the workspace and gives your feet something warm to land on. The floor is the foundation that makes everything above it look better.
Choose warm-toned wood, laminate, or vinyl plank flooring that matches or complements your furniture. If you already have flooring you love just add a rug to define your desk zone and add comfort. Pick a low-pile or flat-weave rug that your chair rolls on smoothly. Make sure the rug color ties into the wall or desk tone for a cohesive feel. A well-chosen floor or rug is the finishing touch that makes a tiny office feel complete and professionally designed.